- Automating Workflows with n8n and Local LLMs
- Generating Images with ComfyUI and Z Image Turbo
- Local LLM Coding with VSCode and Qwen3-Coder
- Running and Serving LLMs with LM Studio
- Running LLMs on PyTorch with AMD ROCm™ Software
- Build a GitHub-to-Slack Development Digest with Agent Canvas
- Building Custom GPU Kernels with PyTorch and AMD ROCm™
- Building Your First Agent with GAIA
- Chatting with LLMs in Open WebUI
- Clustering Four Ryzen™ AI Halos with RCCL
- Clustering Four Ryzen™ AI Halos with RPC
- Clustering Two Ryzen™ AI Halos with RCCL
- Clustering Two Ryzen™ AI Halos with RPC
- Fine-Tuning LLMs with LLaMA Factory
- Fine-Tuning LLMs with PyTorch and AMD ROCm™ Software
- Fine-Tuning LLMs with Unsloth
- Getting Started with Lemonade
- Getting Started with Ollama
- Getting Started with OpenHands and a Local LLM
- Getting Started with vLLM
- Local Computer Vision with AMD Ryzen™ AI NPU
- Real-Time Speech-to-Speech Translation
- Remote Development with AMD Sync
- Running DeepSeek V4 Flash with ds4
- Running Hermes Agent Locally with Lemonade Server
- Running OpenClaw Locally with Lemonade Server
| Lemonade | 11.8 |
| Node.js | Latest |
| Agent Canvas | 1.10.0 |
| Lemonade | 11.7 |
| Agent Canvas | 1.10.0 |
| Lemonade | Latest |
| Node.js | Latest |
| Agent Canvas | Latest |
| Lemonade | Latest |
| Agent Canvas | Latest |
| Lemonade | Latest |
| Node.js | Latest |
| Agent Canvas | Latest |
| Lemonade | Latest |
| Agent Canvas | Latest |
| Lemonade | Latest |
| Node.js | Latest |
| Agent Canvas | Latest |
| Lemonade | Latest |
| Agent Canvas | Latest |
| Lemonade | Latest |
| Node.js | Latest |
| Agent Canvas | Latest |
| Lemonade | Latest |
| Agent Canvas | Latest |
| Lemonade | Latest |
| Node.js | Latest |
| Agent Canvas | Latest |
| Lemonade | Latest |
| Agent Canvas | Latest |
| Lemonade | Latest |
| Node.js | Latest |
| Agent Canvas | Latest |
| Lemonade | Latest |
| Agent Canvas | Latest |
- Overview
- What You’ll Learn
- Core Concepts
- Setting the Memory Configuration
- Check for Software Updates
- Prerequisites
- 1. Start Lemonade Server
- 2. Verify the Local Model
- 3. Install and Launch Agent Canvas
- 4. Configure the Local LLM
- 5. Open a Workspace
- 6. Run Your First Coding Task
- 7. Review and Steer the Agent
- Troubleshooting
- Next Steps
- Resources
Getting Started with OpenHands and a Local LLM
Install Agent Canvas, connect a local Lemonade model, and run your first OpenHands coding agent on your AMD Ryzen™ AI.
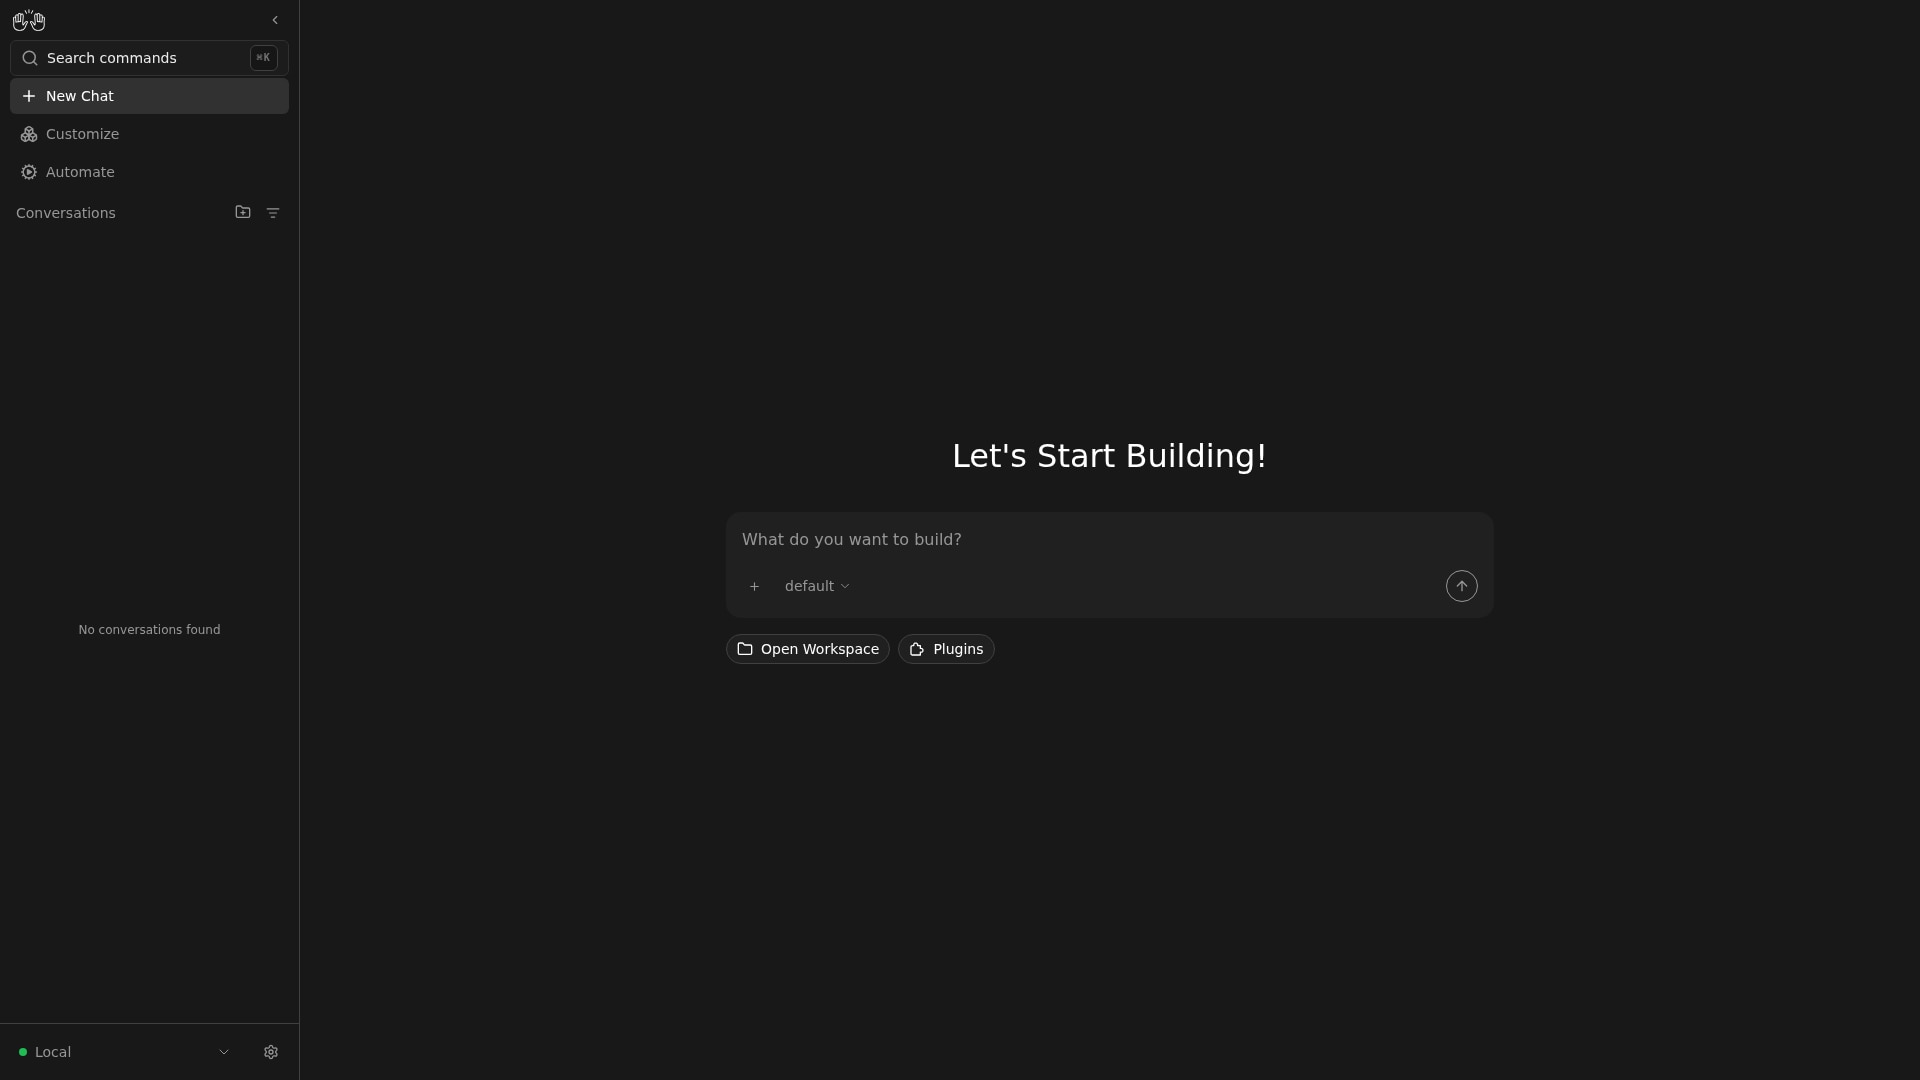
Overview
OpenHands is an AI software agent that can write code, run commands, browse the web, and edit files in a real workspace. Instead of copying suggestions out of a chat window, you point the agent at a project folder and let it do the work: implement a feature, fix a bug, write tests, or explain a codebase.
Agent Canvas is the recommended
browser UI for running OpenHands. A single agent-canvas command starts the
agent server, the automation backend, and the web frontend together, so you can
drive a conversation with the agent from your browser.
To keep everything on your AMD system, the agent talks to a local model served by Lemonade Server. Lemonade exposes that model through an OpenAI-compatible API, so Agent Canvas can configure it like any other OpenAI-style endpoint while the model, your code, and the conversation context all stay on your machine.
In this playbook, you will start a local model, launch Agent Canvas, point it at that model, and run your first coding task against a real project folder.
What You’ll Learn
- How to start Lemonade Server and confirm a local model answers chat requests
- How to install and launch Agent Canvas from the npm package
- How to configure Agent Canvas to use a local Lemonade model as the LLM
- How to start an OpenHands conversation and watch the agent edit files and run commands in a workspace
- How to review what the agent changed and steer it with follow-up messages
Core Concepts
| Concept | What it is | Where it fits in this playbook |
|---|---|---|
| Lemonade Server | A local LLM serving platform built for AMD hardware that exposes an OpenAI-compatible API. Your data never leaves your machine. | Runs the model that powers the agent. |
| OpenHands | An AI software agent that reads and edits files, runs shell commands, and browses the web inside a workspace. | The agent you drive from the chat. |
| Agent Canvas | The browser UI and backend that runs OpenHands conversations and shows tool calls and file changes. | Launches the stack and hosts your conversation. |
| Workspace | The project folder the agent is allowed to read and modify. | The target of the agent’s edits and commands. |
Setting the Memory Configuration
For the Ryzen AI Halo, the dedicated GPU memory defaults to 64GB, which is sufficient for most workloads. For larger models or longer contexts, increasing this may help. To adjust, open AMD Software: Adrenalin Edition™ and navigate to Performance → Tuning → AMD Variable Graphics Memory. Reboot for the changes to take effect.
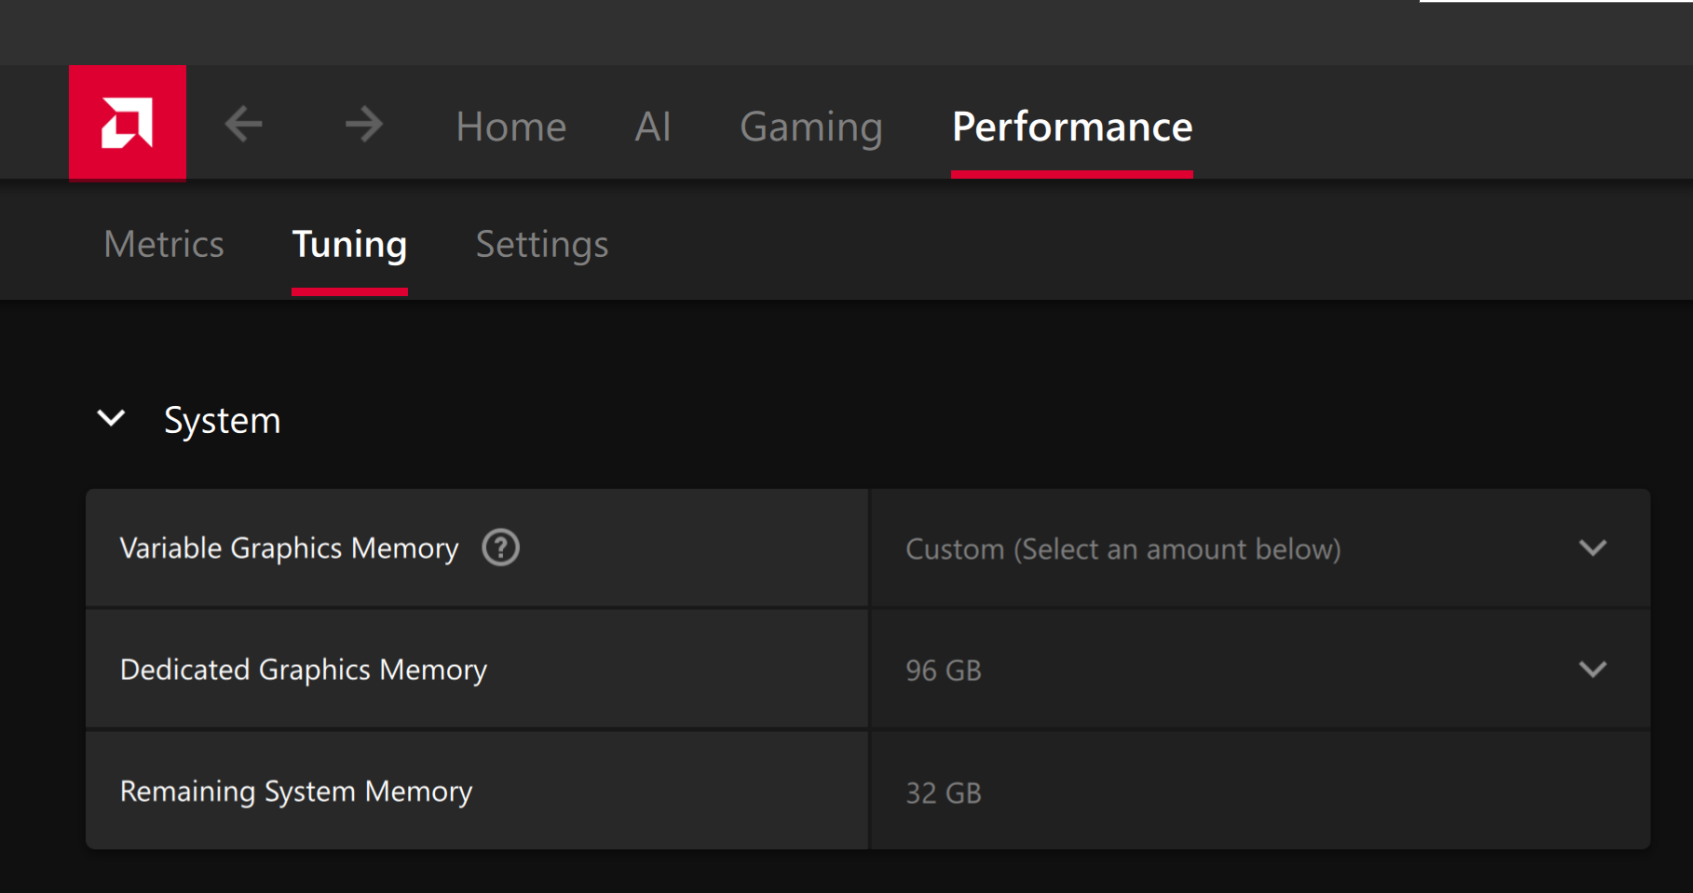
To change the dedicated GPU memory value, open AMD Software: Adrenalin Edition™ and navigate to Performance → Tuning → AMD Variable Graphics Memory. Reboot for the changes to take effect.
On Linux, to run larger models, increase the shared memory pool available to the GPU. This might involve setting the BIOS dedicated GPU memory to the minimum, so that the shared memory pool can be maximized.
For the AMD Ryzen™ AI Halo, to modify the default setting, open the AMD Ryzen™ AI Developer Center and go to the Settings tab. Under Graphics Performance Settings, increase the Shared Video Memory slider, then click Apply Changes and reboot for the changes to take effect.
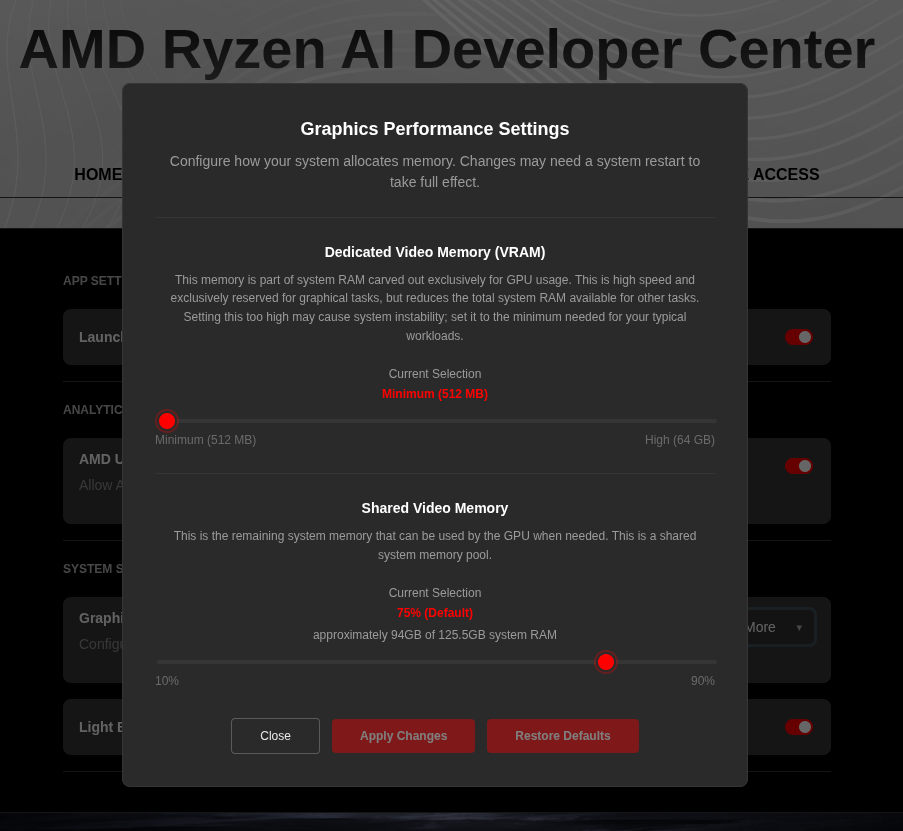
Increase the shared memory pool by changing the kernel’s Translation Table Manager (TTM) page setting. AMD recommends setting the minimum dedicated VRAM in the BIOS (0.5 GB) so the maximum amount is available as shared memory.
- Install the
pipxutility and add the path for pipx-installed wheels to the system search path:
sudo apt install pipxpipx ensurepath- Install the
amd-debug-toolswheel from PyPI:
pipx install amd-debug-tools- Query the current shared memory settings:
amd-ttm- Increase the shared memory allocation (units in GB):
amd-ttm --set <NUM>- Reboot for the changes to take effect.
Check for Software Updates
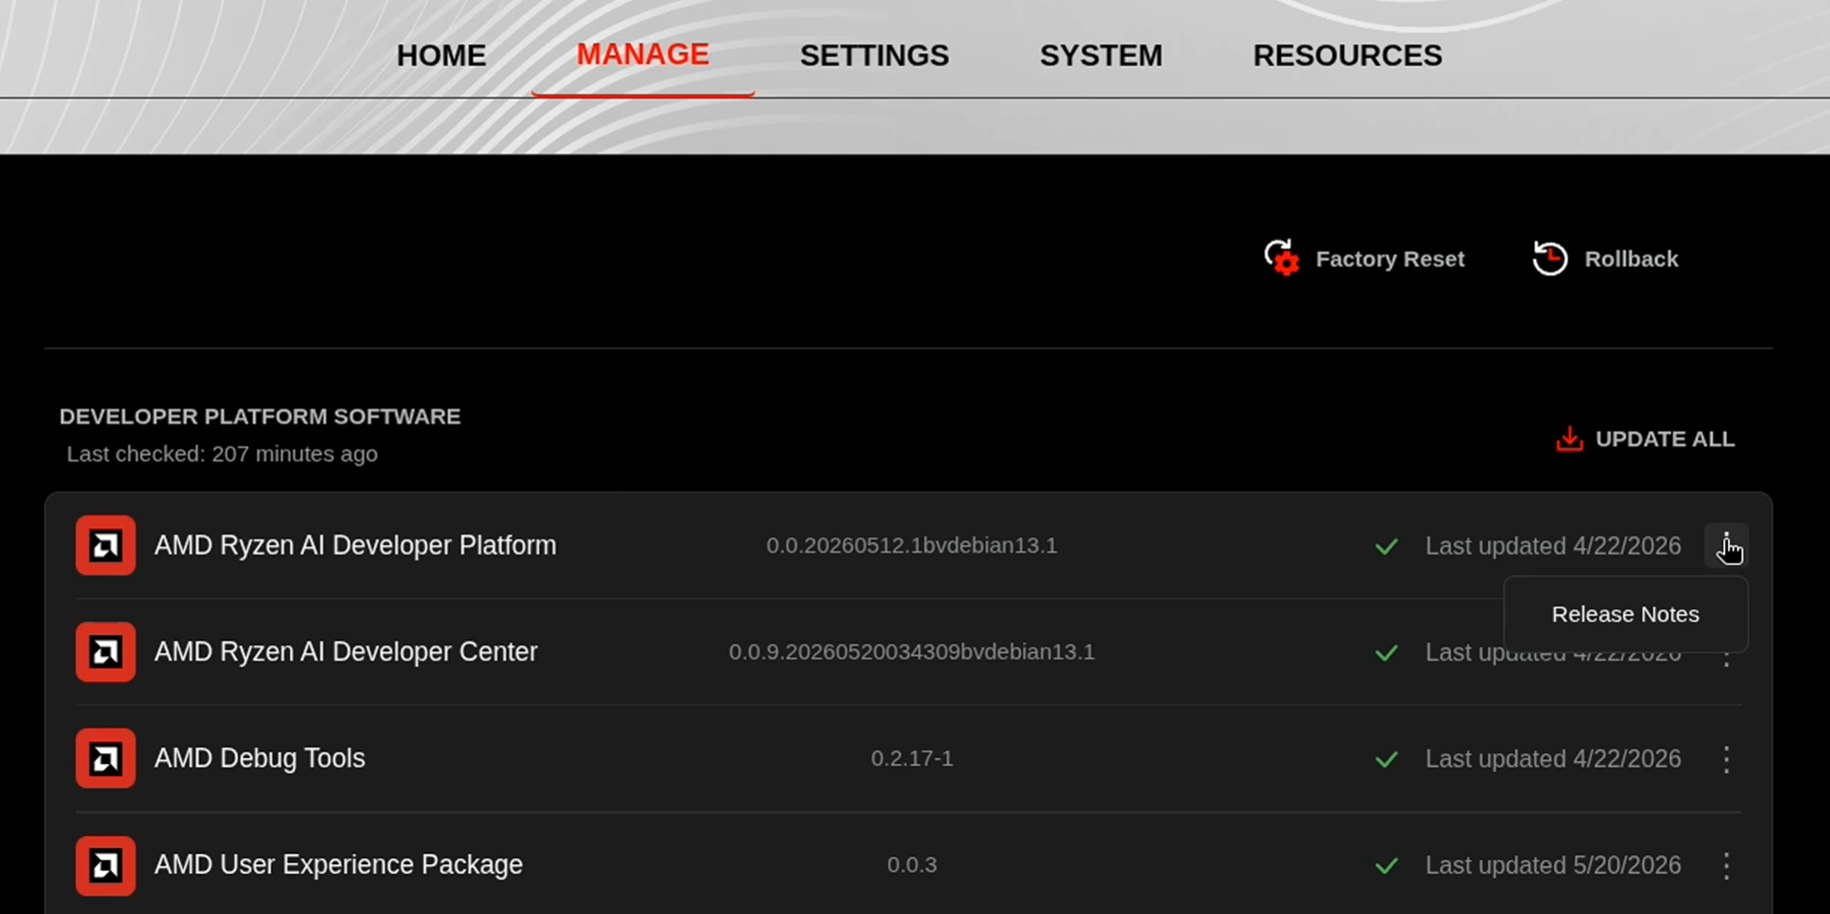
Before starting, ensure your Ryzen AI Halo has the latest software installed. Open the AMD Ryzen™ AI Developer Center and check for available updates, both to the app itself and additional software.
Go to the Updates tab. If updates are available, install them and reboot before continuing.
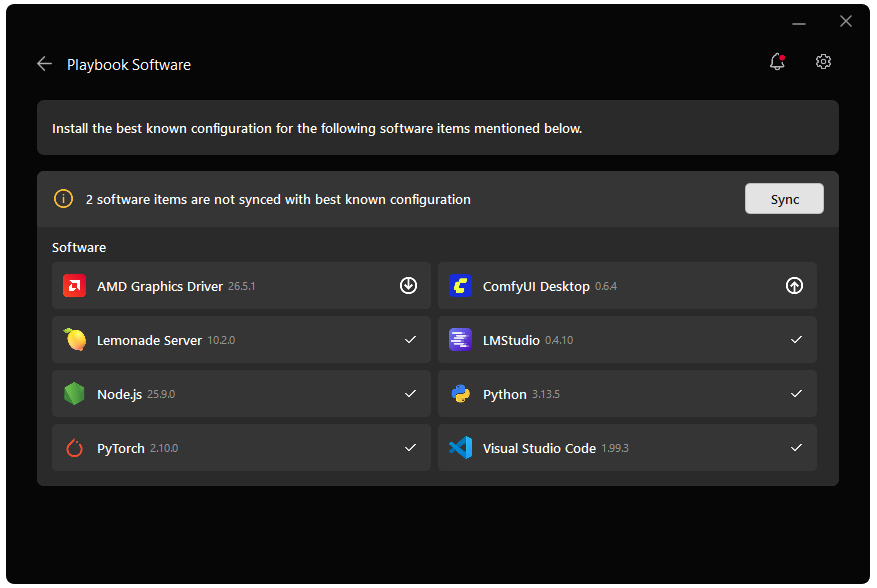
Go to the Manage tab. If updates are available, install them and reboot before continuing.
Prerequisites
Lemonade
Installing Lemonade
Download the latest installer from lemonade-server.ai and run the .msi file.
After installation:
- The
lemonadeCLI is added to your system PATH automatically - Lemonade server is expected to run in the background automatically
You can also install silently from the command line:
msiexec /i lemonade-server-minimal.msi /qnUbuntu:
sudo add-apt-repository ppa:lemonade-team/stablesudo apt install lemonade-serverArch Linux (AUR):
yay -S lemonade-serverFor other distributions or to install from source, see the full installation options.
Verifying Lemonade Installation
Open a terminal and run:
lemonade --versionYou should see output like:
lemonade version x.y.zIf you see a version number, Lemonade is installed correctly and ready to go.
For quick reference, here are common Lemonade CLI commands:
| Command | What it does |
|---|---|
lemonade --help | Shows all available commands and flags. |
lemonade --version | Prints the installed Lemonade version. |
lemonade status | Confirms whether the Lemonade server is running and reachable. The default OpenAI-compatible API base URL is http://localhost:13305/api/v1. |
lemonade list | Lists models available to your Lemonade setup. |
lemonade pull <MODEL_NAME> | Downloads a model without launching it. |
lemonade run <MODEL_NAME> | Downloads the model if needed, then starts it for inference/chat. |
lemonade run <MODEL_NAME> --llamacpp rocm | Starts a llama.cpp model with the ROCm backend. |
lemonade run <MODEL_NAME> --llamacpp vulkan | Starts a llama.cpp model with the Vulkan backend. |
lemonade config | Displays the current Lemonade configuration values. |
lemonade config set llamacpp.backend=rocm | Sets the default llama.cpp backend to ROCm. |
For the latest Lemonade server options or troubleshooting, please refer to the official Lemonade documentation.
Node.js
- Download the Windows 64-bit Installer from nodejs.org
- Run the installer and follow the prompts
- Verify installation:
node --versionnpm --versioncurl -o- https://raw.githubusercontent.com/Homebrew/install/HEAD/install.sh | bash
# Download and install Node.js:brew install node@22
# Verify the Node.js version:node -v # Should print "v22.22.1".
# Verify npm version:npm -v # Should print "10.9.4".Lemonade
Installing Lemonade
Download the latest installer from lemonade-server.ai and run the .msi file.
After installation:
- The
lemonadeCLI is added to your system PATH automatically - Lemonade server is expected to run in the background automatically
You can also install silently from the command line:
msiexec /i lemonade-server-minimal.msi /qnUbuntu:
sudo add-apt-repository ppa:lemonade-team/stablesudo apt install lemonade-serverArch Linux (AUR):
yay -S lemonade-serverFor other distributions or to install from source, see the full installation options.
Verifying Lemonade Installation
Open a terminal and run:
lemonade --versionYou should see output like:
lemonade version x.y.zIf you see a version number, Lemonade is installed correctly and ready to go.
For quick reference, here are common Lemonade CLI commands:
| Command | What it does |
|---|---|
lemonade --help | Shows all available commands and flags. |
lemonade --version | Prints the installed Lemonade version. |
lemonade status | Confirms whether the Lemonade server is running and reachable. The default OpenAI-compatible API base URL is http://localhost:13305/api/v1. |
lemonade list | Lists models available to your Lemonade setup. |
lemonade pull <MODEL_NAME> | Downloads a model without launching it. |
lemonade run <MODEL_NAME> | Downloads the model if needed, then starts it for inference/chat. |
lemonade run <MODEL_NAME> --llamacpp rocm | Starts a llama.cpp model with the ROCm backend. |
lemonade run <MODEL_NAME> --llamacpp vulkan | Starts a llama.cpp model with the Vulkan backend. |
lemonade config | Displays the current Lemonade configuration values. |
lemonade config set llamacpp.backend=rocm | Sets the default llama.cpp backend to ROCm. |
For the latest Lemonade server options or troubleshooting, please refer to the official Lemonade documentation.
You need:
- Lemonade Server installed and able to serve the model below.
- Node.js 22.12 or later and
npm(used by theagent-canvasCLI). uv, the Python package manager that Agent Canvas uses to manage the agent server environment. If your system does not already have it, install it from the uv installation guide before launching Agent Canvas.
- Docker Desktop for Windows,
installed and running. On Windows, the Agent Canvas stack runs from the
published Docker image, which bundles Node.js,
uv, and the@openhands/agent-canvaspackage, so you do not install those on the host.
- A project folder to work in. This can be any local git repository or code directory you want the agent to work on.
1. Start Lemonade Server
Start the model from the Lemonade CLI:
lemonade config set llamacpp.backend=vulkanlemonade config set ctx_size=65536lemonade run "Qwen3.6-35B-A3B-GGUF"Choose a model that fits your hardware.
Qwen3.6-35B-A3B-GGUF(~20 GB) is a strong coding model but needs a large memory pool. If your device has limited memory or GPU VRAM, pick a smaller GGUF model from the Lemonade model library instead and use that model ID throughout this playbook.
Lemonade exposes an OpenAI-compatible API at:
http://127.0.0.1:13305/api/v12. Verify the Local Model
Confirm Lemonade can serve the selected model:
curl -s "http://127.0.0.1:13305/api/v1/models" | python3 -m json.toolThen send a small chat request:
curl -sS "http://127.0.0.1:13305/api/v1/chat/completions" \ -H "Content-Type: application/json" \ -d '{ "model": "Qwen3.6-35B-A3B-GGUF", "messages": [ {"role": "user", "content": "Reply with exactly: OK"} ], "temperature": 0, "max_tokens": 64 }' | python3 -m json.toolIf this returns a choices array, Lemonade is ready for Agent Canvas.
3. Install and Launch Agent Canvas
Install the published Agent Canvas package globally:
npm install -g @openhands/agent-canvasThen start the full stack from a terminal:
agent-canvasBy default, Agent Canvas starts on http://localhost:8000. Open that URL in
your browser. The port is not special — if 8000 is already in use, pass any
free port with --port (or -p) when you launch Agent Canvas:
agent-canvas --port 3000Then open http://localhost:3000 instead. The default local backend should show
as healthy on the home screen.
The agent-canvas command starts the agent server, the automation backend, and
the web frontend together. You only need this one command to run OpenHands
locally.
On Windows, run the published Agent Canvas container image with Docker Desktop.
The image bundles the Agent Server, automation backend, and web frontend, so you
do not install Node.js, uv, or the CLI on the host.
First, create the config and workspace folders the container mounts:
$env:PROJECTS_PATH = Join-Path $HOME "projects"New-Item -ItemType Directory -Force -Path $env:PROJECTS_PATH, (Join-Path $env:USERPROFILE ".openhands") | Out-NullPull the published image (it is public, so no login is required):
docker pull ghcr.io/openhands/agent-canvas:1.14.0Then start the stack:
docker run -it --rm ` -p 8000:8000 ` -v "$($env:USERPROFILE)\.openhands:/home/openhands/.openhands" ` -v "$($env:PROJECTS_PATH):/projects" ` ghcr.io/openhands/agent-canvas:1.14.0Open http://localhost:8000/canvas in your browser. If port 8000 is already in
use, map a different host port, for example -p 8080:8000, and open
http://localhost:8080/canvas instead.
The .openhands mount persists your LLM profile and settings across container
restarts. The rest of this playbook configures everything through the Agent
Canvas UI in your browser.
4. Configure the Local LLM
On first launch, Agent Canvas opens an onboarding flow. In that flow:
- Keep OpenHands selected as the agent and click Next.
- On Set up your LLM, select Advanced.
- Keep Authentication set to API key.
- Set Custom Model to
openai/Qwen3.6-35B-A3B-GGUF. - Set Base URL to
http://127.0.0.1:13305/api/v1.On Windows the stack runs in a container, which cannot reach the host at
127.0.0.1. Usehttp://host.docker.internal:13305/api/v1instead so the containerized agent can reach Lemonade running on the Windows host. - For API Key, enter any non-empty placeholder such as
lemonade-local. Lemonade does not require a real key, but the OpenHands client needs a value to send. - Click Next.
The completed Advanced settings should look like this. The API key field is masked by the UI.
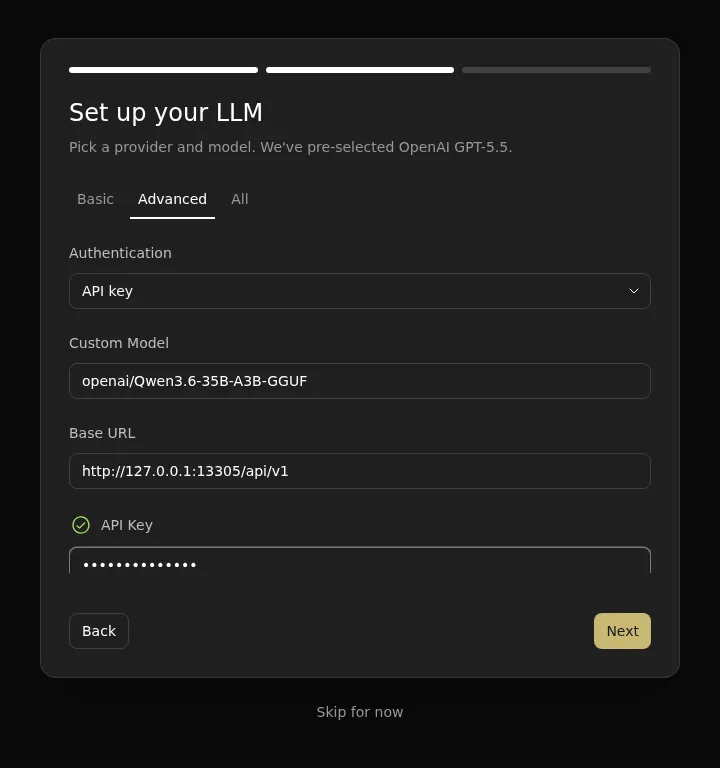
Agent Canvas saves these values as an LLM profile. If your version asks you to
name that profile, use a no-space name such as lemonade-local. If you change
models later, open Settings > LLM and update the same Advanced fields. You
can switch saved profiles from the chat input with the /model command.
5. Open a Workspace
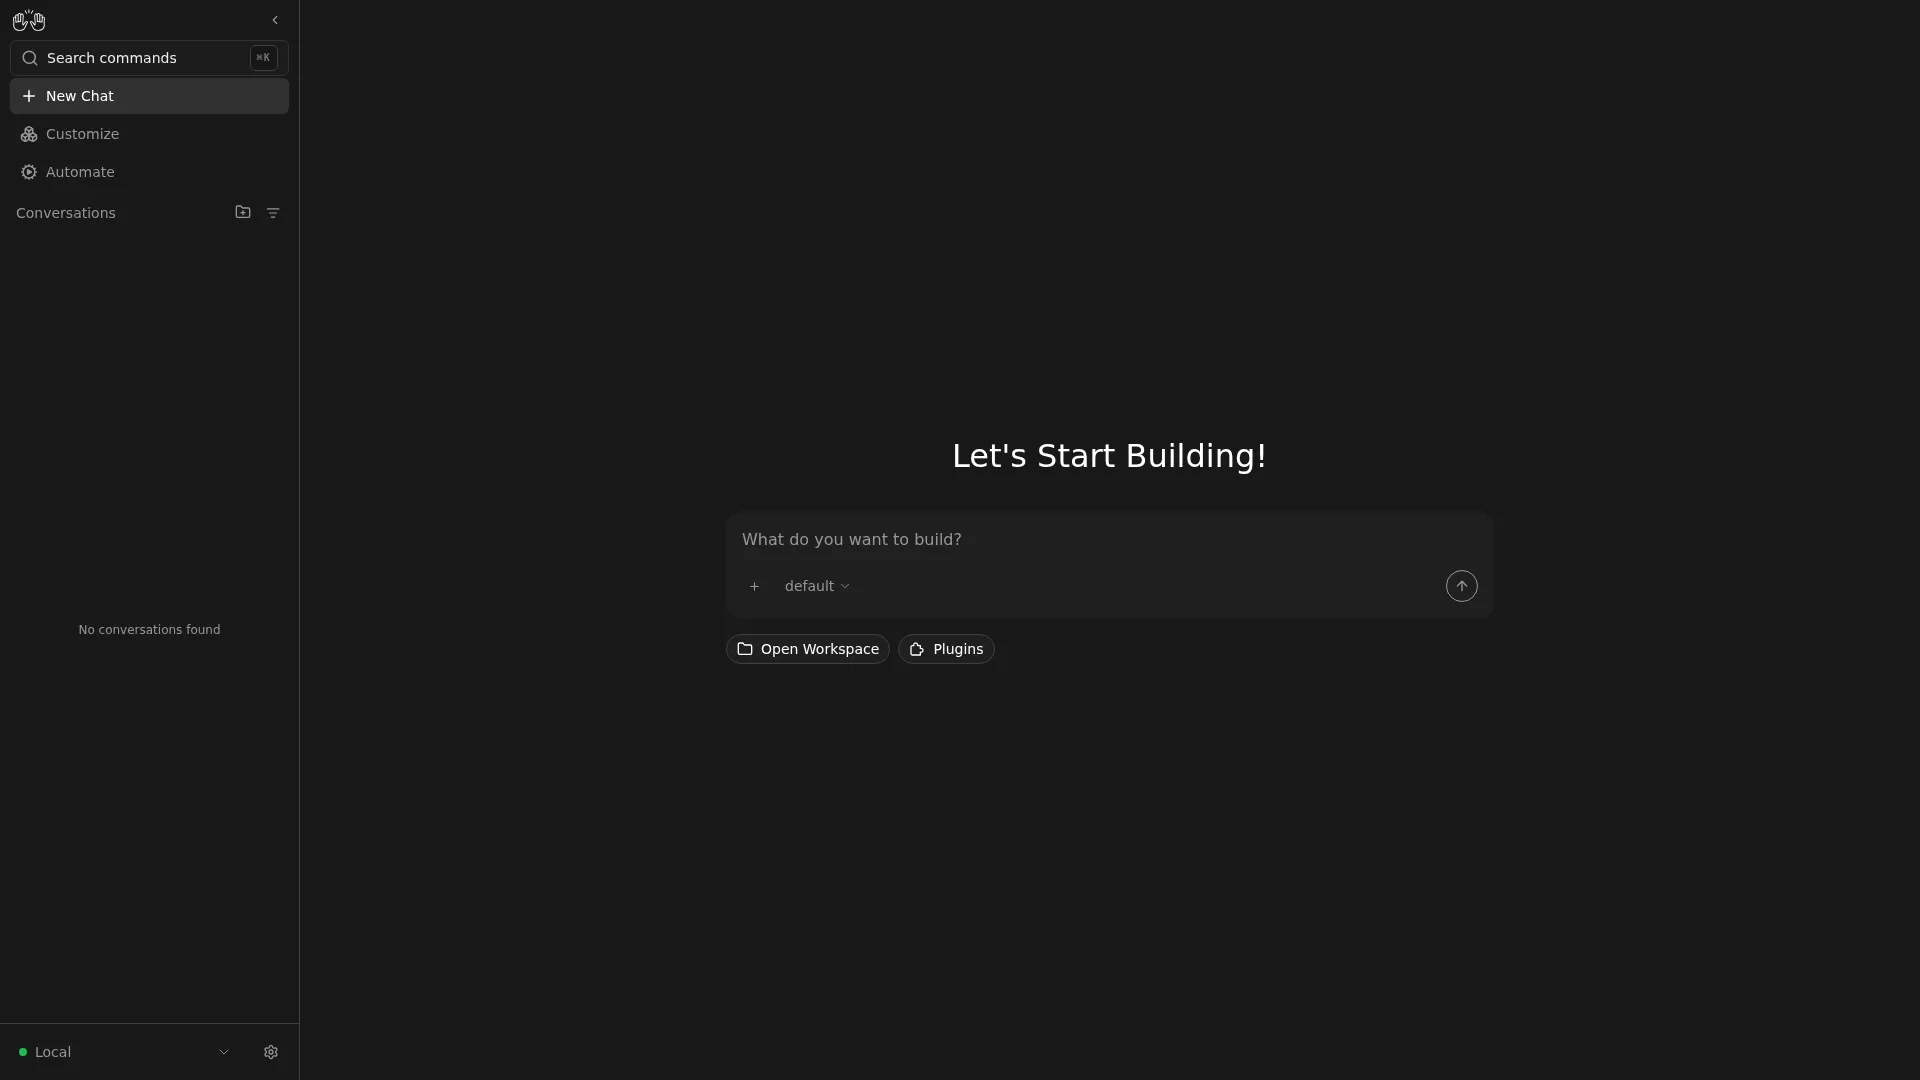
The agent can only read and modify files inside a workspace you choose. Before starting a task, point Agent Canvas at your project folder:
- From the home screen, choose Open Workspace.
- Select the folder that contains your project (for example, a git repository you want the agent to work on).
- Start a new conversation in that workspace.
Everything the agent does—reading files, running commands, editing code—is scoped to that workspace.
6. Run Your First Coding Task
With the workspace open and the local LLM selected, type a concrete task into the chat. A good first task is small and verifiable, for example:
Create a new file called hello.py that defines a function greet(name) thatreturns "Hello, {name}!", and add a small test that prints greet("World")when run as a script.Watch the conversation timeline. OpenHands will:
- Read the workspace to understand the layout.
- Create
hello.pywith the requested function and test block. - Optionally run
python3 hello.pyto verify the output. - Report what it did and any command output in the chat.
You should see the new file appear in the workspace, and the agent’s final message should describe the change it made. This is the payoff moment: the agent wrote and ran real code in your project folder.
7. Review and Steer the Agent
After the agent finishes a step, review its work before accepting the next one:
- File changes: use the workspace file browser or the agent’s diff view to see exactly what was added, changed, or deleted.
- Command output: expand any command the agent ran to see stdout, stderr, and the exit code.
- Follow-ups: if the result is not what you wanted, reply in the same conversation with a correction. The agent keeps the prior context and iterates on the same files.
For example, if the test did not print the expected greeting, reply:
The script did not print anything. Run python3 hello.py and fix it so thegreet("World") test prints to stdout.The agent will re-read the file, run the command, diagnose the issue, and edit the file again—all in the same conversation.
Troubleshooting
agent-canvasis not on PATH: reinstall withnpm install -g @openhands/agent-canvasand confirm the npm global binary directory is on your PATH beforeagent-canvascan be launched from a new terminal.npm install -gfails with a permissions error: configure a user-owned global npm directory, then reopen the terminal and install Agent Canvas again.
mkdir -p ~/.npm-globalnpm config set prefix ~/.npm-globalecho 'export PATH="$HOME/.npm-global/bin:$PATH"' >> ~/.profile. ~/.profilenpm install -g @openhands/agent-canvasuvis missing: install it from the uv installation guide. Agent Canvas usesuvto manage the agent server Python environment.
docker pullordocker runfails to connect: make sure Docker Desktop is running (its whale icon is in the system tray) and that the engine has finished starting.docker versionshould print both a Client and a Server section.- The container starts but the backend never becomes healthy: the first
launch initializes the Agent Server inside the container; give it a minute or
two, then check
docker logs <container>for errors. - The container cannot reach Lemonade: the container reaches the host via
host.docker.internal. Confirm Lemonade is serving on the Windows host withlemonade status, and usehttp://host.docker.internal:13305/api/v1as the Base URL when configuring the LLM.
- The UI loads but the backend shows unhealthy: wait a minute or two for the agent server to finish starting, then refresh. If it stays unhealthy, restart the stack and check the logs for errors.
- Lemonade chat requests fail with a connection error: confirm
curl -fsS "http://127.0.0.1:13305/api/v1/health"succeeds and that Lemonade is still serving the model withlemonade status. - The agent errors with a context-length or token-limit message: start a
fresh conversation so the agent does not carry an oversized history. If it
keeps happening, restart Lemonade with a larger
ctx_sizethan the default 65536 (for examplectx_size=131072), memory permitting. - The agent produces low-quality or incomplete edits: switch to a larger model in Lemonade, or give the agent a smaller, more concrete task and let it finish before asking for the next change.
Next Steps
- Try a larger task in the same workspace, such as adding a unit test file or fixing a known bug, and review the agent’s diff before keeping the change.
- Connect an MCP server such as GitHub or Slack under Customize so the agent can read issues or post updates while it works.
- Save several LLM profiles (a fast small model and a stronger large model) and
switch between them with
/modelmid-conversation. - Move on to OpenHands automations to turn recurring development loops into scheduled or event-triggered agent runs.
Resources
Need help with this playbook?
Run into an issue or have a question? Open a GitHub issue and our team will take a look.