- Generating Images with ComfyUI and Z Image Turbo
- Automating Workflows with n8n and Local LLMs
- Local LLM Coding with VSCode and Qwen3-Coder
- Running and Serving LLMs with LM Studio
- Running LLMs on PyTorch with AMD ROCm™ Software
- Building Custom GPU Kernels with PyTorch and AMD ROCm™
- Building Your First Agent with GAIA
- Chatting with LLMs in Open WebUI
- Clustering Two Ryzen™ AI Halos with RCCL
- Clustering Two Ryzen™ AI Halos with RPC
- Fine-Tuning LLMs with LLaMA Factory
- Fine-Tuning LLMs with PyTorch and AMD ROCm™ Software
- Fine-Tuning LLMs with Unsloth
- Getting Started with Lemonade
- Getting Started with Ollama
- Getting Started with vLLM
- Local Computer Vision with AMD Ryzen™ AI NPU
- Real-Time Speech-to-Speech Translation
- Remote Development with AMD Sync
- Running OpenClaw Locally with Lemonade Server
Fine-Tuning LLMs with PyTorch and AMD ROCm™ Software
Fine-tune large language models (LLMs) using PyTorch and ROCm.

Overview
This tutorial provides step-by-step examples for fine-tuning a large language model (LLM) with PyTorch and ROCm. It covers several techniques, from standard fine-tuning to memory-efficient Parameter-Efficient Fine-Tuning (PEFT) strategies, so you can easily adapt models for your needs.
Model Used: google/gemma-3-4b-it (see Enable HF authentication if gated)
Hardware: AMD Radeon™ GPU with ROCm support
Framework: PyTorch + Hugging Face (Transformers, PEFT, Transformer Reinforcement Learning (TRL))
What You’ll Learn
- How to fine-tune an LLM using LoRA, QLoRA, and full fine-tuning with PyTorch and ROCm
- How to save and deploy your fine-tuned model
- How to monitor training and debug common issues
Setting the Memory Configuration
For the Ryzen AI Halo, the dedicated GPU memory defaults to 64GB, which is sufficient for most workloads. For larger models or longer contexts, increasing this to 96GB may help. To adjust, open AMD Software: Adrenalin Edition™ and navigate to Performance → Tuning → AMD Variable Graphics Memory. Reboot for the changes to take effect.
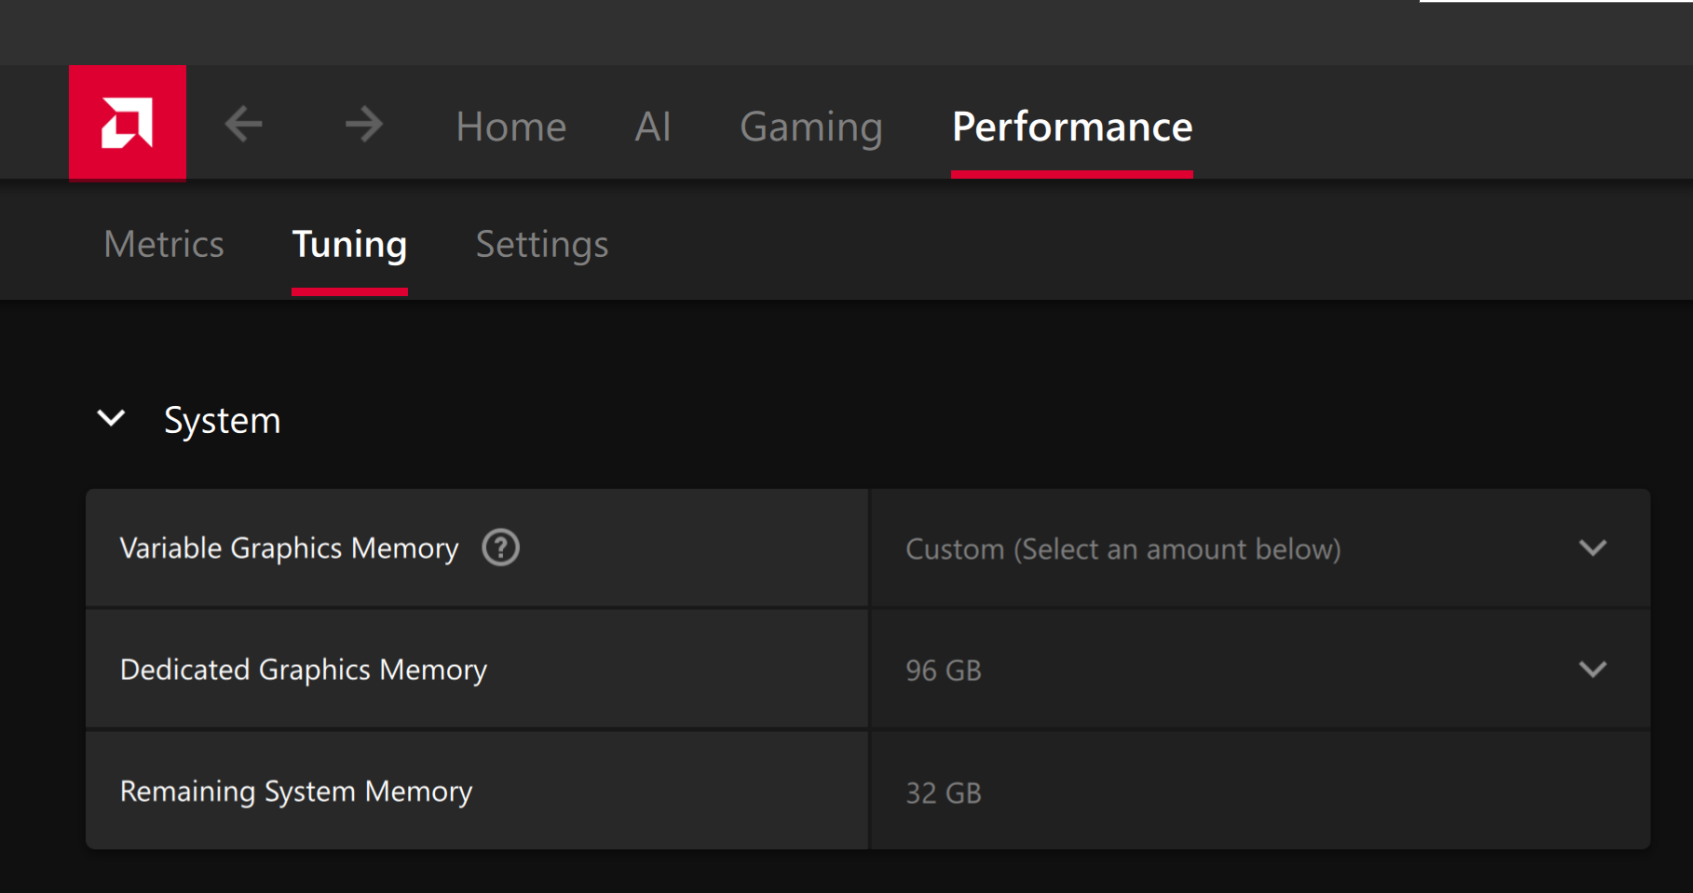
To change the dedicated GPU memory value, open AMD Software: Adrenalin Edition™ and navigate to Performance → Tuning → AMD Variable Graphics Memory. Reboot for the changes to take effect.
On Linux, to run larger models, increase the shared memory pool available to the GPU. This might involve setting the BIOS dedicated GPU memory to the minimum, so that the shared memory pool can be maximized.
For the AMD Ryzen™ AI Halo, the default is 96GB shared. To modify this, open the AMD Ryzen™ AI Developer Center and go to the Settings tab. Under Graphics Performance Settings, increase the Shared Video Memory slider, then click Apply Changes and reboot for the changes to take effect.

Increase the shared memory pool by changing the kernel’s Translation Table Manager (TTM) page setting. AMD recommends setting the minimum dedicated VRAM in the BIOS (0.5 GB) so the maximum amount is available as shared memory.
- Install the
pipxutility and add the path for pipx-installed wheels to the system search path:
sudo apt install pipxpipx ensurepath- Install the
amd-debug-toolswheel from PyPI:
pipx install amd-debug-tools- Query the current shared memory settings:
amd-ttm- Increase the shared memory allocation (units in GB):
amd-ttm --set <NUM>- Reboot for the changes to take effect.
Check for Software Updates
Before starting, ensure your Ryzen AI Halo has the latest software installed. Open the AMD Ryzen™ AI Developer Center and check for available updates, both to the app itself and additional software.
Go to the Updates tab. If updates are available, install them and reboot before continuing.
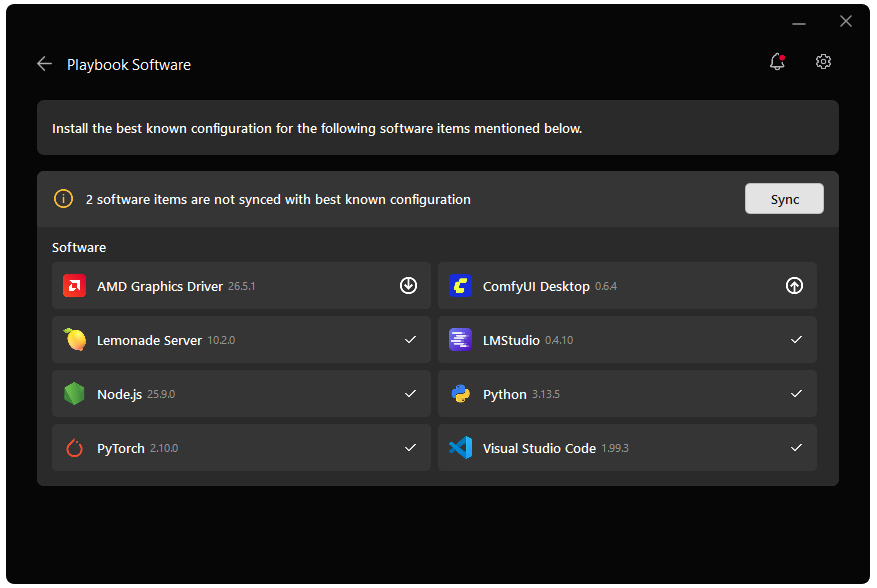
Go to the Manage tab. If updates are available, install them and reboot before continuing.

Installing Software Prerequisites
Create a Virtual Environment
sudo apt updatesudo apt install -y python3-venvpython3 -m venv finetune-venv --system-site-packagessource finetune-venv/bin/activateGrant your user access to GPU devices (log out and back in for this to take effect):
sudo usermod -aG render,video $LOGNAMEsudo apt updatesudo apt install -y python3-venvpython3 -m venv finetune-venvsource finetune-venv/bin/activatepython -m venv finetune-venv --system-site-packagesfinetune-venv\Scripts\activatepython -m venv finetune-venvfinetune-venv\Scripts\activateInstalling Basic Dependencies
PyTorch
Install PyTorch with AMD ROCm™ software support in the created virtual environment:
python -m pip install --index-url https://repo.amd.com/rocm/whl/gfx1151/ "torch==2.11.0+rocm7.13.0" "torchvision==0.26.0+rocm7.13.0" "torchaudio==2.11.0+rocm7.13.0"python -m pip install --index-url https://repo.amd.com/rocm/whl/gfx1150/ "torch==2.11.0+rocm7.13.0" "torchvision==0.26.0+rocm7.13.0" "torchaudio==2.11.0+rocm7.13.0"python -m pip install --index-url https://repo.amd.com/rocm/whl/gfx1152/ "torch==2.11.0+rocm7.13.0" "torchvision==0.26.0+rocm7.13.0" "torchaudio==2.11.0+rocm7.13.0"python -m pip install --index-url https://repo.amd.com/rocm/whl/gfx110X-all/ "torch==2.11.0+rocm7.13.0" "torchvision==0.26.0+rocm7.13.0" "torchaudio==2.11.0+rocm7.13.0"python -m pip install --index-url https://repo.amd.com/rocm/whl/gfx120X-all/ "torch==2.11.0+rocm7.13.0" "torchvision==0.26.0+rocm7.13.0" "torchaudio==2.11.0+rocm7.13.0"For other devices, please refer to this link for full instructions.
Additional Dependencies
pip install transformers==4.57.1 safetensors==0.6.2 accelerate peft trl bitsandbytes "fsspec[http]>=2023.1.0,<=2025.9.0"Windows: Only core packages are tested and supported here. bitsandbytes is not well supported on Windows, so the Windows install omits it; use LoRA or full fine-tuning on Windows (QLoRA requires bitsandbytes and is intended for Linux).
pip install transformers==4.57.1 safetensors==0.6.2 datasets==4.2.0 accelerate peft trl "fsspec[http]>=2023.1.0,<=2025.9.0"Enable HF authentication (gated or custom / non–preinstalled models)
In this example we use google/gemma-3-4b-it, which is a gated model. You must accept the model’s terms on Hugging Face and then authenticate so the training scripts can download it.
- Accept the license: Open https://huggingface.co/google/gemma-3-4b-it, sign in (or create an account), and accept the license/terms on the model page (e.g. “Agree and access repository”).
- Install and log in: Install the Hugging Face CLI, then run the standard login:
pip install huggingface_hubhf auth loginUnderstanding the Techniques
What is LoRA?
LoRA (Low-Rank Adaptation) keeps the base model frozen and only trains small “adapter” matrices that get added to certain layers.
- The key idea: instead of updating a huge weight matrix with millions of parameters, we learn a low-rank update (two small matrices whose product has much fewer parameters). That gives a large reduction in trainable parameters and VRAM while keeping most of the full fine-tuning quality.
W_updated = W + ΔW
# LoRA decomposes the update into two small matrices:W_updated = W + B × A# B: 4096×32 matrix# A: 32×4096 matrix# Total: 262K params (98% reduction!)
What is QLoRA?
QLoRA combines 4-bit quantization with LoRA. The base model is loaded in 4-bit (large memory savings), and only the LoRA adapters are trained in higher precision. So you get the parameter efficiency of LoRA plus much lower VRAM, with a small quality trade-off compared to full-precision LoRA. Note that 4-bit quantization can cause numerical instabilities (loss spikes or NaNs), so users may often prefer LoRA if enough VRAM is available.
Base Model (4-bit): 10GB ← Frozen, quantizedLoRA Adapters (BF16): 2GB ← Trainable, full precisionTotal: 12GB (vs 40GB full precision)2. Choose Your Method
| Method | Memory | Speed | Quality | Best For |
|---|---|---|---|---|
| QLoRA (Linux only) | 12-16GB | Fastest | 90-95% | Low Memory Usage |
| LoRA | 24-32GB | Fast | 95-98% | Balanced approach |
| Full | 80GB+ | Slowest | 100% | Maximum quality |
3. Run Training
Dataset and what the model learns
The scripts turn the dataset into chat examples. For example, the QLoRA script uses Abirate/english_quotes: each example becomes a user–assistant pair like:
- User: “Give me a quote about: <tag>”
- Assistant: “<quote> – <author>”
Fine-tuning teaches the model to respond to prompts asking for quotes about a topic and to return them in the format <quote text> - <author>. The LoRA and full fine-tuning scripts use databricks/databricks-dolly-15k (general instruction/response pairs), so the exact task varies by script; the idea is the same - adapt the model to your chosen dataset and format.
Below is a summary of the available training methods. Each method links to its script and provides a brief description for choosing the right approach.
| Script | Method | Description | Typical VRAM | Recommended For |
|---|---|---|---|---|
| LoRA | Trains small adapter matrices while freezing base model. 3–5x faster; ~95–98% full quality. | 24–32GB | Advanced users; multiple adapters; more VRAM | |
| (Linux only) | QLoRA | 4-bit quantization + LoRA adapters. Lowest memory use, fastest, small quality trade-off. Requires bitsandbytes (Linux only). | 12–16GB | Most users; fast experiments; limited VRAM |
| Full Fine-tuning | Updates all model parameters. Maximum quality; highest memory and compute usage. | 40GB+ | Maximum quality; research; large VRAM |
Simply select your preferred Training method, download the corresponding script and execute it using the command keeping your virtual environment activated:
python3 train_<method_name>.py.Using your Fine-Tuned Model
After Full Fine-Tuning
from transformers import AutoModelForCausalLM, AutoTokenizer
model = AutoModelForCausalLM.from_pretrained(    "output-gemma-3-4b-it-full",     # Directory containing your fully fine-tuned checkpoint    device_map="auto",    torch_dtype="auto"            # Use BF16 if your GPU supports it, else "auto")tokenizer = AutoTokenizer.from_pretrained("output-gemma-3-4b-it-full")
# Generate textprompt = "Explain quantum computing:"inputs = tokenizer(prompt, return_tensors="pt").to(model.device)outputs = model.generate(**inputs, max_new_tokens=200)print(tokenizer.decode(outputs[0], skip_special_tokens=True))
After LoRA/QLoRA Training
from peft import AutoPeftModelForCausalLMfrom transformers import AutoTokenizer
# Load model with LoRA or QLoRA adaptersmodel = AutoPeftModelForCausalLM.from_pretrained(    "output-gemma-3-4b-it-qlora",   # or "output-gemma-3-4b-lora" depending on your training    device_map="auto",    torch_dtype="auto")tokenizer = AutoTokenizer.from_pretrained("output-gemma-3-4b-it-qlora")
# Generate textprompt = "Explain quantum computing:"inputs = tokenizer(prompt, return_tensors="pt").to(model.device)outputs = model.generate(**inputs, max_new_tokens=200)print(tokenizer.decode(outputs[0], skip_special_tokens=True))
Merge LoRA Adapter into Base Model
# Merge LoRA/QLoRA adapter weights into the base model for standalone inferencemerged_model = model.merge_and_unload()merged_model.save_pretrained("gemma-3-4b-merged")tokenizer.save_pretrained("gemma-3-4b-merged")For more custom settings (padding tokens, device, etc), refer to the script that you used for training.
Customization Guide
Use your Own Dataset
All scripts use the same dataset format. Replace the loading section:
from datasets import load_dataset
# Option 1: Local JSON/JSONL filedataset = load_dataset('json', data_files='your_data.json')
# Option 2: Hugging Face Hub datasetdataset = load_dataset('username/dataset-name')
# Option 3: CSV filedataset = load_dataset('csv', data_files='data.csv')
# Format for chat modelsdef format_instruction(example):    return {        "messages": [            {"role": "user", "content": example['instruction']},            {"role": "assistant", "content": example['response']}        ]    }
dataset = dataset.map(format_instruction)
Dataset Format for Local JSON/JSONL file:
When using this method, please ensure that your JSON files are correctly structured to avoid parsing errors.
The following guidelines must be adhered to:
- File Formatting: JSON files should be formatted within an Integrated Development Environment (IDE) to ensure proper structure and syntax.
- Required Keys: The custom JSON file must contain the keys
instructionandresponse. These keys are essential for the method to function correctly.
[ { "instruction": "Your first instruction here", "response": "Expected response here" }, { "instruction": "Your second instruction here", "response": "Expected response here" }]Dataset Format for Hugging Face Hub dataset
When utilizing datasets from Hugging Face, please ensure that your datasets are structured correctly to facilitate seamless integration.
The following guidelines should be followed:
- Instruction-Response Pair: Focus on datasets that include an
instruction-responsepair. This structure is essential for the intended functionality. - Custom Key Modification: If your dataset does not conform to the
instruction-responsestructure, you have the option to modify theformat_instruction()function. This allows you to accommodate specific keys as needed.
Example Adjustment: In cases where the dataset’s output needs to be adjusted, you can modify the response section within the format_instruction() function to fit your requirements.
def format_instruction(example): return { "messages": [ {"role": "user", "content": example['input']}, {"role": "assistant", "content": example['output']} ] }Dataset Format for CSV file
To accommodate the script using a CSV file format, you need to ensure that the CSV file contains columns named instruction and response.
instruction,response"Your first instruction here","Expected response here""Your second instruction here","Expected response here"Adjust Training Parameters
Edit the training script and change the variables to match your goals: learning rate (LR), epochs (EPOCHS), batch size (BATCH_SIZE), gradient accumulation (GRAD_ACCUM_STEPS), and for LoRA/QLoRA rank (LORA_R). For faster runs use fewer epochs and a higher learning rate (LR); for better quality use more epochs and a lower LR. Reduce batch size or sequence length if you hit out-of-memory errors.
Memory Optimization Tips
If you encounter out-of-memory errors:
1. Reduce Batch Size:
BATCH_SIZE = 1GRAD_ACCUM_STEPS = 16 # Maintain effective batch size2. Reduce Sequence Length:
max_seq_length=256 # Instead of 5123. Use More Aggressive Quantization:
Full → LoRA → QLoRA4. Enable Gradient Checkpointing (Full fine-tuning only):
model.gradient_checkpointing_enable()Monitoring & Debugging
Watch GPU Memory
# Check ROCm GPU statuswatch -n 1 amd-smi
# Show memory inforocm-smi --showmeminfo vram
(Optional) Track Experiments with Weights & Biases
To log runs and metrics to Weights & Biases:
pip install wandbwandb loginIn the training script, set report_to="wandb" and optionally run_name="your-experiment-name" in the trainer config. If you prefer not to use Wandb, leave report_to at its default or set it to "none".
Common Issues
Out of Memory (OOM)
Solution: Reduce batch size and/or use QLoRA
BATCH_SIZE = 1GRAD_ACCUM_STEPS = 16# Or: python train_qlora.pyLoss Not Decreasing
Solution: Adjust learning rate
LR = 1e-4 # Try lower# orLR = 5e-4 # Try higherSlow Training
Solution: Increase batch size if memory allows
BATCH_SIZE = 8Next Steps
After you have completed successful fine-tuning, consider the following next steps to get more from your model:
- Evaluate thoroughly on held-out test data to measure generalization and avoid overfitting.
- Experiment by trying different hyperparameter values for better accuracy, speed, and memory trade-offs.
- Track all your experiments (and corresponding metrics) with Weights & Biases for reproducible research.
- Try training on your own custom datasets to adapt the model specifically for your use-case.
- Deploy your fine-tuned model for fast inference using efficient backends such as vLLM on compatible hardware.
- Explore advanced techniques including prompt engineering, mixed precision, and longer sequence lengths.
- Train multiple LoRA adapters for different tasks or domains and swap them as needed.
Need help with this playbook?
Run into an issue or have a question? Open a GitHub issue and our team will take a look.