- Generating Images with ComfyUI and Z Image Turbo
- Automating Workflows with n8n and Local LLMs
- Local LLM Coding with VSCode and Qwen3-Coder
- Running and Serving LLMs with LM Studio
- Running LLMs on PyTorch with AMD ROCm™ Software
- Building Custom GPU Kernels with PyTorch and AMD ROCm™
- Building Your First Agent with GAIA
- Chatting with LLMs in Open WebUI
- Clustering Two Ryzen™ AI Halos with RCCL
- Clustering Two Ryzen™ AI Halos with RPC
- Fine-Tuning LLMs with LLaMA Factory
- Fine-Tuning LLMs with PyTorch and AMD ROCm™ Software
- Fine-Tuning LLMs with Unsloth
- Getting Started with Lemonade
- Getting Started with Ollama
- Getting Started with vLLM
- Local Computer Vision with AMD Ryzen™ AI NPU
- Real-Time Speech-to-Speech Translation
- Remote Development with AMD Sync
- Running OpenClaw Locally with Lemonade Server
Clustering Two Ryzen™ AI Halos with RCCL
Set up a multi-node cluster using two Ryzen™ AI Halo devices with RCCL for distributed workloads
Overview
Your Ryzen™ AI Halo is already capable of running large language models locally. Clustering takes this further by combining the GPU memory of multiple systems over a local network, giving you access to even larger models with stronger reasoning, better code generation, and deeper multilingual understanding, all entirely on your own hardware.
This playbook teaches you how to cluster two Ryzen AI Halo systems using RCCL (ROCm Communication Collectives Library) with vLLM and run Qwen3.5-397B, a 397B parameter model, across both machines with ROCm acceleration.
What You’ll Learn
- How to extend VRAM allocation on Ryzen AI Halo systems
- Launching vLLM with ROCm support
- Configuring RCCL for multi-node tensor-parallel inference across two Ryzen AI Halo systems
- Running a 397B parameter model across two networked Ryzen AI Halo systems
Prerequisites
Hardware
This playbook requires two Ryzen AI Halo units and one Ethernet switch, connected in a star topology with each unit wired directly to the switch.
| Component | Quantity | Description |
|---|---|---|
| Ryzen AI Halo | 2 | Compute nodes that form the cluster |
| 10Gbps Ethernet switch | 1 | Central switch to allow multi node Ryzen AI Halo communication (at least 2 ports) |
| Ethernet cable | 2 | Connects each Halo unit to the switch (Cat 7 or higher recommended) |
Software
sudo apt install curlPhysical Hardware Setup
Connect each Ryzen AI Halo unit to the Ethernet switch using a Cat 7 (or higher) cable. This establishes the 10Gbps link used for high-speed communication between the nodes.
1. Determine Network Interfaces
On each machine, find the name of its network interface and note it down (it will be referred to in the rest of the instructions as IFNAME). Run:
ip route get 1.1.1.1 | grep -oP 'dev \K\S+'This prints the interface name directly, for example:
enp191s02. Verify Network Link Speeds
Confirm the link is active and running at full speed by checking the speed of your interface:
sudo ethtool <IFNAME> | grep SpeedYou should see a speed of 10000Mb/s:
Speed: 10000Mb/sExtending VRAM Allocation
Memory Configuration for Running Large Models
On Linux, ROCm utilizes a shared system memory pool, and this pool is configured by default to half the system memory.
This amount can be increased by changing the kernel’s Translation Table Manager (TTM) page setting, with the following instructions. AMD recommends setting the minimum dedicated VRAM in the BIOS (0.5 GB).
- Install the pipx utility and add the path for pipx installed wheels into the system search path.
sudo apt install pipxpipx ensurepath- Install the amd-debug-tools wheel from PyPI.
pipx install amd-debug-tools- Run the amd-ttm tool to query the current settings for shared memory.
amd-ttm- Reconfigure shared memory settings to 120 GB:
amd-ttm --set 120- Reboot the system for changes to take effect.
vLLM Container Initialization
Your Ryzen AI Halo ships with vLLM packaged inside a prebuilt container image, which you run using Podman, a free and open source container tool.
1. Create the Model Download Directory
When you serve the Qwen3.5-397B model in this playbook, vLLM will automatically download the model weights to your system. To make sure those weights are accessible from inside the container, first create a models directory that the container can mount:
mkdir -p ~/.local/share/vLLM/models2. Launch the vLLM Container
The command below launches the container and drops you into an interactive shell. It mounts the models directory you just created and passes your IFNAME to NCCL_SOCKET_IFNAME and GLOO_SOCKET_IFNAME, telling RCCL (the library vLLM uses to coordinate GPUs across the cluster) which interface to use.
Start the container with:
sudo podman run -it --name vllm_cluster --replace --pull missing --network=host --device /dev/kfd --device /dev/dri -v ~/.local/share/vLLM/models:/opt/vLLM/models --env HF_HOME=/opt/vLLM/models --entrypoint="bin/bash" --shm-size=64g -e NCCL_SOCKET_IFNAME=<IFNAME> -e GLOO_SOCKET_IFNAME=<IFNAME> oci-registry.ryai.dev/ryai-vllm:latestRunning the Model on the Cluster
vLLM uses Ray to orchestrate the cluster and RCCL to handle GPU-to-GPU communication across nodes. One machine acts as the head node (Machine 1), coordinating inference. The other joins as a worker node (Machine 2), contributing its GPU memory and compute.
At launch, vLLM shards the model across both nodes using tensor parallelism. Once loaded, inference proceeds as if running on a single accelerator.
Step 1: Start the Ray Head Node (Machine 1)
On Machine 1, start the Ray head node to initialize the cluster:
ray start --head --port=6379 --node-ip-address=<MACHINE_1_IP> --num-gpus=1Finding
<MACHINE_1_IP>: On Machine 1, runhostname -I | awk '{print $1}'to find its local IP address.
Step 2: Join the Cluster (Machine 2)
On Machine 2, connect to the head node to form the cluster:
ray start --address=<MACHINE_1_IP>:6379 --node-ip-address=<MACHINE_2_IP> --num-gpus=1Finding
<MACHINE_2_IP>: On Machine 2, runhostname -I | awk '{print $1}'to find its local IP address.
Step 3: Serve the Model (Machine 1)
On Machine 1, launch the vLLM server. This will automatically download the model and begin serving it across both nodes:
vllm serve Qwen/Qwen3.5-397B-A17B-GPTQ-Int4 \ --port 7000 \ --host 0.0.0.0 \ --max-model-len 32768 \ --gpu-memory-utilization 0.9 \ --dtype float16 \ --tensor-parallel-size 2 \ --distributed-executor-backend ray \ --enforce-eager \ --language-model-only \ --reasoning-parser qwen3Parameter Reference
| Flag | Purpose |
|---|---|
--port | Port to serve the HTTP API on |
--host | IP address to bind the server to (0.0.0.0 for all interfaces) |
--max-model-len | Maximum context length in tokens |
--gpu-memory-utilization | Fraction of GPU memory to allocate (0.0–1.0) |
--dtype | Data type for model weights |
--tensor-parallel-size | Number of GPUs to shard the model across (set to total GPUs in the cluster) |
--distributed-executor-backend | Backend for multi-node execution (ray for cluster deployments) |
--enforce-eager | Disables CUDA graph compilation for compatibility |
--language-model-only | Skips loading auxiliary model components (e.g., vision encoder) |
--reasoning-parser | Enables structured reasoning output parsing for the model |
For full parameter usage, refer to the vLLM documentation.
Accessing the Model
vLLM exposes an OpenAI-compatible API, so you can connect any compatible client or interface to your cluster. One popular option is Open WebUI, which provides a browser-based chat interface.
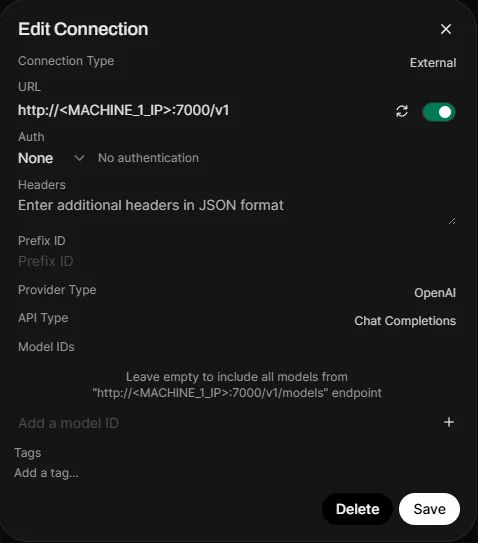
To connect Open WebUI to your vLLM endpoint:
- Open Settings > Admin Panel > Connections
- Click the + on Manage OpenAI API Connections
- Set the Connection Type to External
- Set the URL to
http://<MACHINE_1_IP>:7000/v1 - Under Auth, select None from the dropdown
- Leave Model IDs empty to automatically discover all models from the endpoint
Finding
<MACHINE_1_IP>: On Machine 1, runhostname -I | awk '{print $1}'to find its local IP address. If accessing Open WebUI from Machine 1 itself, you can usehttp://localhost:7000/v1.
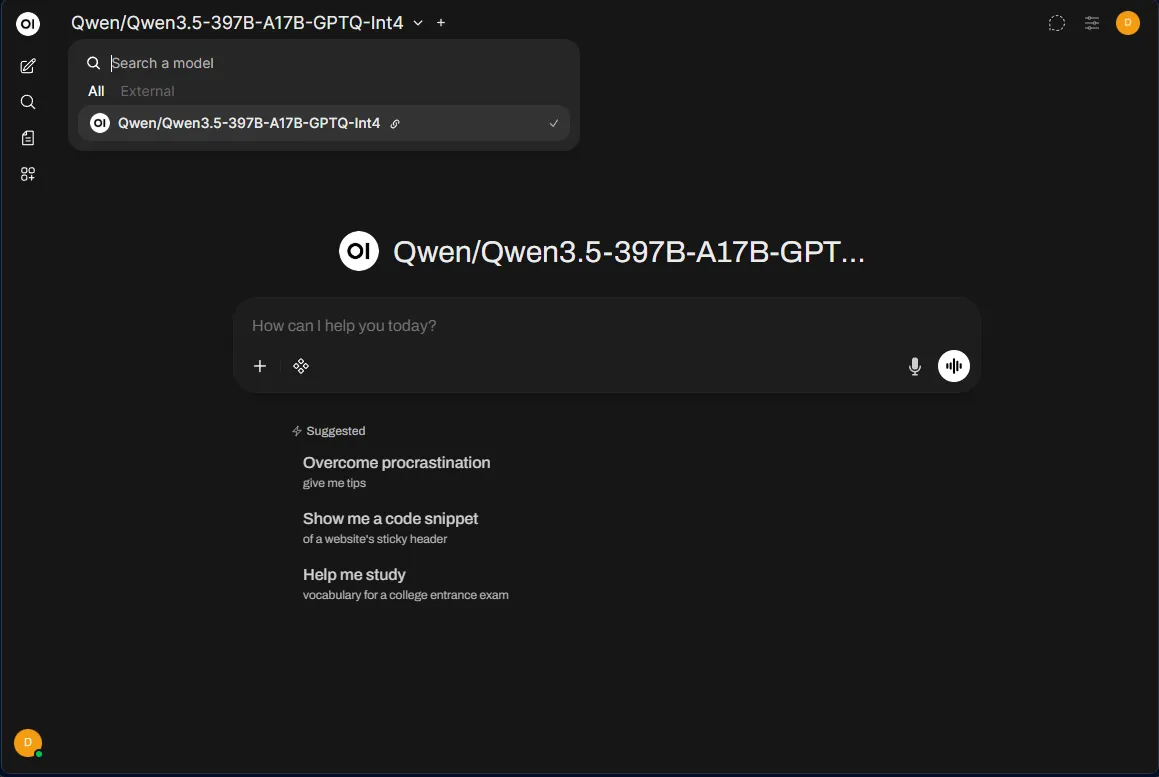
Once connected, select the model from the model dropdown in Open WebUI and start chatting. The model is now running across both of your Ryzen AI Halo nodes:
Next Steps
- Explore other models: Discover new models on Hugging Face that fit within your cluster’s combined GPU memory
- Scale to four nodes: Add two more Ryzen AI Halo systems as additional Ray workers to shard models across even more GPUs. This requires an Ethernet switch with at least four ports, one for each node. Follow Step 2: Join the Cluster on each additional worker and increase
--tensor-parallel-sizeaccordingly - Try other parallelism strategies: vLLM supports expert parallel for mixture-of-experts models and data parallel for higher throughput. Experiment with
--enable-expert-paralleland--data-parallel-sizeto find the best configuration for your workload
Need help with this playbook?
Run into an issue or have a question? Open a GitHub issue and our team will take a look.