Install and configure Hermes Agent autonomous AI agent with Lemonade Server as its local AI backend.
Overview
Hermes Agent is a self-improving AI agent built by Nous Research. It has a built-in learning loop, it creates skills from experience, builds a persistent memory of who you are across sessions, and can run scheduled automations on your behalf. Unlike a simple chat assistant, Hermes takes real actions: running shell commands, writing files, browsing the web, and delegating parallel workstreams to subagents.
Lemonade Server is the local inference backend that powers it. It is an open-source server that runs GenAI models directly on your AMD hardware and exposes them through the industry-standard OpenAI API.
Together they form a fully local AI agent stack: Lemonade handles model inference on your GPU, and Hermes provides the agent loop, memory, skills, and messaging gateway.
Before you continue: Hermes Agent is a highly autonomous AI agent. Giving any AI agent access to your system may result in unpredictable or unintended outcomes. Proceed only if you understand the risks and are comfortable with autonomous software acting on your behalf.
What You’ll Learn
By the end of this playbook you will be able to:
Install Hermes Agent and point it at Lemonade Server as its AI backend.
(Recommended) Enable Docker/Podman sandboxing to isolate the agent’s actions from your host.
Start the Hermes gateway and confirm your agent is ready.
Connect a communication channel (Discord or Telegram) so you can chat with your agent from any device.
Setting the Memory Configuration
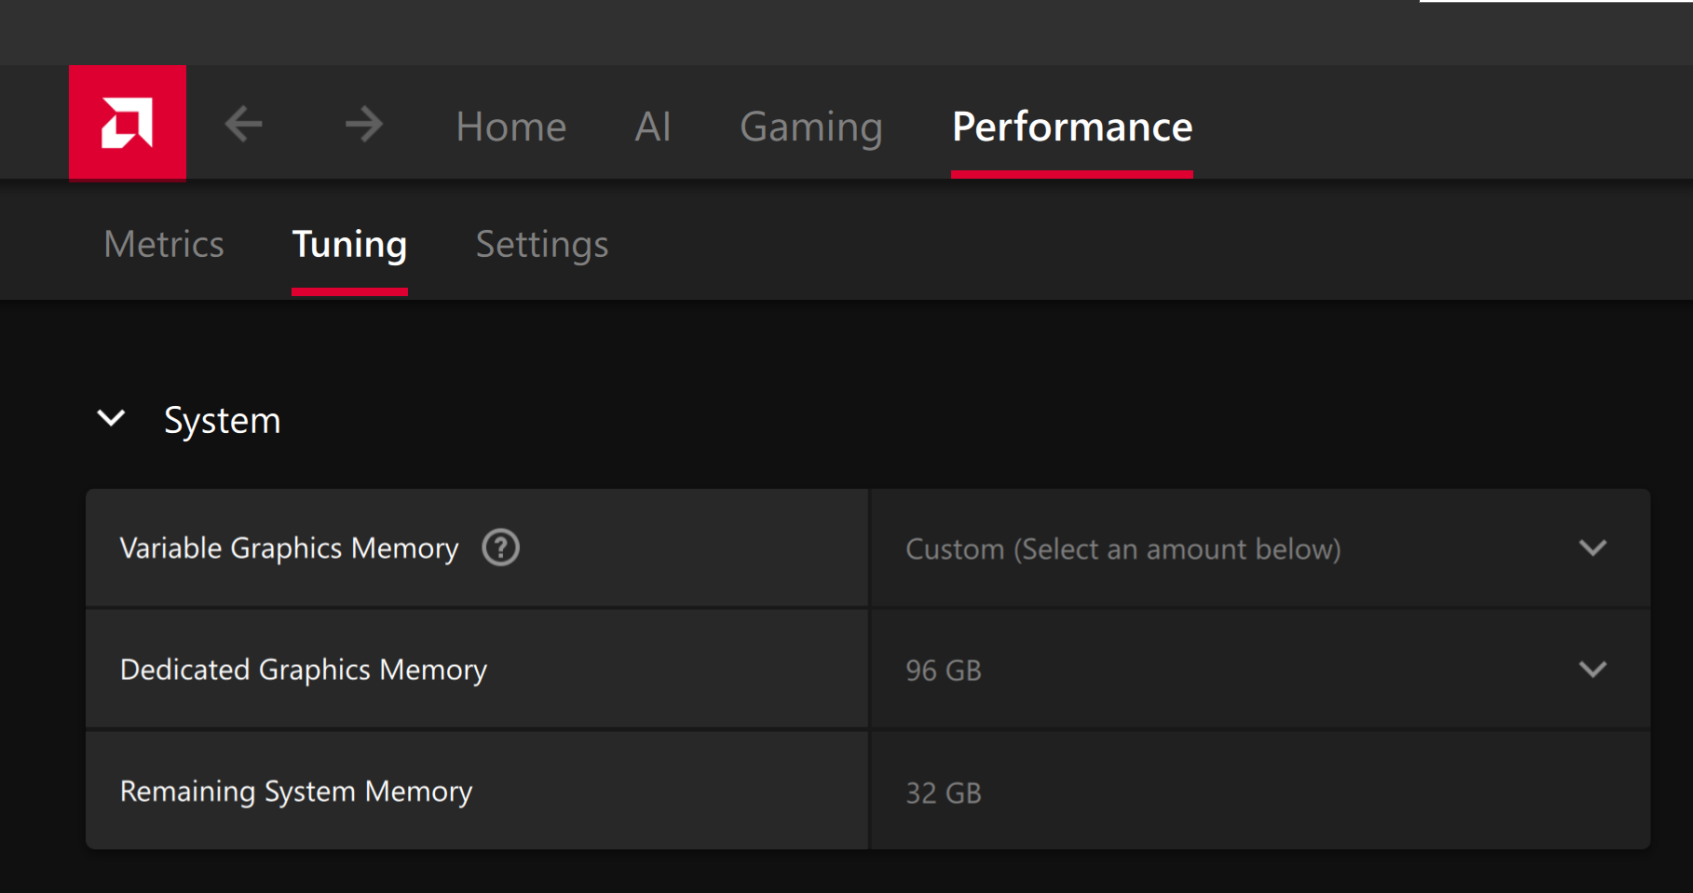
For the Ryzen AI Halo, the dedicated GPU memory defaults to 64GB, which is sufficient for most workloads. For larger models or longer contexts, increasing this may help. To adjust, open AMD Software: Adrenalin Edition™ and navigate to Performance → Tuning → AMD Variable Graphics Memory. Reboot for the changes to take effect.
To change the dedicated GPU memory value, open AMD Software: Adrenalin Edition™ and navigate to Performance → Tuning → AMD Variable Graphics Memory. Reboot for the changes to take effect.
On Linux, to run larger models, increase the shared memory pool available to the GPU. This might involve setting the BIOS dedicated GPU memory to the minimum, so that the shared memory pool can be maximized.
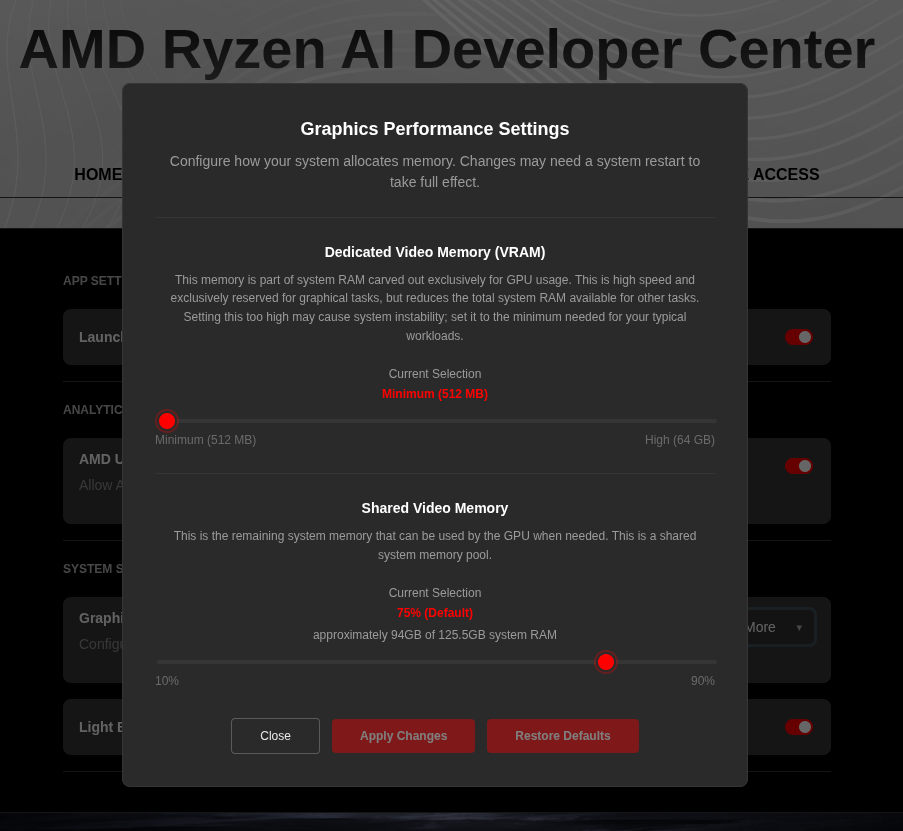
For the AMD Ryzen™ AI Halo, to modify the default setting, open the AMD Ryzen™ AI Developer Center and go to the Settings tab. Under Graphics Performance Settings, increase the Shared Video Memory slider, then click Apply Changes and reboot for the changes to take effect.
Increase the shared memory pool by changing the kernel’s Translation Table Manager (TTM) page setting. AMD recommends setting the minimum dedicated VRAM in the BIOS (0.5 GB) so the maximum amount is available as shared memory.
Install the pipx utility and add the path for pipx-installed wheels to the system search path:
Terminal window
sudoaptinstallpipx
pipxensurepath
Install the amd-debug-tools wheel from PyPI:
Terminal window
pipxinstallamd-debug-tools
Query the current shared memory settings:
Terminal window
amd-ttm
Increase the shared memory allocation (units in GB):
Terminal window
amd-ttm--set<NUM>
Reboot for the changes to take effect.
Check for Software Updates
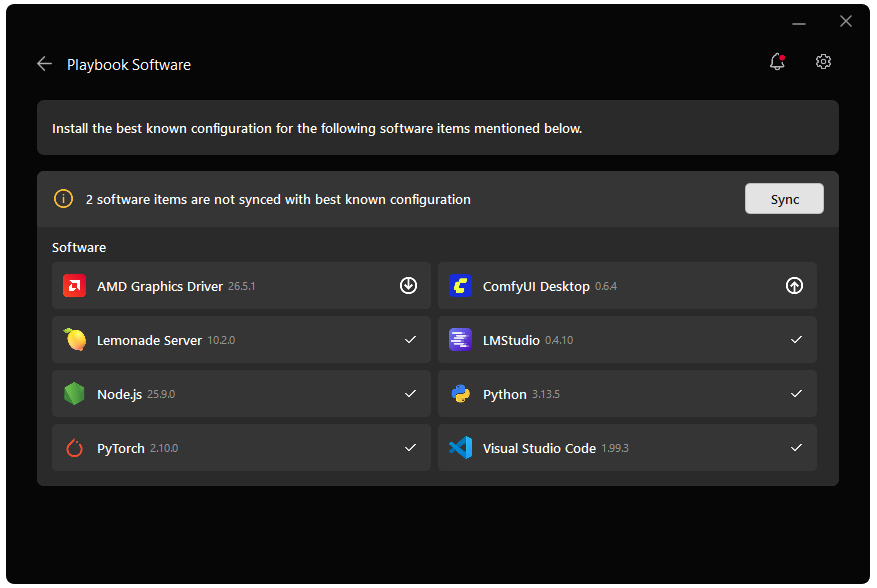
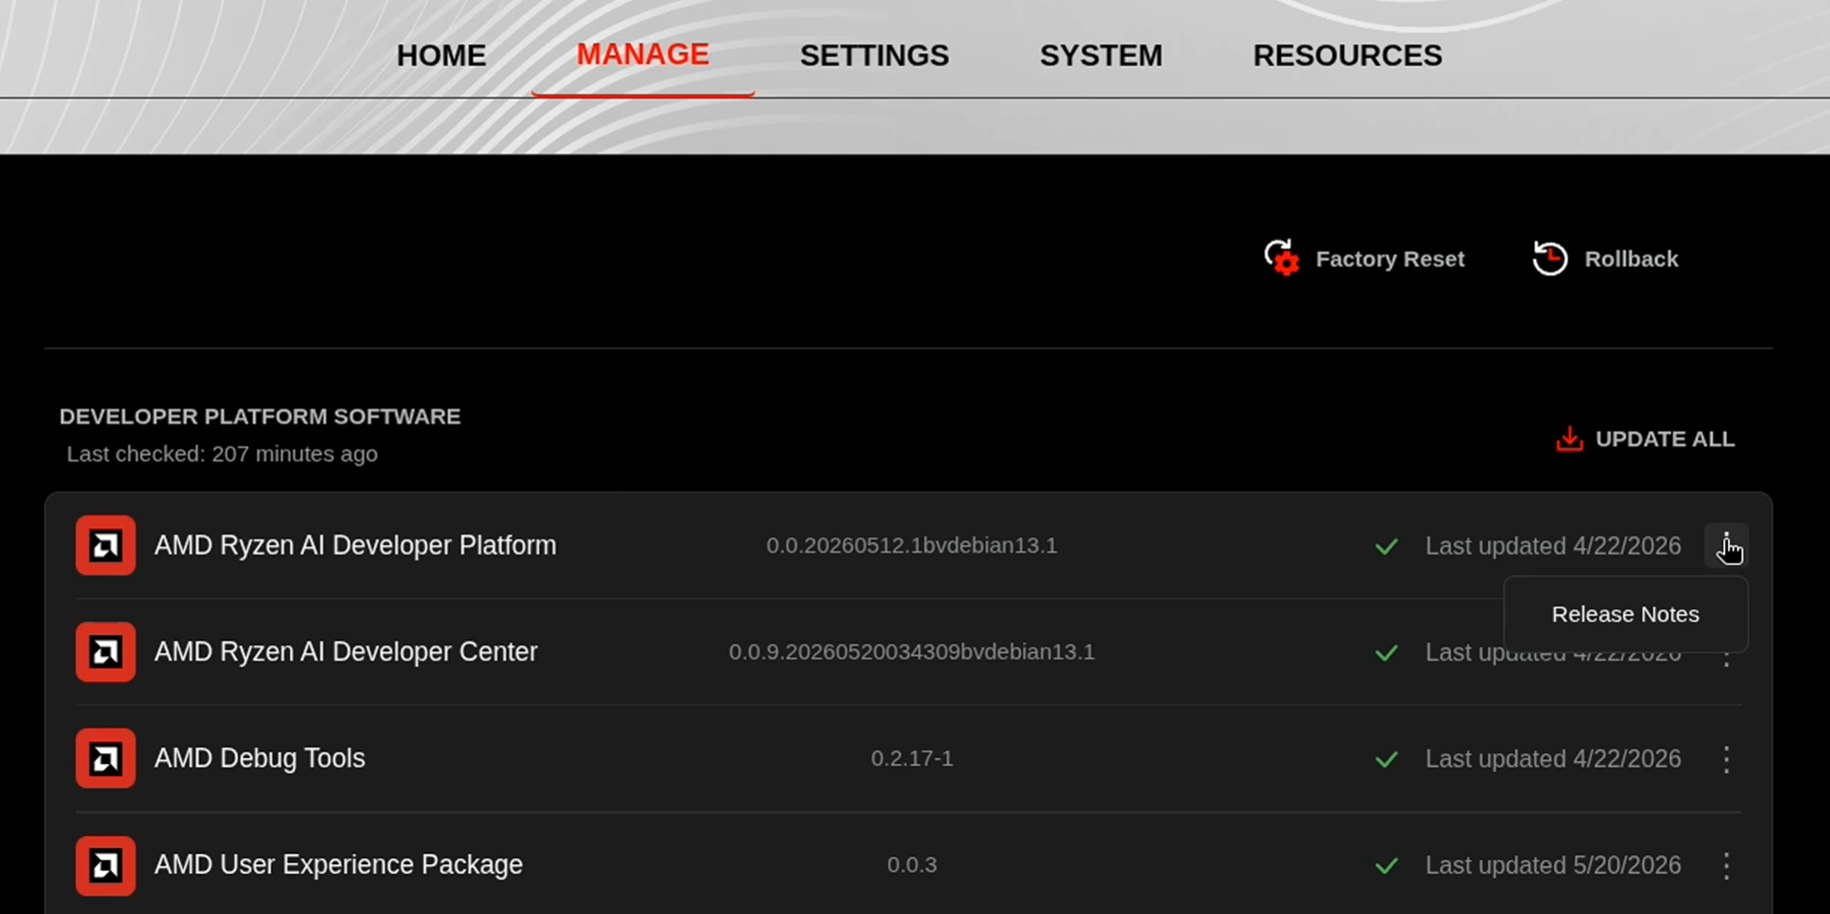
Before starting, ensure your Ryzen AI Halo has the latest software installed. Open the AMD Ryzen™ AI Developer Center and check for available updates, both to the app itself and additional software.
Go to the Updates tab. If updates are available, install them and reboot before continuing.
Go to the Manage tab. If updates are available, install them and reboot before continuing.
Installing Software Prerequisites
A PC running Ubuntu 24.04+ or a compatible Debian-based Linux distribution with apt-get
At least 12 GB of RAM (64 GB+ recommended for larger models)
The recommended model for this playbook is Qwen3.6-35B-A3B-GGUF from Unsloth, a strong MoE model with a 263k-token context window that is well-suited to agent workloads. This model uses UD-Q4_K_XL quantization. Pull it now:
Terminal window
lemonadepullQwen3.6-35B-A3B-GGUF
Then load it with a large context window and save that setting for future runs:
The model has a default context length of 262,144 tokens. If you encounter out-of-memory (OOM) errors, consider reducing the context window.
Tip: Disable thinking for faster agent responses: Qwen3.6-35B-A3B runs in thinking mode by default, which adds latency before each response. For agent loops this overhead accumulates quickly. The lemonade-sdk/recipes repo provides a ready-made config that disables thinking. To use it, download the file and import it:
We run Hermes Agent inside WSL and connect it to Lemonade running natively on Windows. This gives you a Linux shell environment for Hermes while keeping Lemonade’s GPU acceleration on the Windows side.
Install WSL and Ubuntu
Open PowerShell as Administrator and install the WSL kernel:
Terminal window
wsl --install --no-distribution
Then install Ubuntu:
Terminal window
wsl --install -d Ubuntu-24.04
Enable systemd in WSL
Run this inside the Ubuntu terminal:
Terminal window
sudotee/etc/wsl.conf>/dev/null<<'EOF'
[boot]
systemd=true
EOF
Restart WSL:
Terminal window
wsl --shutdown
wsl
Bridge Lemonade from Windows into WSL
WSL2 runs in a virtual network. Lemonade on Windows binds to 127.0.0.1, which WSL cannot reach directly. A Windows port proxy forwards traffic from the WSL gateway IP to Windows localhost.
Find your WSL gateway IP (run inside WSL):
Terminal window
iprouteshowdefault|awk'{print $3}'|head-1
Add the port proxy (run in PowerShell as Administrator, replacing <WSL-Gateway-IP> with your WSL gateway IP):
The netsh portproxy rule survives reboots but the WSL gateway IP can change after wsl --shutdown. If Lemonade becomes unreachable from WSL after a restart, get the updated gateway IP and update the proxy with this new IP.
Install Hermes Agent
Run the commands in this section inside your WSL terminal unless noted otherwise.
The --skip-setup flag skips the interactive setup wizard so you can configure the model backend manually in the next step.
Reload your shell:
Terminal window
source~/.bashrc
Confirm the installation:
Terminal window
hermes--version
Run a self-diagnostic to check all dependencies:
Terminal window
hermesdoctor
Configure Hermes to Use Lemonade
Hermes stores its model configuration in ~/.hermes/config.yaml. You can either use the interactive hermes model picker or can write the config directly.
Option 1: Interactive picker
Run the following inside your WSL terminal.
Terminal window
hermesmodel
Terminal window
hermesmodel
When prompted:
Select Custom endpoint (enter URL manually)
API base URL:http://127.0.0.1:13305/api/v1
API base URL: use the WSL gateway IP: run ip route show default | awk '{print $3}' | head -1 inside WSL to get it, then enter http://<WSL-Gateway-IP>:13305/api/v1
API key:lemonade
API compatibility mode:1 (Auto-detect)
Select model: choose Qwen3.6-35B-A3B-GGUF from the list
Context length in tokens:262144
Display name:local-lemonade (or any name you prefer)
hermes model saves both the active model selection and a named custom_providers entry that stores the context length alongside the endpoint. The result in ~/.hermes/config.yaml looks like this:
model:
default: Qwen3.6-35B-A3B-GGUF
provider: custom
base_url: http://127.0.0.1:13305/api/v1
api_key: lemonade
custom_providers:
- name: local-lemonade
base_url: http://127.0.0.1:13305/api/v1
api_key: lemonade
model: Qwen3.6-35B-A3B-GGUF
models:
Qwen3.6-35B-A3B-GGUF:
context_length: 262144
Option 2: Write config directly
Terminal window
mkdir-p~/.hermes
cat>>~/.hermes/config.yaml<<'EOF'
model:
default: Qwen3.6-35B-A3B-GGUF
provider: custom
base_url: http://127.0.0.1:13305/api/v1
api_key: lemonade
custom_providers:
- name: local-lemonade
base_url: http://127.0.0.1:13305/api/v1
api_key: lemonade
model: Qwen3.6-35B-A3B-GGUF
models:
Qwen3.6-35B-A3B-GGUF:
context_length: 262144
EOF
Inside your WSL terminal, get the Windows host IP and write the config:
Hermes Agent can route all agent shell and file operations through an isolated container rather than running them directly on your host. This limits the blast radius of any unintended action to the sandbox, leaving your host filesystem and network untouched.
The terminal.backend is still docker.
HERMES_DOCKER_BINARY is what tells Hermes to use Podman as the runtime instead.
Hermes will now spin up a persistent sandbox container and route all terminal and file-tool calls through it. The container shares the life of the Hermes process, is reused across all tool calls, and is destroyed when Hermes exits.
Verify the sandbox is working: Start Hermes (hermes) and ask it to run hostname - you should see a short container ID instead of your machine’s hostname. You can also ask it to rm -rf <path-to-a-dummy-file/folder>: Hermes will confirm the deletion, but the folder will still be on your host. The command ran inside the container’s isolated $HOME, not yours.
Need stronger isolation? Hermes also provides an official Docker image (nousresearch/hermes-agent) that runs the entire agent process inside a container - gateway, tools, and all. See the Hermes Docker documentation for setup details.
(Recommended) Hermes Integration with Firecrawl Services
Hermes can browse and extract content from websites using its built-in web tools. However, many modern websites use bot-detection systems, which block simple HTTP requests and return challenge pages instead of the actual content. As a result, Hermes may be unable to reliably extract information from these sites.
To overcome this limitation, Firecrawl provides a self-hosted web crawling and content extraction service that can bypass these challenges and unlock the full potential of Hermes automation.
In this setup, Firecrawl runs as a set of Docker containers managed with Podman. To simplify lifecycle management and automatic startup, we register Firecrawl as a user-level systemd service that orchestrates the underlying Podman Compose stack. This allows Hermes to start, stop, and verify the Firecrawl service using standard systemctl --user commands instead of interacting with containers directly.
To keep things simple, we’ve broken the whole process into four steps:
1. Register the system service
Navigate to the systemd user configuration directory:
Terminal window
cd~/.config/systemd/user
Create and open a new file called firecrawl.service.
At this point, the service has been defined but not yet registered with systemd.
Make sure the filename matches exactly what you created above, then run:
Terminal window
systemctl--userdaemon-reload
systemctl--userenablefirecrawl.service
If successful, you should see the following output:
Created symlink ’~/.config/systemd/user/default.target.wants/firecrawl.service’ → ’~/.config/systemd/user/firecrawl.service’.
default.target.wants/ contains symbolic links to services that are configured to start automatically.
2. Configure Firecrawl for your Service
SELF-HOST Firecrawl is ideal for those who need full control over their scraping and data processing environments but comes with the trade-off of additional maintenance and configuration efforts.
Once that is done, download the Hermes Compose file hermes-compose.yaml and place it in the root /firecrawl directory:
This convention is required for systemd to locate and start the service correctly as specified in WorkingDirectory=${HOME}/firecrawl.
You can always expand the stack by adding additional Firecrawl services as needed. The full list of available services can be found in the official Firecrawl docker-compose.yaml.
4. Launch Hermes service through Firecrawl
Before handing control over to systemd, validate that everything works correctly by running the stack manually:
Terminal window
podmancompose-fhermes-compose.yamlup-d
If everything is configured correctly, you should see the Hermes container come up and your command line output should look similar to this:
Once verified, bring the stack back down before proceeding:
Terminal window
podmancompose-fhermes-compose.yamldown
Now that everything is validated, start the service through systemd:
Terminal window
systemctl--userstartfirecrawl.service
The Hermes API is accessible from within the interactive container, and the Web Dashboard is available on same host and port at http://127.0.0.1:9119.
To stop the service, run:
Terminal window
systemctl--userstopfirecrawl.service
Hermes Native
Start an interactive CLI session directly:
Terminal window
hermes
Congratulations, you’ve built a fully local AI agent stack.
Web Dashboard
Hermes includes a browser-based UI for managing config, API keys, models, sessions, memory, and cron jobs. Open a second terminal while the gateway or CLI is running and launch it with:
Terminal window
hermesdashboard
This starts a local server and opens http://127.0.0.1:9119 in your browser. See the dashboard documentation for the full feature reference.
Optional: Connect a Communication Channel
Once the gateway is running you can reach your local agent from any device. Hermes supports Discord, Telegram, and others
Discord
Discord requires a server where you have administrator access to add a bot. If you share servers but don’t own one, use Telegram instead.
Create a Discord application and bot
Go to the Discord Developer Portal and click New Application. Give it a name (e.g. “hermes-bot”).
In the sidebar, click Bot. Set a username for the bot.
Still on the Bot page, scroll to Privileged Gateway Intents and enable:
Message Content Intent (required)
Server Members Intent (recommended)
Scroll back up and click Reset Token to generate your bot token. Copy it.
Add the bot to your server
In the sidebar, click OAuth2 / URL Generator.
Under Scopes, enable bot and applications.commands.
Right-click your server icon / Privacy Settings / toggle on Direct Messages. This is required for the pairing step.
Configure Hermes for Discord
Add the following to ~/.hermes/.env:
Terminal window
# Required
DISCORD_BOT_TOKEN=your-bot-token
DISCORD_ALLOWED_USERS=your-discord-user-id
Then start the gateway:
Terminal window
hermesgateway
The bot should come online in Discord within a few seconds. Send it a message, either a DM or in a channel it can see.
Telegram
Create a Telegram bot
Open Telegram and message @BotFather.
Send /newbot and follow the prompts. Save the bot token it gives you.
Configure Hermes for Telegram
Add the following to ~/.hermes/.env:
Terminal window
TELEGRAM_BOT_TOKEN=your-bot-token
TELEGRAM_ALLOWED_USERS=your-telegram-user-id# comma-separated for multiple users
Don’t know your Telegram user ID? Message @userinfobot in Telegram, it will reply with your numeric ID.
Then start the gateway:
Terminal window
hermesgateway
Send your bot any message in Telegram to test. You can now chat with your agent via Telegram DM. See the full Telegram setup guide for webhook mode and advanced options.
Next Steps
Now that your agent can receive commands from your phone and act on your local machine, here are three directions worth exploring:
Automated research digest: Schedule Hermes to search the web for topics you care about each morning, summarize the findings with your local model, and push a digest to your phone via Telegram or Discord, all running on your own hardware with no cloud costs.
Code review on demand: Point Hermes at a GitHub repository, ask it to review open pull requests, and have it post comments or a summary back to your chat. With the Docker terminal backend, all git operations run inside the sandbox, keeping your host clean.
Local file assistant: Give Hermes access to a working directory and ask it to organize, rename, summarize, or transform files on demand from your phone. Because the Docker terminal backend confines all writes to the sandbox workspace, accidental destructive operations are contained.
Need help with this playbook?
Run into an issue or have a question? Open a GitHub issue and our team will take a look.