- Automating Workflows with n8n and Local LLMs
- Generating Images with ComfyUI and Z Image Turbo
- Local LLM Coding with VSCode and Qwen3-Coder
- Running and Serving LLMs with LM Studio
- Running LLMs on PyTorch with AMD ROCm™ Software
- Build a GitHub-to-Slack Development Digest with Agent Canvas
- Building Custom GPU Kernels with PyTorch and AMD ROCm™
- Building Your First Agent with GAIA
- Chatting with LLMs in Open WebUI
- Clustering Four Ryzen™ AI Halos with RCCL
- Clustering Four Ryzen™ AI Halos with RPC
- Clustering Two Ryzen™ AI Halos with RCCL
- Clustering Two Ryzen™ AI Halos with RPC
- Fine-Tuning LLMs with LLaMA Factory
- Fine-Tuning LLMs with PyTorch and AMD ROCm™ Software
- Fine-Tuning LLMs with Unsloth
- Getting Started with Lemonade
- Getting Started with Ollama
- Getting Started with OpenHands and a Local LLM
- Getting Started with vLLM
- Local Computer Vision with AMD Ryzen™ AI NPU
- Real-Time Speech-to-Speech Translation
- Remote Development with AMD Sync
- Running DeepSeek V4 Flash with ds4
- Running Hermes Agent Locally with Lemonade Server
- Running OpenClaw Locally with Lemonade Server
| Lemonade | 11.8 |
| Node.js | Latest |
| Agent Canvas | 1.10.0 |
| Lemonade | 11.7 |
| Agent Canvas | 1.10.0 |
| Lemonade | Latest |
| Node.js | Latest |
| Agent Canvas | Latest |
| Lemonade | Latest |
| Agent Canvas | Latest |
| Lemonade | Latest |
| Node.js | Latest |
| Agent Canvas | Latest |
| Lemonade | Latest |
| Agent Canvas | Latest |
| Lemonade | Latest |
| Node.js | Latest |
| Agent Canvas | Latest |
| Lemonade | Latest |
| Agent Canvas | Latest |
| Lemonade | Latest |
| Node.js | Latest |
| Lemonade | Latest |
| Lemonade | Latest |
| Node.js | Latest |
| Lemonade | Latest |
| Lemonade | Latest |
| Node.js | Latest |
| Lemonade | Latest |
- Overview
- What You’ll Learn
- Core Concepts
- Setting the Memory Configuration
- Check for Software Updates
- Prerequisites
- Variables Used in This Playbook
- 1. Start Lemonade Server
- 2. Verify the Local Model
- 3. Start Agent Canvas
- 4. Configure the Local LLM in the UI
- 5. Install GitHub and Slack MCP Servers
- 6. Create the Digest Automation
- 7. Test the Automation
- Troubleshooting
- Next Steps
- Resources
Build a GitHub-to-Slack Development Digest with Agent Canvas
Configure Agent Canvas, GitHub MCP, Slack MCP, and a scheduled OpenHands automation that posts a local-LLM digest.
Overview
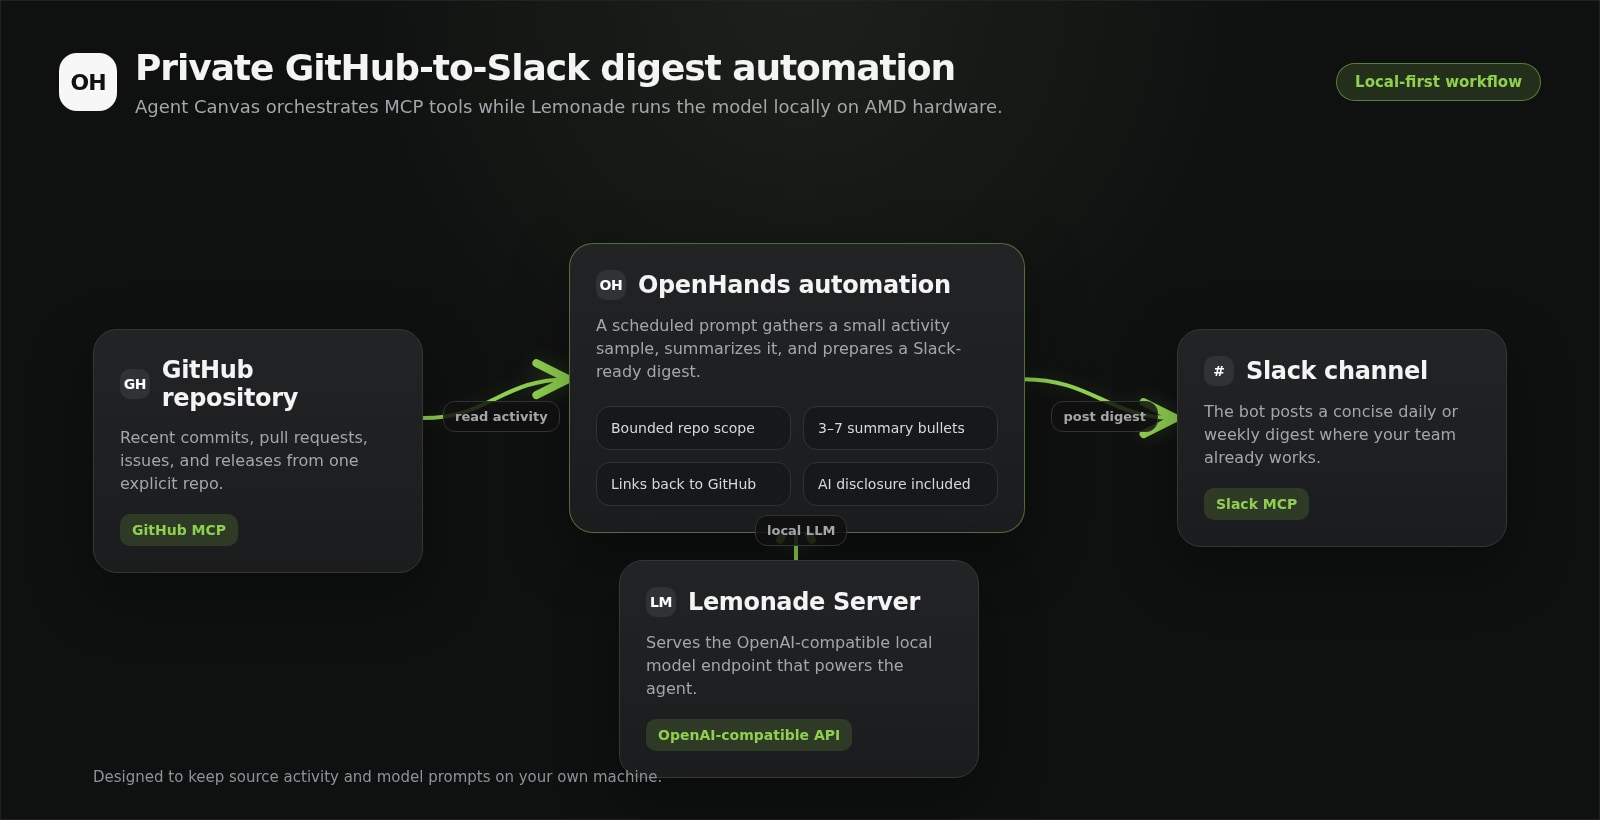
Developers spend a lot of time on small recurring loops: reviewing labeled pull requests, answering GitHub comments, triaging new issues, turning Slack threads into standup notes or incident follow-ups, and tracking release or research signals. Each loop is familiar, but it still requires judgment: gather the right context, decide what matters, and post a clear update where the team already works.
OpenHands automations turn those loops into scheduled or event-triggered agent conversations: runs where an AI software agent can read context, call tools, and produce an update. The shared automation templates in the OpenHands extensions catalog follow this pattern for GitHub pull request review, repository monitoring, Linear issue triage, incident retrospectives, Slack standup digests, and research briefs: an automation wakes up, uses configured integrations such as GitHub or Slack to fetch context, reasons over that context with a large language model (LLM), and writes back a result.
Agent Canvas is the local control plane for building and testing those automations. In this playbook it runs an OpenHands Agent Server, the backend process that executes agent conversations, and connects the agent to external services such as GitHub and Slack.
To keep the workflow on your AMD system, the agent talks to a local model served by Lemonade Server. Lemonade exposes that model through an OpenAI-compatible API, so Agent Canvas can configure it like a remote OpenAI-style endpoint while the model, prompt, and workflow context stay local.
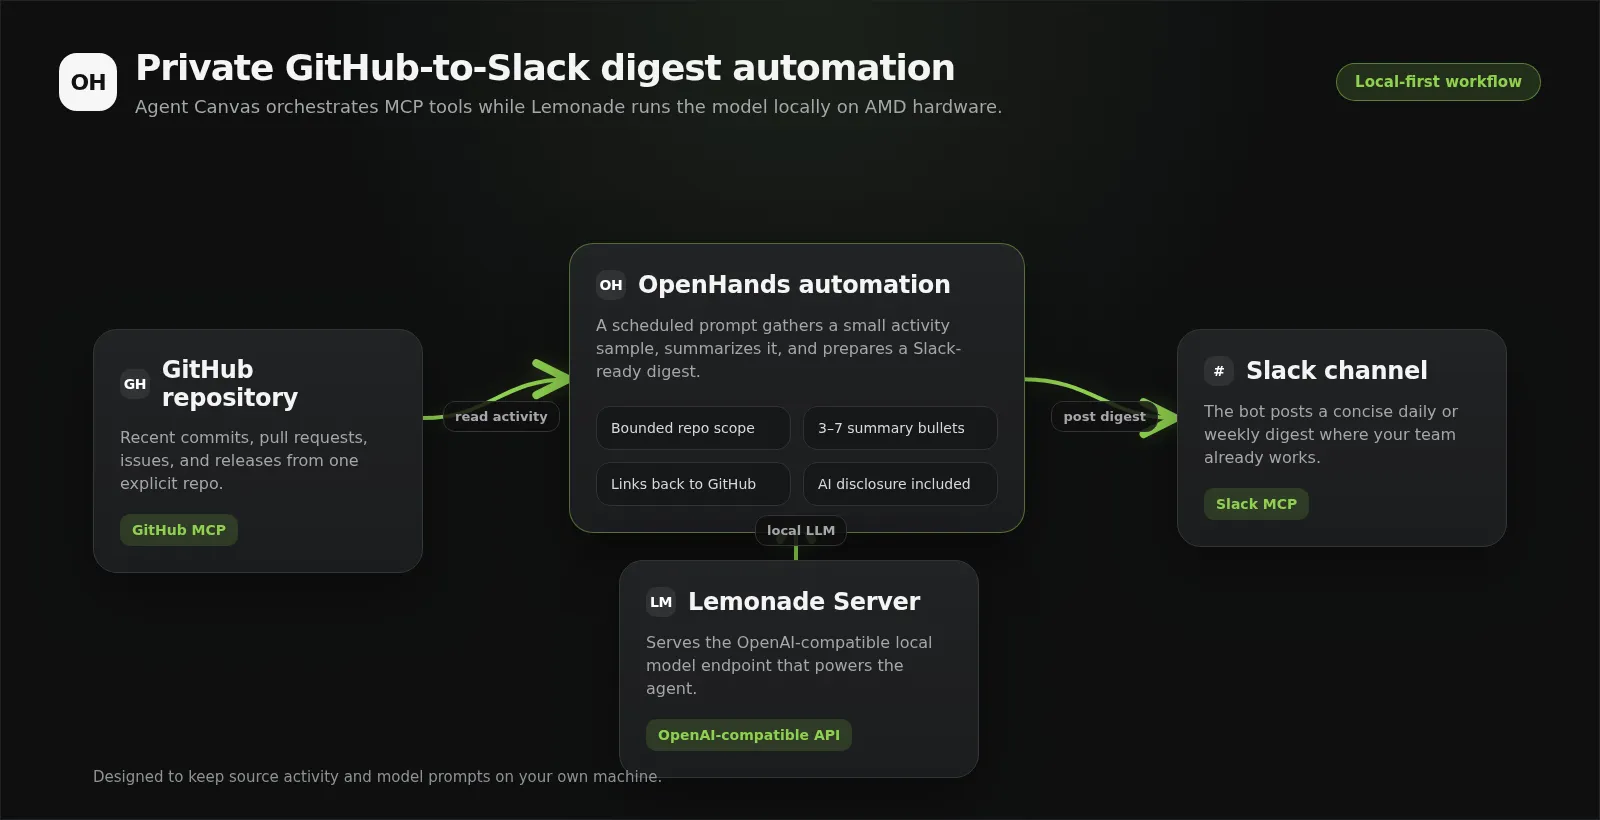
In this playbook, you will build one concrete automation: a scheduled GitHub-to-Slack development digest. It uses GitHub to inspect recent repository activity, Slack to post the digest, Agent Canvas API calls to configure and test the automation, and Lemonade to run the LLM locally.
What You’ll Learn
- How to start Lemonade Server and verify a local model answers chat requests
- How to launch Agent Canvas and point its Agent Server at a local LLM
- How to install GitHub and Slack Model Context Protocol (MCP) servers through the Agent Server API
- How to create and dispatch a scheduled OpenHands automation that posts a development digest to Slack
- How to troubleshoot the most common local-model and automation failures
Core Concepts
| Concept | What it is | Where it fits in this playbook |
|---|---|---|
| Lemonade Server | A local LLM serving platform built for AMD hardware that exposes an OpenAI-compatible API. Your data never leaves your machine. | Runs the model that powers the agent. |
| OpenHands Agent Server | The backend process that executes OpenHands agent conversations. | Hosts the agent, its LLM profile, and its MCP servers. |
| Agent Canvas | The local control plane for OpenHands that runs Agent Server and a UI for inspecting agent runs. | Launches the backends and provides the API you call. |
| MCP server | A Model Context Protocol server that gives an agent tools for an external service such as GitHub or Slack. | Lets the agent read GitHub and write to Slack. |
| OpenHands automation | A scheduled or event-triggered agent conversation that fetches context, reasons over it, and writes a result somewhere. | The GitHub-to-Slack digest you build here. |
Setting the Memory Configuration
For the Ryzen AI Halo, the dedicated GPU memory defaults to 64GB, which is sufficient for most workloads. For larger models or longer contexts, increasing this may help. To adjust, open AMD Software: Adrenalin Edition™ and navigate to Performance → Tuning → AMD Variable Graphics Memory. Reboot for the changes to take effect.
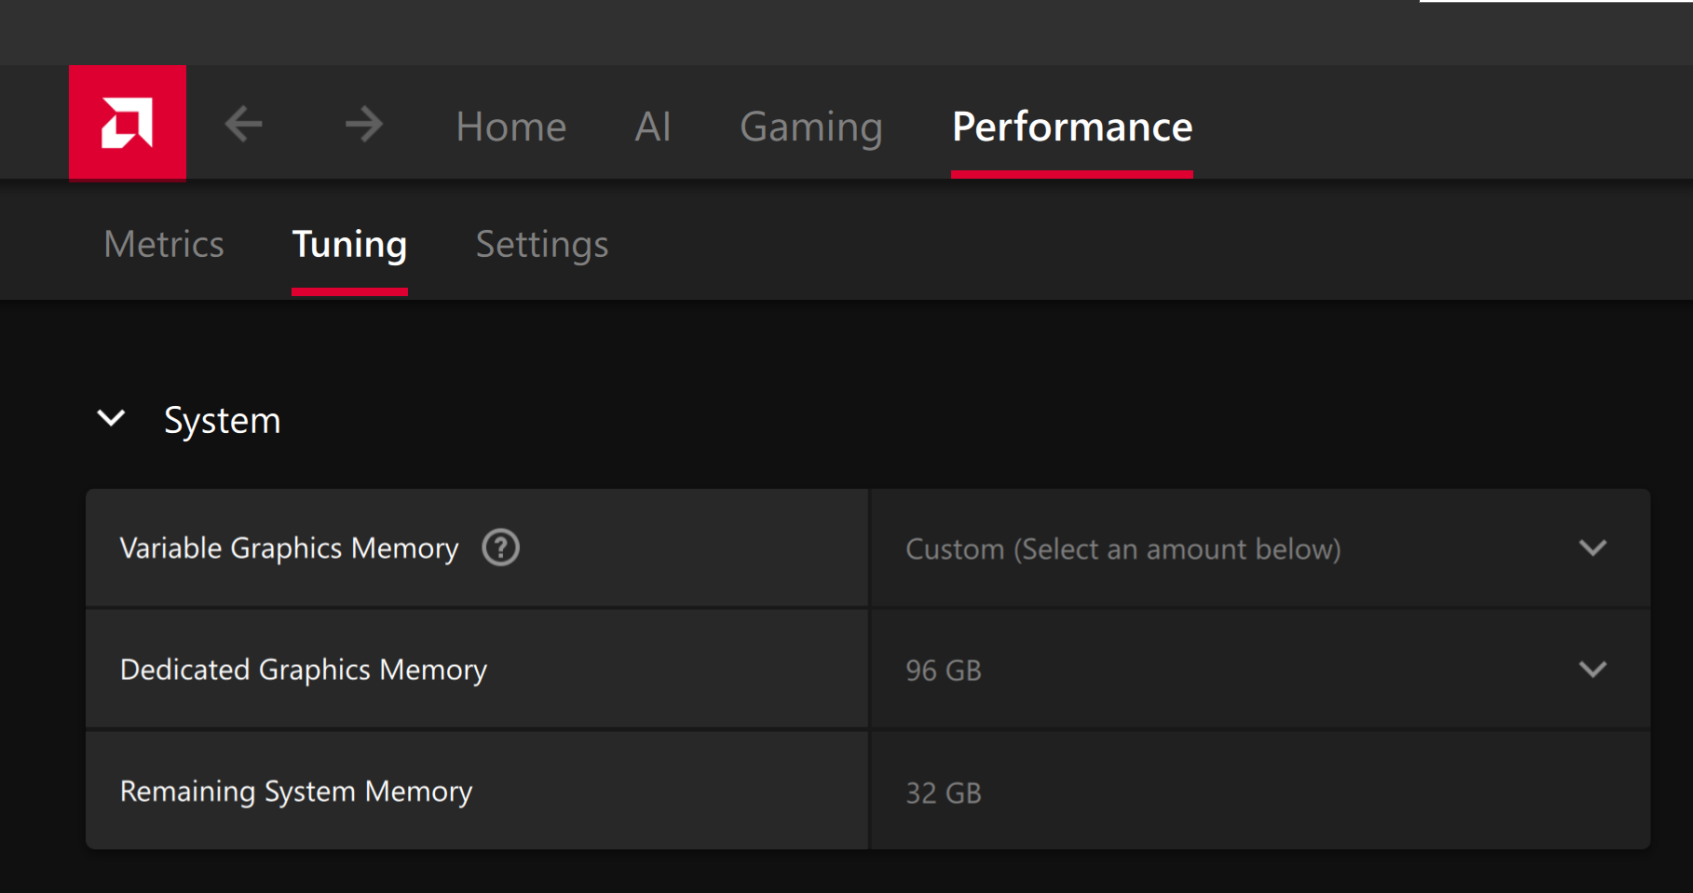
To change the dedicated GPU memory value, open AMD Software: Adrenalin Edition™ and navigate to Performance → Tuning → AMD Variable Graphics Memory. Reboot for the changes to take effect.
On Linux, to run larger models, increase the shared memory pool available to the GPU. This might involve setting the BIOS dedicated GPU memory to the minimum, so that the shared memory pool can be maximized.
For the AMD Ryzen™ AI Halo, to modify the default setting, open the AMD Ryzen™ AI Developer Center and go to the Settings tab. Under Graphics Performance Settings, increase the Shared Video Memory slider, then click Apply Changes and reboot for the changes to take effect.
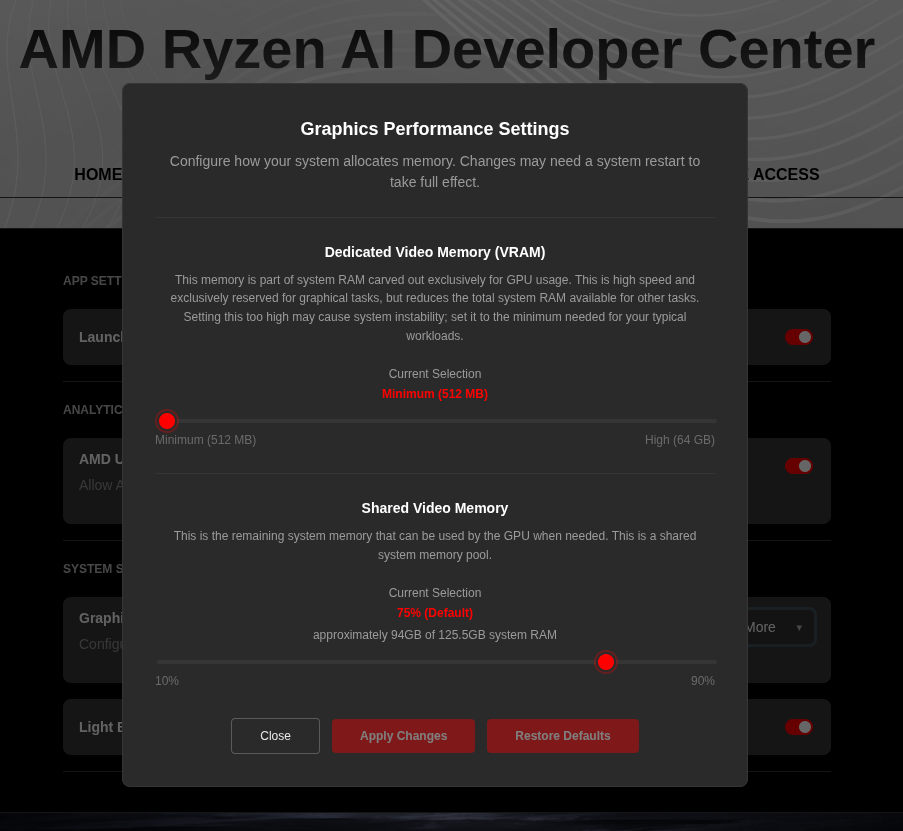
Increase the shared memory pool by changing the kernel’s Translation Table Manager (TTM) page setting. AMD recommends setting the minimum dedicated VRAM in the BIOS (0.5 GB) so the maximum amount is available as shared memory.
- Install the
pipxutility and add the path for pipx-installed wheels to the system search path:
sudo apt install pipxpipx ensurepath- Install the
amd-debug-toolswheel from PyPI:
pipx install amd-debug-tools- Query the current shared memory settings:
amd-ttm- Increase the shared memory allocation (units in GB):
amd-ttm --set <NUM>- Reboot for the changes to take effect.
Check for Software Updates
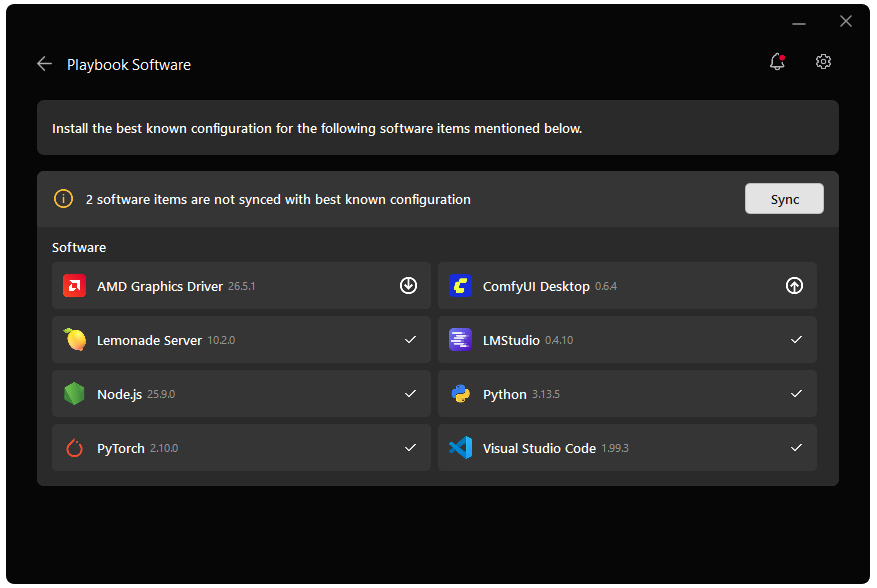
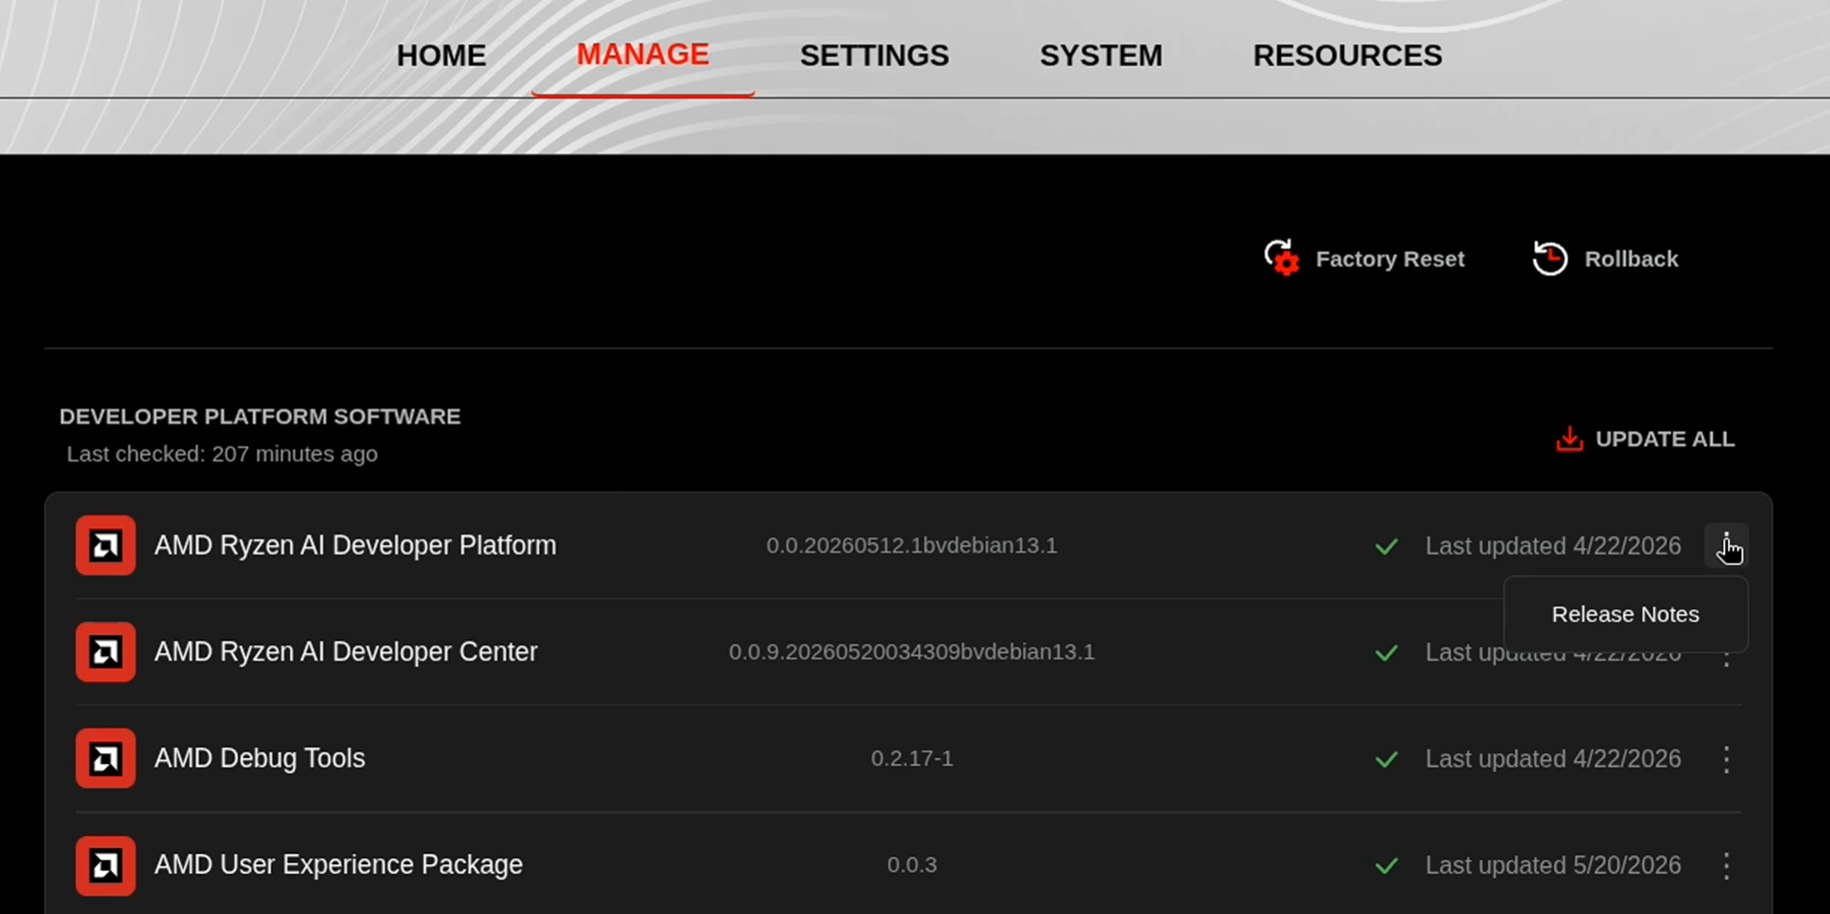
Before starting, ensure your Ryzen AI Halo has the latest software installed. Open the AMD Ryzen™ AI Developer Center and check for available updates, both to the app itself and additional software.
Go to the Updates tab. If updates are available, install them and reboot before continuing.
Go to the Manage tab. If updates are available, install them and reboot before continuing.
Prerequisites
Lemonade
Installing Lemonade
Download the latest installer from lemonade-server.ai and run the .msi file.
After installation:
- The
lemonadeCLI is added to your system PATH automatically - Lemonade server is expected to run in the background automatically
You can also install silently from the command line:
msiexec /i lemonade-server-minimal.msi /qnUbuntu:
sudo add-apt-repository ppa:lemonade-team/stablesudo apt install lemonade-serverArch Linux (AUR):
yay -S lemonade-serverFor other distributions or to install from source, see the full installation options.
Verifying Lemonade Installation
Open a terminal and run:
lemonade --versionYou should see output like:
lemonade version x.y.zIf you see a version number, Lemonade is installed correctly and ready to go.
For quick reference, here are common Lemonade CLI commands:
| Command | What it does |
|---|---|
lemonade --help | Shows all available commands and flags. |
lemonade --version | Prints the installed Lemonade version. |
lemonade status | Confirms whether the Lemonade server is running and reachable. The default OpenAI-compatible API base URL is http://localhost:13305/api/v1. |
lemonade list | Lists models available to your Lemonade setup. |
lemonade pull <MODEL_NAME> | Downloads a model without launching it. |
lemonade run <MODEL_NAME> | Downloads the model if needed, then starts it for inference/chat. |
lemonade run <MODEL_NAME> --llamacpp rocm | Starts a llama.cpp model with the ROCm backend. |
lemonade run <MODEL_NAME> --llamacpp vulkan | Starts a llama.cpp model with the Vulkan backend. |
lemonade config | Displays the current Lemonade configuration values. |
lemonade config set llamacpp.backend=rocm | Sets the default llama.cpp backend to ROCm. |
For the latest Lemonade server options or troubleshooting, please refer to the official Lemonade documentation.
Node.js
- Download the Windows 64-bit Installer from nodejs.org
- Run the installer and follow the prompts
- Verify installation:
node --versionnpm --versioncurl -o- https://raw.githubusercontent.com/Homebrew/install/HEAD/install.sh | bash
# Download and install Node.js:brew install node@22
# Verify the Node.js version:node -v # Should print "v22.22.1".
# Verify npm version:npm -v # Should print "10.9.4".Lemonade
Installing Lemonade
Download the latest installer from lemonade-server.ai and run the .msi file.
After installation:
- The
lemonadeCLI is added to your system PATH automatically - Lemonade server is expected to run in the background automatically
You can also install silently from the command line:
msiexec /i lemonade-server-minimal.msi /qnUbuntu:
sudo add-apt-repository ppa:lemonade-team/stablesudo apt install lemonade-serverArch Linux (AUR):
yay -S lemonade-serverFor other distributions or to install from source, see the full installation options.
Verifying Lemonade Installation
Open a terminal and run:
lemonade --versionYou should see output like:
lemonade version x.y.zIf you see a version number, Lemonade is installed correctly and ready to go.
For quick reference, here are common Lemonade CLI commands:
| Command | What it does |
|---|---|
lemonade --help | Shows all available commands and flags. |
lemonade --version | Prints the installed Lemonade version. |
lemonade status | Confirms whether the Lemonade server is running and reachable. The default OpenAI-compatible API base URL is http://localhost:13305/api/v1. |
lemonade list | Lists models available to your Lemonade setup. |
lemonade pull <MODEL_NAME> | Downloads a model without launching it. |
lemonade run <MODEL_NAME> | Downloads the model if needed, then starts it for inference/chat. |
lemonade run <MODEL_NAME> --llamacpp rocm | Starts a llama.cpp model with the ROCm backend. |
lemonade run <MODEL_NAME> --llamacpp vulkan | Starts a llama.cpp model with the Vulkan backend. |
lemonade config | Displays the current Lemonade configuration values. |
lemonade config set llamacpp.backend=rocm | Sets the default llama.cpp backend to ROCm. |
For the latest Lemonade server options or troubleshooting, please refer to the official Lemonade documentation.
You need:
- Lemonade Server installed by following the standard Lemonade installation guide.
- Node.js 22.12 or later and
npm, used to install the published Agent Canvas CLI and run MCP servers withnpx. uv, the Python package manager Agent Canvas uses to build the Agent Server environment. If it is not already installed, install it from the uv installation guide.- A recent published
@openhands/agent-canvaspackage with schema-driven agent settings,LLMSummarizingCondenserSettings.max_tokens, and LLMcustom_tokenizersupport. - The Python
transformerspackage available in the Agent Server environment. It is required for chat-template token counting whencustom_tokenizeris set.
- Docker Desktop for Windows, installed and running. On Windows, the Agent Canvas stack runs from the published Docker image, which bundles Node.js,
uv,transformers, and the@openhands/agent-canvaspackage, so you do not install those on the host.
- A GitHub token with read access to the repository you want summarized.
- A Slack bot token (
xoxb-...) withchat:writeand channel read access. - A Slack team ID (
T...). - A Slack channel ID (
C...) where the digest should be posted.
Invite the Slack app to the target channel before testing the automation.
Variables Used in This Playbook
export LEMONADE_BASE_URL="http://127.0.0.1:13305/api/v1"export LEMONADE_MODEL="Qwen3.6-35B-A3B-GGUF"$env:LEMONADE_BASE_URL = "http://127.0.0.1:13305/api/v1"$env:LEMONADE_MODEL = "Qwen3.6-35B-A3B-GGUF"These two variables are used by the verification commands below. The model, tokenizer, and other LLM settings are entered directly in the Agent Canvas UI in later steps, so their literal values are shown inline where you need them.
The following values are entered into the Agent Canvas UI in later steps. Set them here so you can copy them in:
export GITHUB_REPO_FILTER="your-org/your-repo"export SLACK_DIGEST_CHANNEL="C0123456789"export DIGEST_TIMEZONE="America/New_York"$env:GITHUB_REPO_FILTER = "your-org/your-repo"$env:SLACK_DIGEST_CHANNEL = "C0123456789"$env:DIGEST_TIMEZONE = "America/New_York"Use an explicit owner/repo value for GITHUB_REPO_FILTER.
Broad organization wildcards can return too much MCP context for local models.
1. Start Lemonade Server
Start the model from the Lemonade CLI:
lemonade config set llamacpp.backend=vulkanlemonade config set ctx_size=65536lemonade run "${LEMONADE_MODEL}"lemonade config set llamacpp.backend=vulkanlemonade config set ctx_size=65536lemonade run "$env:LEMONADE_MODEL"Choose a model that fits your hardware.
Qwen3.6-35B-A3B-GGUF(~20 GB) is a strong model for this workflow but needs a large memory pool. If your device has limited memory or GPU VRAM, pick a smaller GGUF model from the Lemonade model library and use that model ID (and its matching tokenizer) throughout this playbook.
Lemonade exposes an OpenAI-compatible API at:
http://127.0.0.1:13305/api/v1Optional: if Agent Canvas or the automation runner is not on the same machine, publish the Lemonade endpoint through a secure tunnel and use the HTTPS URL as the LLM base URL.
ngrok exposes a local port to the internet over a secure HTTPS URL; it requires a free ngrok account, and you replace YOUR_NGROK_DOMAIN.ngrok-free.dev with your own reserved domain:
ngrok http 13305 --url YOUR_NGROK_DOMAIN.ngrok-free.dev2. Verify the Local Model
Confirm Lemonade can serve the selected model:
curl -s "${LEMONADE_BASE_URL}/models" | python3 -m json.toolThen send a small chat request:
curl -sS "${LEMONADE_BASE_URL}/chat/completions" \ -H "Content-Type: application/json" \ -d '{ "model": "'"${LEMONADE_MODEL}"'", "messages": [ {"role": "user", "content": "Reply with exactly: OK"} ], "temperature": 0, "max_tokens": 64 }' | python3 -m json.toolcurl.exe -s "$env:LEMONADE_BASE_URL/models"Then send a small chat request:
$body = @{ model = "$env:LEMONADE_MODEL" messages = @(@{ role = "user"; content = "Reply with exactly: OK" }) temperature = 0 max_tokens = 64} | ConvertTo-Json -Depth 5curl.exe -sS "$env:LEMONADE_BASE_URL/chat/completions" -H "Content-Type: application/json" -d $bodyIf this returns a choices array, Lemonade is ready for Agent Canvas.
3. Start Agent Canvas
Install the published Agent Canvas package and start the full stack:
npm install -g @openhands/agent-canvasagent-canvasIf the global npm install fails with a permissions error, see the npm permissions troubleshooting entry below.
By default, Agent Canvas starts on http://localhost:8000.
Open that URL in your browser.
The port is not special—if 8000 is already in use, pass any free port with --port (or -p).
The default local backend should show as healthy on the home screen.
The agent-canvas command starts the agent server, the automation backend, and the web frontend together.
You only need this one command to run OpenHands locally.
The rest of this playbook configures everything through the Agent Canvas UI in your browser.
On Windows, run the published Agent Canvas container image with Docker Desktop.
The image bundles the Agent Server, automation backend, and web frontend, so you do not install Node.js, uv, or the CLI on the host.
First, create the config and workspace folders the container mounts:
$env:PROJECTS_PATH = Join-Path $HOME "projects"New-Item -ItemType Directory -Force -Path $env:PROJECTS_PATH, (Join-Path $env:USERPROFILE ".openhands") | Out-NullPull the published image (about 6 GB; it is public, so no login is required):
docker pull ghcr.io/openhands/agent-canvas:1.14.0Then start the stack:
docker run -it --rm ` -p 8000:8000 ` -v "$($env:USERPROFILE)\.openhands:/home/openhands/.openhands" ` -v "$($env:PROJECTS_PATH):/projects" ` ghcr.io/openhands/agent-canvas:1.14.0Open http://localhost:8000/canvas in your browser.
If port 8000 is already in use, map a different host port, for example -p 8080:8000, and open http://localhost:8080/canvas instead.
The .openhands mount persists your LLM profile, MCP servers, and automations across container restarts.
The rest of this playbook configures everything through the Agent Canvas UI in your browser at http://localhost:8000/canvas.
4. Configure the Local LLM in the UI
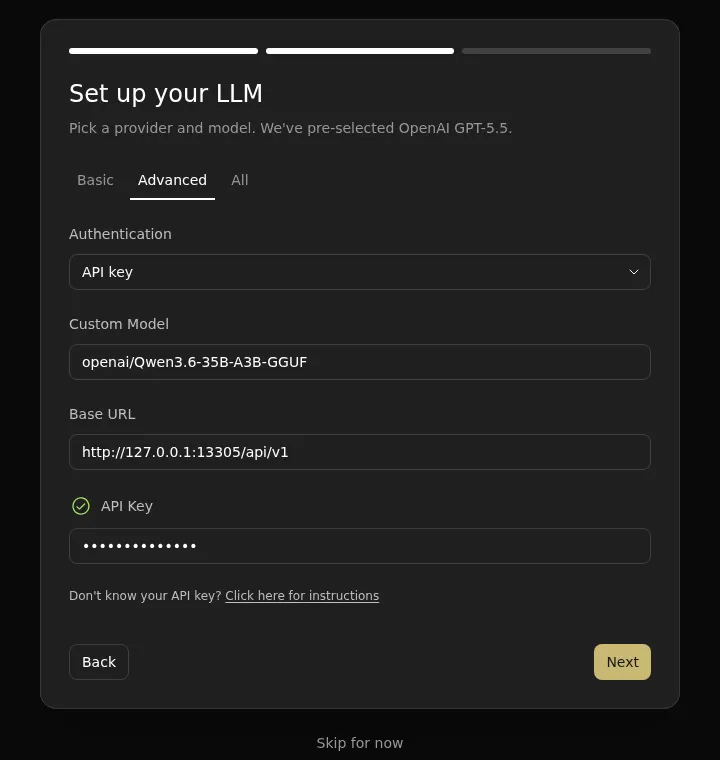
On first launch, Agent Canvas opens an onboarding flow. In that flow:
- Keep OpenHands selected as the agent and click Next.
- On Set up your LLM, select Advanced.
- Keep Authentication set to API key.
- Set Custom Model to
openai/Qwen3.6-35B-A3B-GGUF. - Set Base URL to
http://127.0.0.1:13305/api/v1. - For API Key, enter any non-empty placeholder such as
lemonade-local. Lemonade does not require a real key, but the OpenHands client needs a value to send.
Windows (Docker): the Agent Server runs inside the container, so set Base URL to
http://host.docker.internal:13305/api/v1instead ofhttp://127.0.0.1:13305/api/v1. From inside the container,127.0.0.1is the container itself;host.docker.internalreaches Lemonade running on the Windows host, and Docker Desktop provides that hostname automatically.
The connection fields should look like this. The API key field is masked by the UI.
Then select All and set the extra local-model fields:
- Scroll to Custom Tokenizer and set it to
Qwen/Qwen3.6-35B-A3B. - Scroll to LiteLLM Extra Body and set it to
{"enable_thinking": true}. - Click Next.
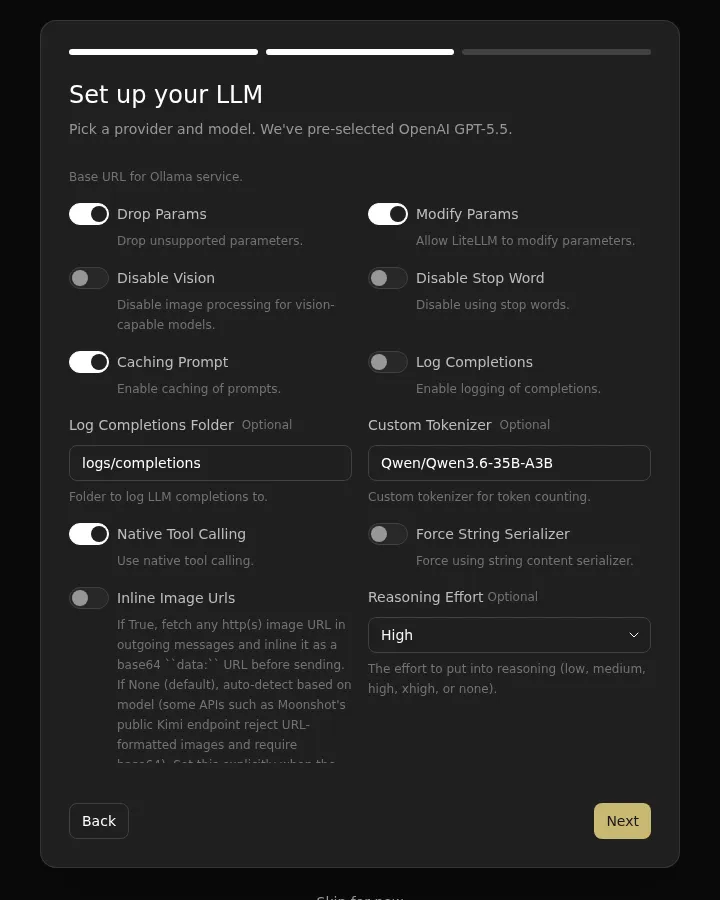
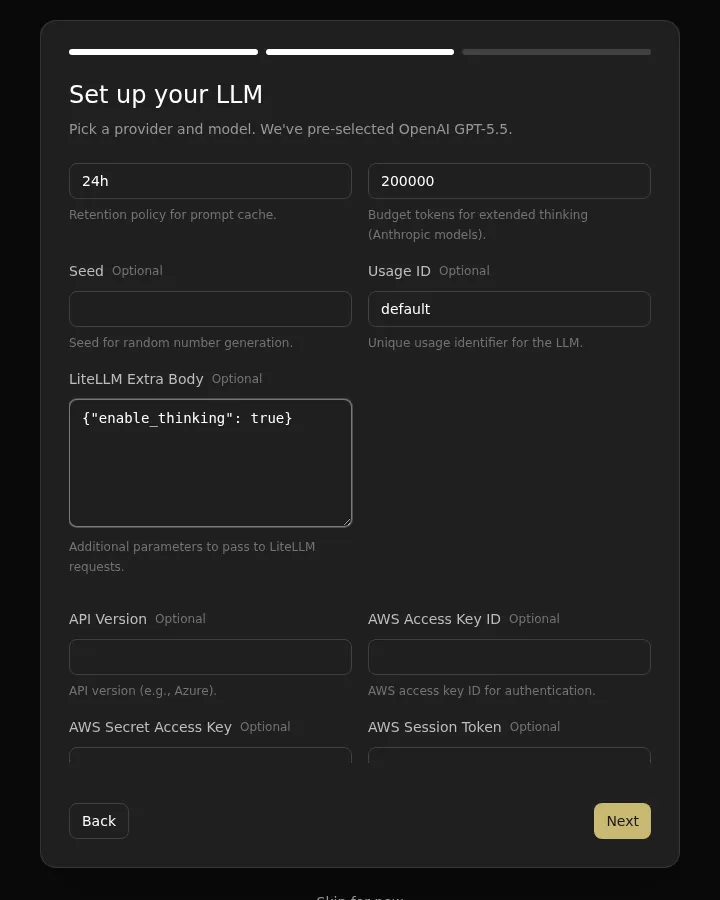
The LLM settings should show:
| Field | Value |
|---|---|
| Custom Model | openai/Qwen3.6-35B-A3B-GGUF |
| Base URL | http://127.0.0.1:13305/api/v1 |
| Custom tokenizer | Qwen/Qwen3.6-35B-A3B |
| LiteLLM extra body | {"enable_thinking": true} |
The openai/ prefix tells LiteLLM to use OpenAI-compatible request formatting against the Lemonade endpoint.
The custom tokenizer is the original Hugging Face tokenizer for the GGUF model; it lets OpenHands count the same chat-template tokens that the local model server sees.
The current first-use LLM form does not show condenser settings.
If your Agent Canvas build exposes condenser settings later under Settings > LLM, use llm_summarizing and set max tokens below the Lemonade context window, such as 56000.
5. Install GitHub and Slack MCP Servers
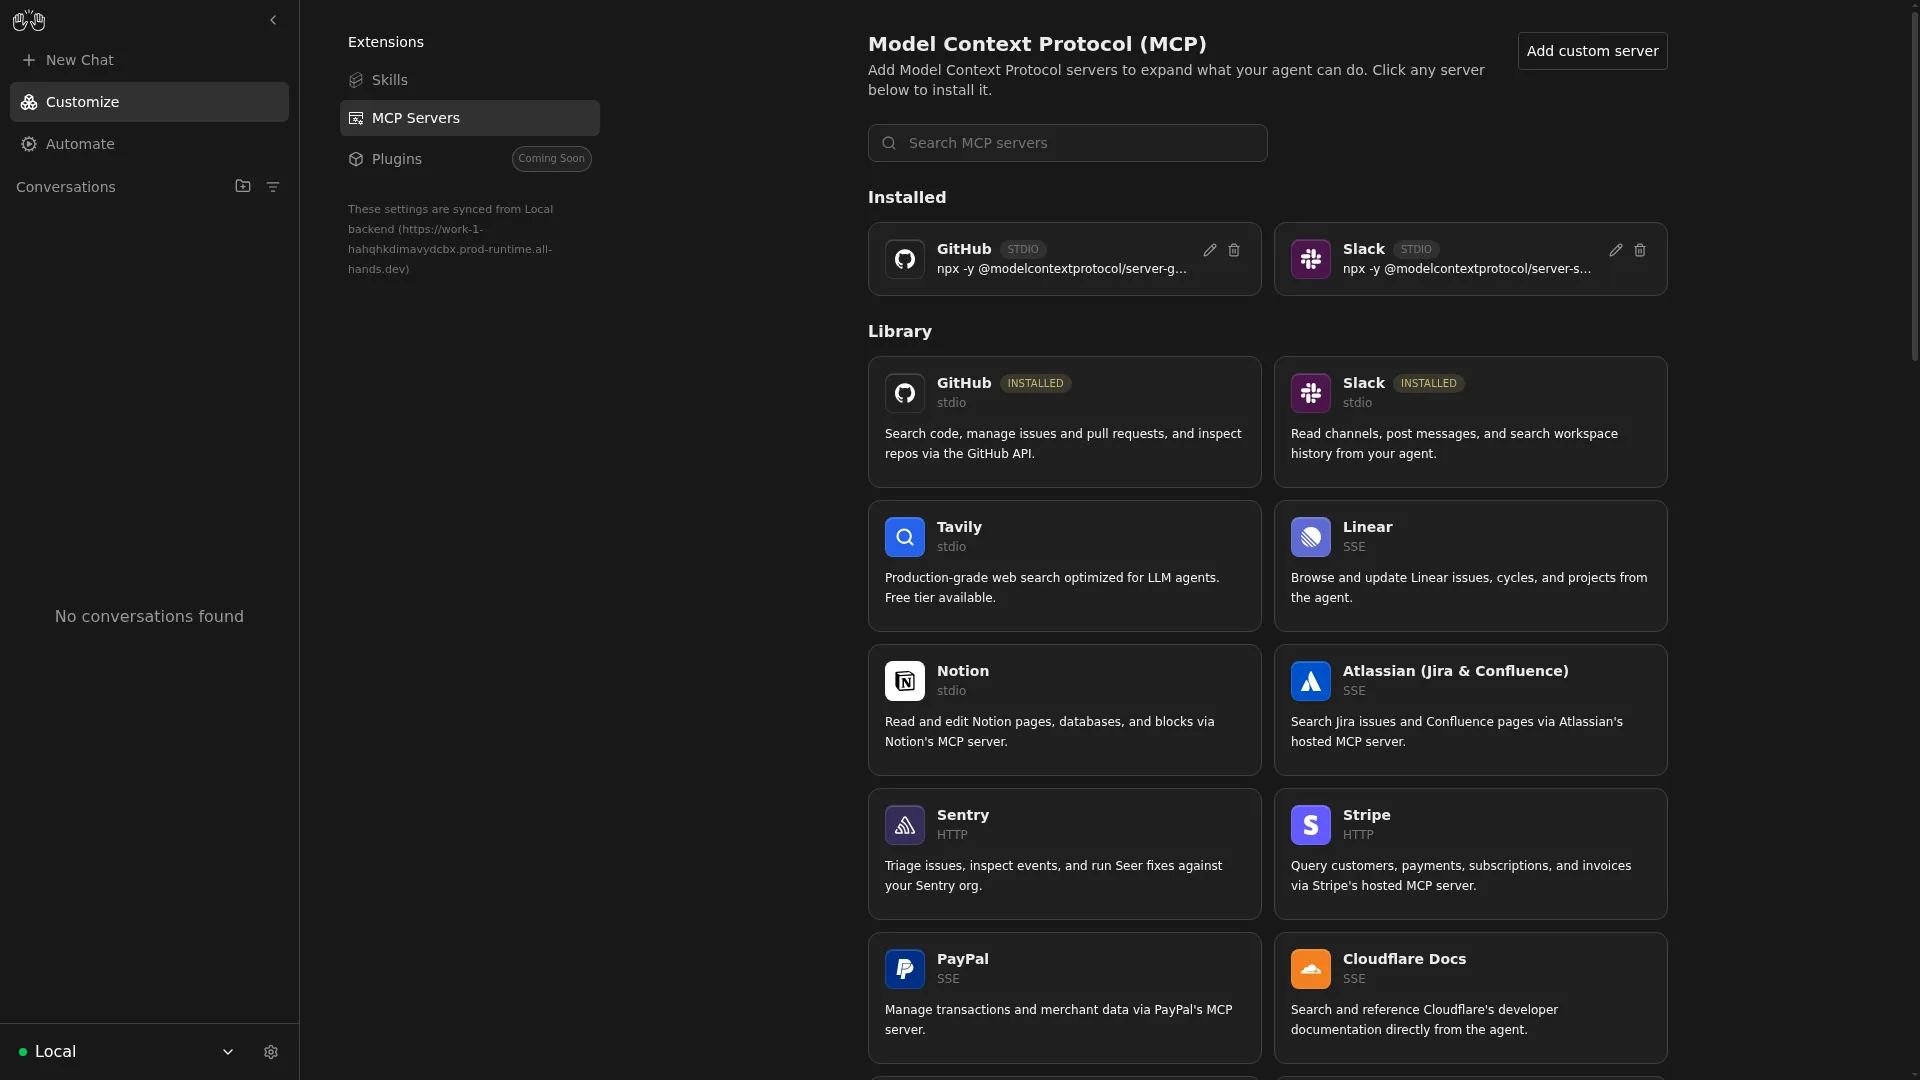
In the Agent Canvas UI, open Customize (or Settings > MCP) to add the MCP servers that give the agent tools for GitHub and Slack. Token values are sent only to your local Agent Server and are persisted as encrypted settings.
Windows (Docker): the
npxMCP server commands below run inside the container, which already includes Node.js, so nothing extra is installed on the host. Because.openhandsis mounted, the MCP servers and their tokens persist across container restarts.
GitHub MCP server
Add a new MCP server with these settings:
| Field | Value |
|---|---|
| Name | github |
| Command | npx |
| Args | -y @modelcontextprotocol/server-github |
| Env | GITHUB_PERSONAL_ACCESS_TOKEN = your GitHub token |
Use a GitHub token with read access to the repository you want summarized.
Slack MCP server
Add a second MCP server with these settings:
| Field | Value |
|---|---|
| Name | slack |
| Command | npx |
| Args | -y @modelcontextprotocol/server-slack |
| Env | SLACK_BOT_TOKEN = xoxb-... |
| Env | SLACK_TEAM_ID = T0123456789 |
| Env | SLACK_CHANNEL_IDS = your digest channel ID |
Set SLACK_CHANNEL_IDS to the digest channel ID (the same value as SLACK_DIGEST_CHANNEL) so the agent does not need to page through every Slack channel.
After adding both servers, use the Test button on each one to confirm it connects and advertises tools. The GitHub server should list GitHub tools, and the Slack server should list Slack tools.
6. Create the Digest Automation
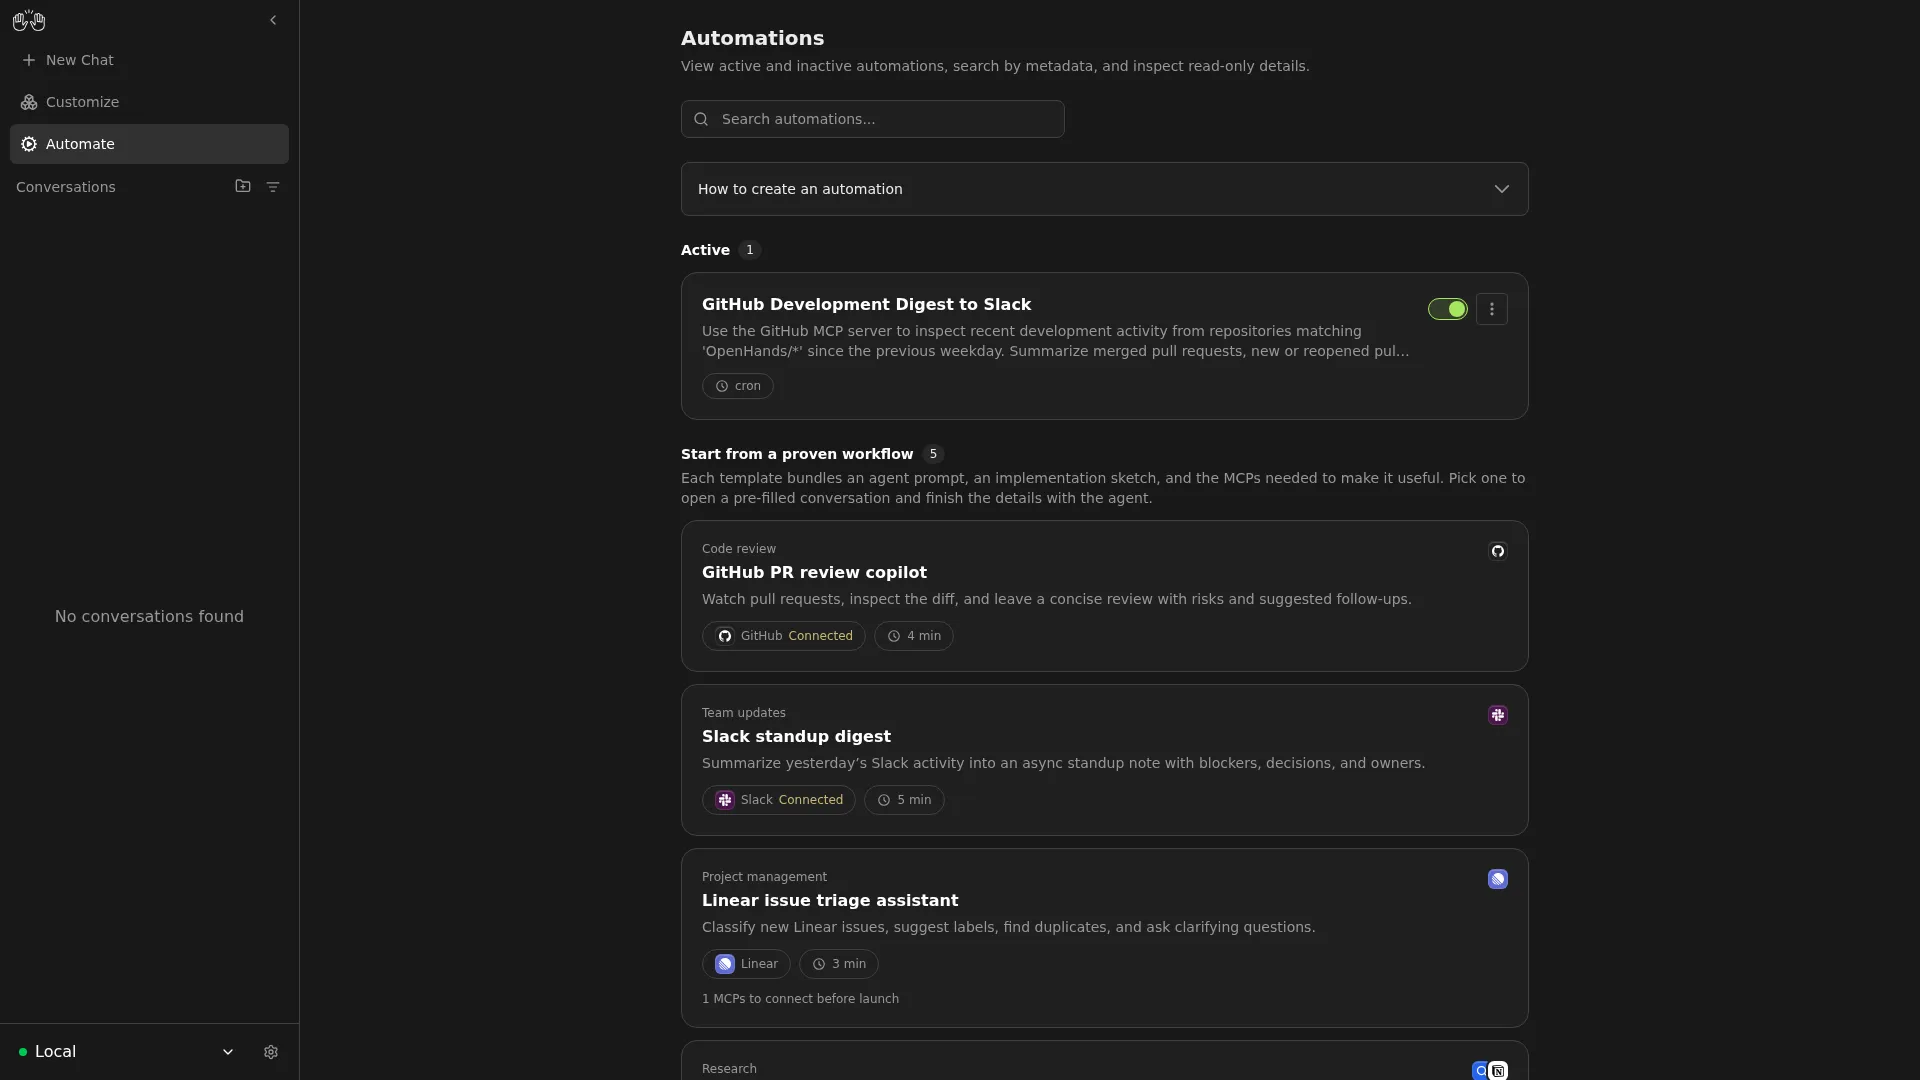
In the Agent Canvas UI, open the Automations page and create a new automation:
- Choose Create automation and select the Prompt preset type.
- Set the Name to
GitHub Development Digest to Slack. - Set the Prompt to the following text, replacing the repository and channel placeholders with your values:
Use the GitHub MCP server for exactly one repository: your-org/your-repo.Inspect recent development activity since the previous weekday, includingmerged pull requests, newly opened or reopened pull requests, notablecommits pushed to main or release branches, new issues, important issueupdates, releases, risks, blockers, and review requests. Keep GitHublookups small: inspect the latest 3 to 5 commits, pull requests, issues,and releases. Use the Slack MCP server to post directly to channel IDC0123456789. Keep the Slack message concise: title with date range, 3 to 7bullets, links back to GitHub, and a Needs attention section only ifneeded. End with: This digest was generated by an AI agent (OpenHands) onbehalf of the user. Do not include secrets, raw tokens, privateenvironment variables, or unrelated Slack messages.- Set the Trigger to Cron with the schedule
0 9 * * 1-5(9 AM on weekdays) and set the Timezone to your timezone, for exampleAmerica/New_York. - Set the Timeout to
900seconds. - Save the automation.
The automation detail page shows the new automation with its cron trigger and the generated prompt-preset entrypoint.
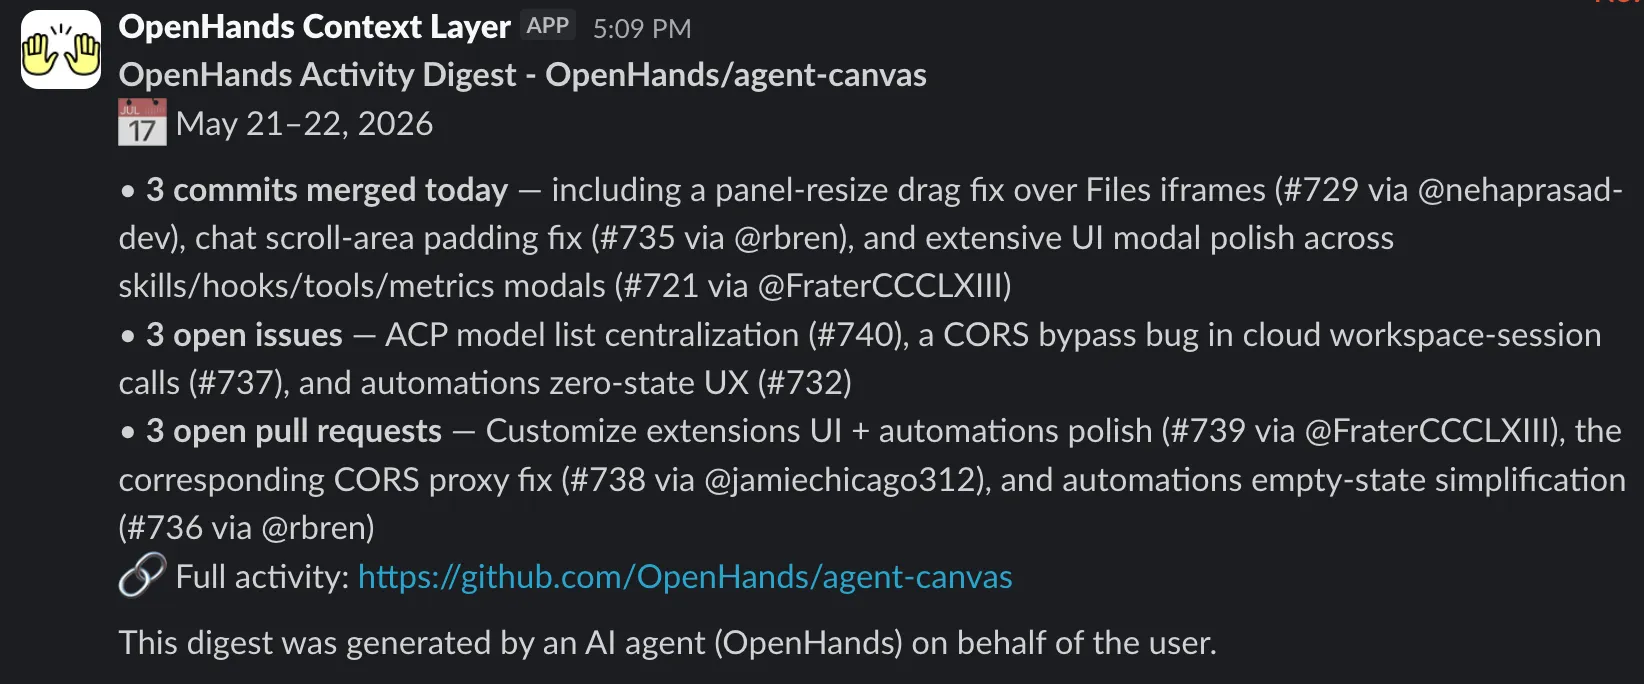
7. Test the Automation
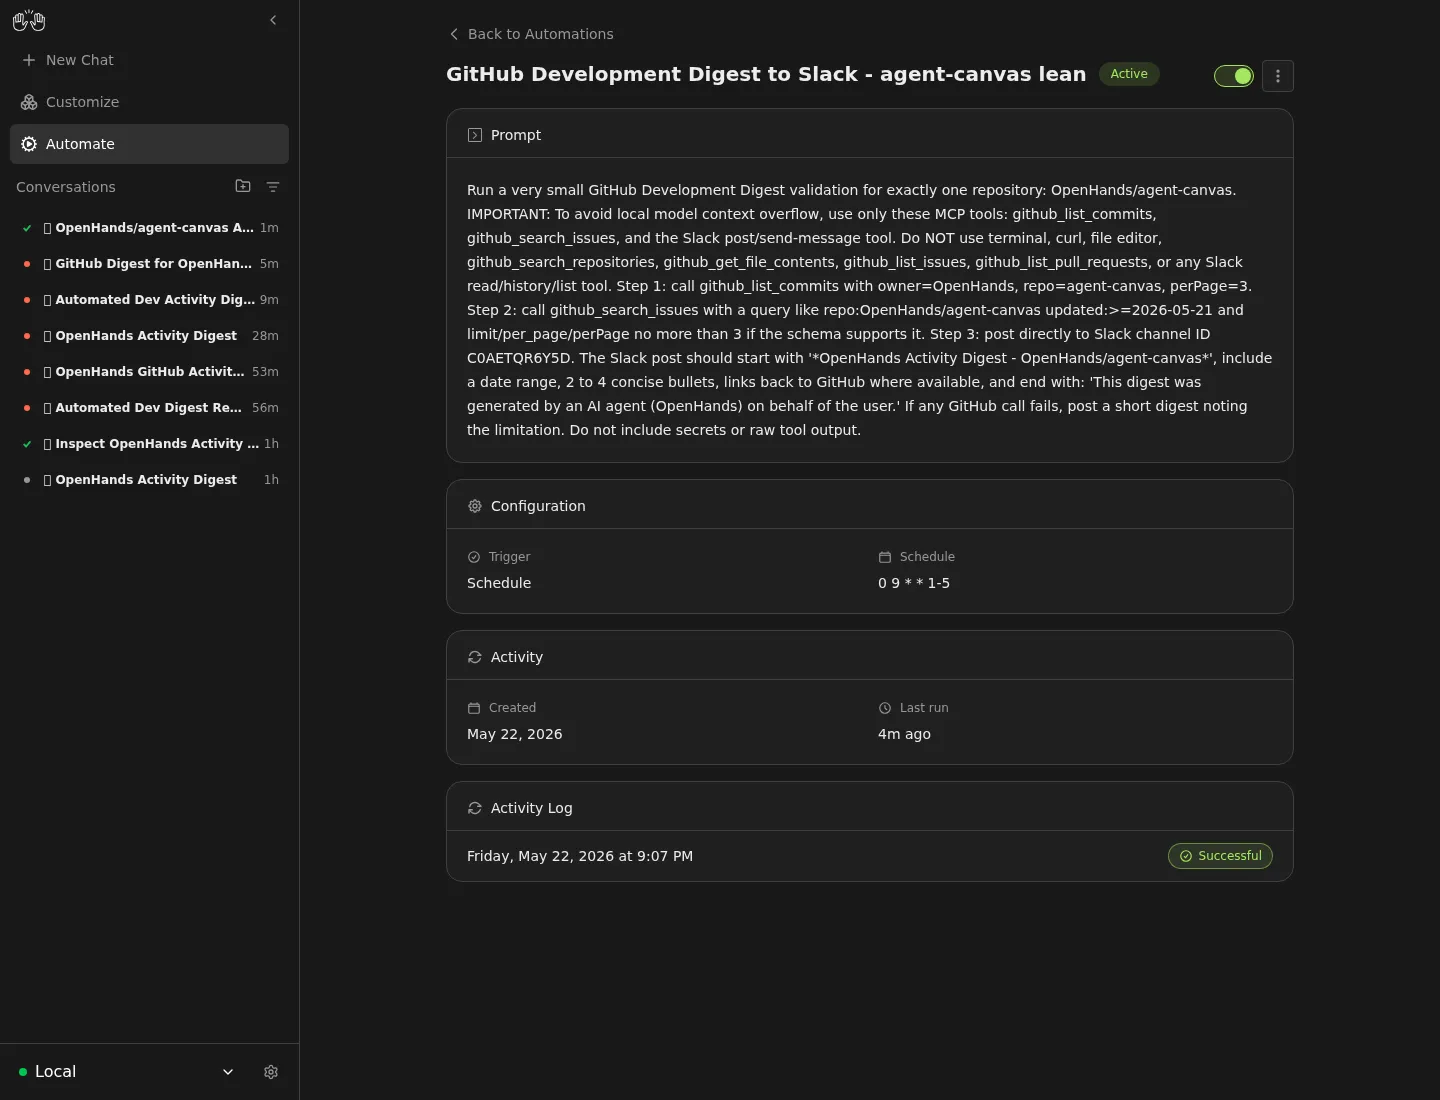
From the automation detail page in the Agent Canvas UI:
- Click Run now (or Dispatch) to run the automation once immediately.
- Watch the run list on the same page. The latest run should transition to
COMPLETED. - Open your target Slack channel. It should contain the generated digest.
You do not need to wait for the cron schedule to fire—Run now triggers a run on demand so you can confirm the prompt, MCP connections, and Slack posting all work before relying on the schedule.
Troubleshooting
- Docker port 8000 is already in use: map a different host port, for example
docker run ... -p 8080:8000 ..., and openhttp://localhost:8080/canvas. docker pullfails with a credential error (for example, “A specified logon session does not exist”): run the pull from an interactive Windows session, or pre-pull the image. The image is public, so nodocker loginis required.- The UI loads but the backend is unhealthy: the first launch builds the Agent Server environment inside the container. Wait a minute and refresh, then check
docker logs <container>for progress. - Agent Canvas cannot reach Lemonade from the container: set the LLM Base URL to
http://host.docker.internal:13305/api/v1(not127.0.0.1), and confirm Lemonade is running on the Windows host.
- Lemonade is down: restart it with the
lemonade run "${LEMONADE_MODEL}"command in step 1, then re-run the health check. npm install -gfails with a permissions error: on Linux or WSL, configure a user-owned global npm directory, add it to your shell startup file, then install Agent Canvas again:
mkdir -p ~/.npm-globalnpm config set prefix "$HOME/.npm-global"printf '\nexport PATH="$HOME/.npm-global/bin:$PATH"\n' >> ~/.bashrcexport PATH="$HOME/.npm-global/bin:$PATH"npm install -g @openhands/agent-canvasIf you use zsh, add the same export PATH=... line to ~/.zshrc instead of ~/.bashrc.
- Agent Canvas rejects the LLM settings after setting
custom_tokenizer: installtransformersin the Agent Server Python environment, restart Agent Canvas if needed, and retry saving the LLM settings. OpenHands requires Transformers to load the tokenizer chat template whencustom_tokenizeris set. - Agent Canvas cannot reach Lemonade: verify
curl -fsS "${LEMONADE_BASE_URL}/health"and confirm the base URL entered in the first-use LLM form or Settings > LLM matches the running local endpoint or HTTPS tunnel. - The LLM settings did not save: make sure you clicked Next after entering the values. Reopen Settings > LLM to confirm the values persisted.
- GitHub MCP cannot see private repositories: confirm the GitHub token has read access to the target repository and that the MCP Test button in Customize advertises GitHub tools.
- Slack can read channels but cannot post: invite the Slack app to the target channel and confirm the bot has
chat:write. - The automation lists too many Slack channels: use a Slack channel ID and set
SLACK_CHANNEL_IDSon the Slack MCP server in Customize. - The automation run fails or exceeds context: confirm Lemonade was started with
ctx_size=65536, confirm the OpenHands LLM hascustom_tokenizerset, and use an explicit repository with GitHub result sets capped to 3 to 5 items. If your Agent Canvas build exposes condenser settings, set condenser max tokens below the Lemonade context window.
Next Steps
- Add a weekly release-only digest.
- Add a GitHub event-triggered automation for faster PR or push alerts.
- Route the same digest into Notion, Linear, or another MCP-backed tool.
Resources
Need help with this playbook?
Run into an issue or have a question? Open a GitHub issue and our team will take a look.