- Automating Workflows with n8n and Local LLMs
- Generating Images with ComfyUI and Z Image Turbo
- Local LLM Coding with VSCode and Qwen3-Coder
- Running and Serving LLMs with LM Studio
- Running LLMs on PyTorch with AMD ROCm™ Software
- Build a GitHub-to-Slack Development Digest with Agent Canvas
- Building Custom GPU Kernels with PyTorch and AMD ROCm™
- Building Your First Agent with GAIA
- Chatting with LLMs in Open WebUI
- Clustering Four Ryzen™ AI Halos with RCCL
- Clustering Four Ryzen™ AI Halos with RPC
- Clustering Two Ryzen™ AI Halos with RCCL
- Clustering Two Ryzen™ AI Halos with RPC
- Fine-Tuning LLMs with LLaMA Factory
- Fine-Tuning LLMs with PyTorch and AMD ROCm™ Software
- Fine-Tuning LLMs with Unsloth
- Getting Started with Lemonade
- Getting Started with Ollama
- Getting Started with OpenHands and a Local LLM
- Getting Started with vLLM
- Local Computer Vision with AMD Ryzen™ AI NPU
- Real-Time Speech-to-Speech Translation
- Remote Development with AMD Sync
- Running DeepSeek V4 Flash with ds4
- Running Hermes Agent Locally with Lemonade Server
- Running OpenClaw Locally with Lemonade Server
| AMD GPU Driver | Latest from Ryzen AI Developer Center |
| PyTorch | 2.13 |
| ComfyUI | Latest from Ryzen AI Developer Center |
| AMD GPU Driver | 26.8.1 (from Ryzen AI Developer Center) |
| ComfyUI Desktop | Latest from Ryzen AI Developer Center |
| AMD GPU Driver | Latest inbox driver |
| PyTorch | 2.13.0 |
| ComfyUI | Latest |
| AMD GPU Driver | Adrenalin 26.9.1 |
| ComfyUI | Latest |
| AMD GPU Driver | RSL 26.14 |
| PyTorch | 2.13.0 |
| ComfyUI | Latest |
| AMD GPU Driver | Adrenalin 26.9.1 |
| ComfyUI | Latest |
| AMD GPU Driver | RSL 26.14 |
| PyTorch | 2.13.0 |
| ComfyUI | Latest |
| AMD GPU Driver | Adrenalin 26.9.1 |
| ComfyUI | Latest |
| AMD GPU Driver | RSL 26.14 |
| PyTorch | 2.13.0 |
| ComfyUI | Latest |
| AMD GPU Driver | Adrenalin 26.9.1 |
| ComfyUI | Latest |
- Overview
- What You’ll Learn
- Setting the Memory Configuration
- Check for Software Updates
- Installing Software Prerequisites
- Launching ComfyUI
- Finding the Z-Image Turbo Template
- Downloading Models
- Understanding the Interface
- Generating Your First Image
- Adjusting Generation Parameters
- Working with Workflows
- Next Steps
Generating Images with ComfyUI and Z Image Turbo
Create stunning AI-generated images using ComfyUI with Z Image Turbo.

Overview
ComfyUI is a powerful, node-based interface for Stable Diffusion and other diffusion models. Unlike traditional text-to-image interfaces with simple prompt boxes, ComfyUI exposes the entire image generation pipeline as a visual graph, giving you fine-grained control over every step from text encoding to latent space manipulation to final decoding.
This tutorial teaches you how to use ComfyUI with the Z Image Turbo model on your GPU to generate high-quality AI images.
What You’ll Learn
- How to launch ComfyUI and load the Z-Image Turbo template
- Understanding diffusion pipeline components
- Generating images and tuning generation parameters
- Saving and sharing workflows
Setting the Memory Configuration
For the Ryzen AI Halo, the dedicated GPU memory defaults to 64GB, which is sufficient for most workloads. For larger models or longer contexts, increasing this may help. To adjust, open AMD Software: Adrenalin Edition™ and navigate to Performance → Tuning → AMD Variable Graphics Memory. Reboot for the changes to take effect.
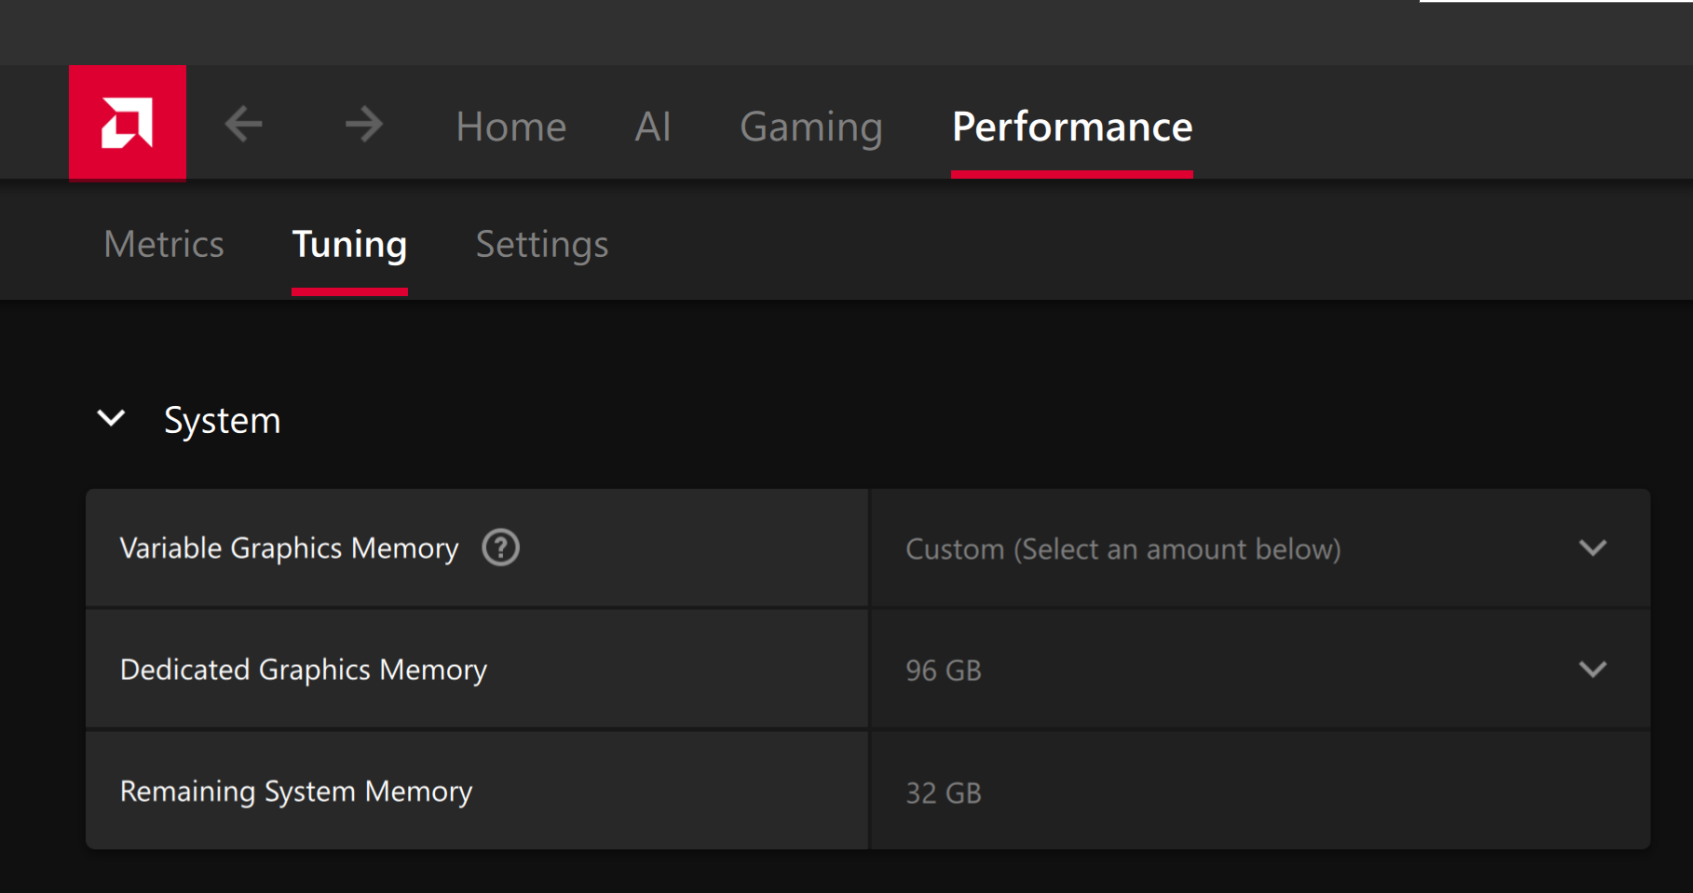
To change the dedicated GPU memory value, open AMD Software: Adrenalin Edition™ and navigate to Performance → Tuning → AMD Variable Graphics Memory. Reboot for the changes to take effect.
On Linux, to run larger models, increase the shared memory pool available to the GPU. This might involve setting the BIOS dedicated GPU memory to the minimum, so that the shared memory pool can be maximized.
For the AMD Ryzen™ AI Halo, to modify the default setting, open the AMD Ryzen™ AI Developer Center and go to the Settings tab. Under Graphics Performance Settings, increase the Shared Video Memory slider, then click Apply Changes and reboot for the changes to take effect.
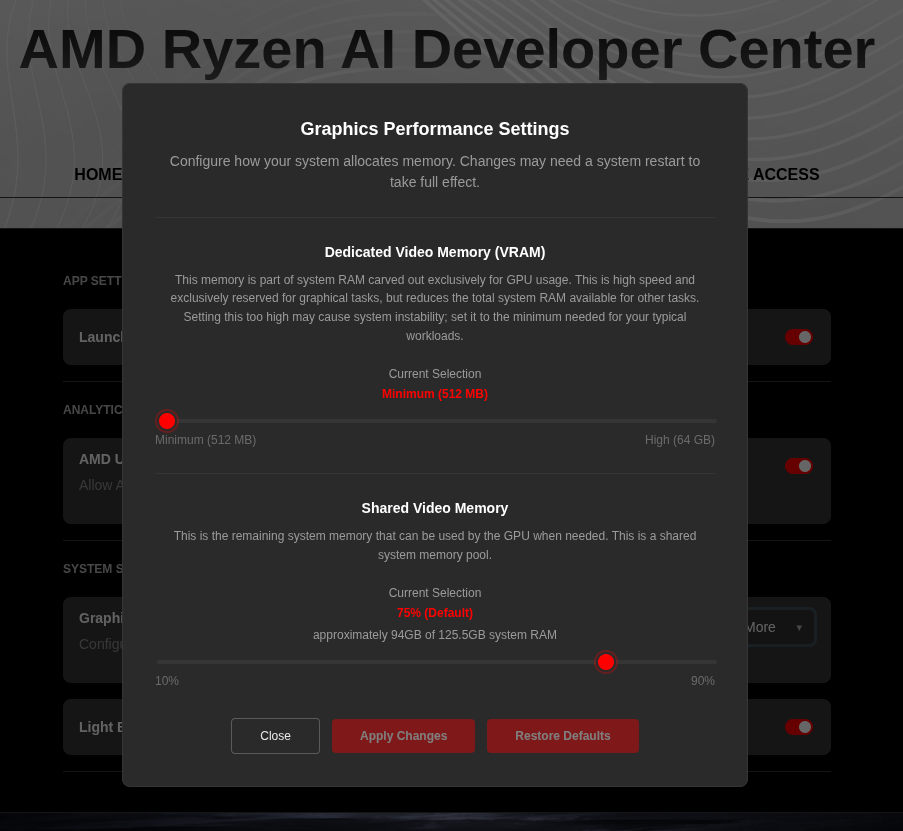
Increase the shared memory pool by changing the kernel’s Translation Table Manager (TTM) page setting. AMD recommends setting the minimum dedicated VRAM in the BIOS (0.5 GB) so the maximum amount is available as shared memory.
- Install the
pipxutility and add the path for pipx-installed wheels to the system search path:
sudo apt install pipxpipx ensurepath- Install the
amd-debug-toolswheel from PyPI:
pipx install amd-debug-tools- Query the current shared memory settings:
amd-ttm- Increase the shared memory allocation (units in GB):
amd-ttm --set <NUM>- Reboot for the changes to take effect.
Check for Software Updates
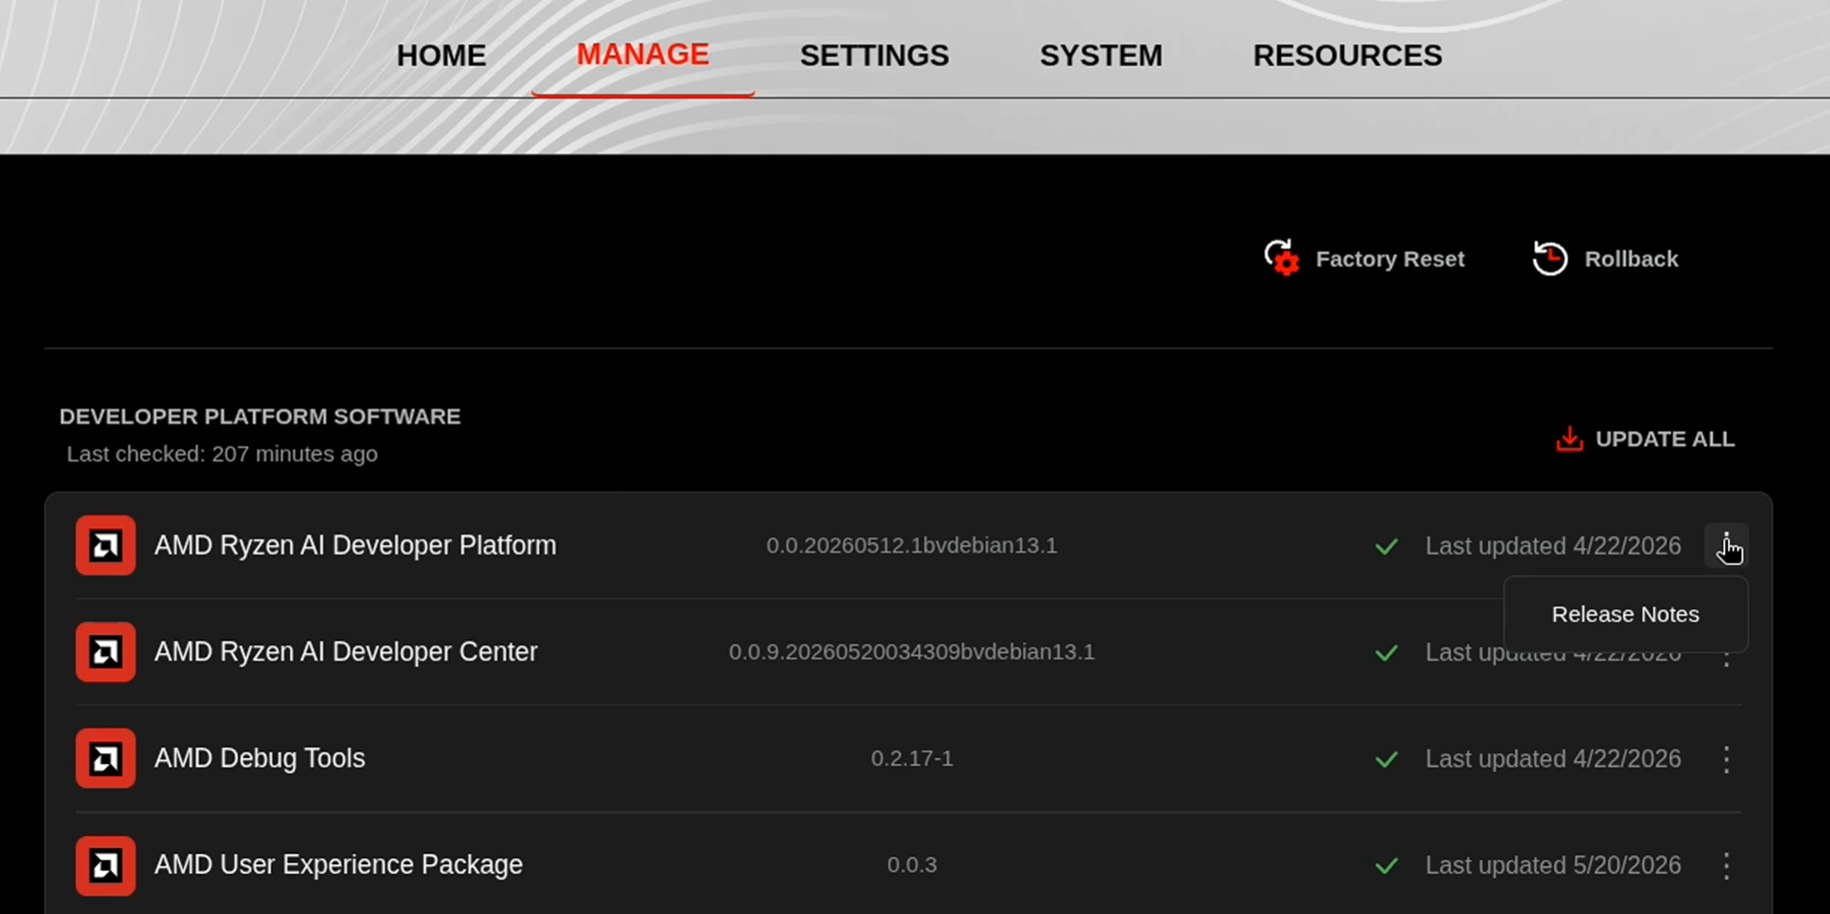
Before starting, ensure your Ryzen AI Halo has the latest software installed. Open the AMD Ryzen™ AI Developer Center and check for available updates, both to the app itself and additional software.
Go to the Updates tab. If updates are available, install them and reboot before continuing.
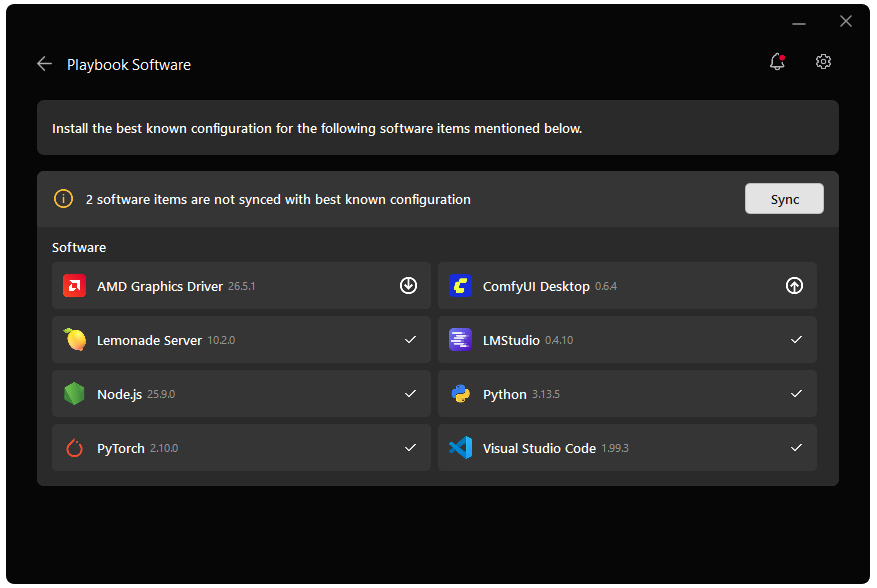
Go to the Manage tab. If updates are available, install them and reboot before continuing.
Installing Software Prerequisites
AMD GPU Driver
Update to the latest AMD GPU driver using AMD Software: Adrenalin Edition™.
- Open
AMD Software: Adrenalin Editionfrom your Start menu or system tray. - Navigate to Driver and Software, click Manage Updates.
- If an update is available, follow the prompts to download and install.
AMD GPU Driver
Install the AMD GPU Driver (amdgpu) using the Radeon Software for Linux (RSL) flow. For instructions for your distribution, see the ROCm installation at: Install the kernel driver.
For the driver itself, see Linux® Drivers for AMD Radeon™
ComfyUI
- Download the latest Windows ComfyUI installer from download.comfy.org.
- Choose your hardware setup: Select
AMD ROCm. - Choose where to install ComfyUI: Use the default path or your preferred folder.
- Desktop App Settings: We recommend unselecting “Automatic Updates” to ensure you are using the recommended version of this app.
- Press “Next” to begin installation.
Clone ComfyUI
git clone https://github.com/Comfy-Org/ComfyUI.git(Optional) Checkout a specific version
git checkout v0.19.2Install ComfyUI requirements
With the Python virtual environment activated, run:
cd ComfyUIpip install -r requirements.txtGrant your user access to GPU devices (log out and back in for this to take effect):
sudo usermod -aG render,video $LOGNAMECreate a Virtual Environment
On Linux, open a terminal in the directory of your choice and run the following prompt to create a venv:
sudo apt updatesudo apt install -y python3-venvpython3 -m venv comfyui-envsource comfyui-env/bin/activateAMD GPU Driver
Update to the latest AMD GPU driver using AMD Software: Adrenalin Edition™.
- Open
AMD Software: Adrenalin Editionfrom your Start menu or system tray. - Navigate to Driver and Software, click Manage Updates.
- If an update is available, follow the prompts to download and install.
AMD GPU Driver
Install the AMD GPU Driver (amdgpu) using the Radeon Software for Linux (RSL) flow. For instructions for your distribution, see the ROCm installation at: Install the kernel driver.
For the driver itself, see Linux® Drivers for AMD Radeon™
PyTorch
Install PyTorch with AMD ROCm™ software support in the created virtual environment:
python -m pip install --index-url https://stable.repo.amd.com/rocm/whl-next/ "torch[device-gfx1151]==2.13.0+rocm10.0.0" "torchvision[device-gfx1151]==0.28.0+rocm10.0.0" "torchaudio==2.11.0.2+rocm10.0.0"python -m pip install --index-url https://stable.repo.amd.com/rocm/whl-next/ "torch[device-gfx1150]==2.13.0+rocm10.0.0" "torchvision[device-gfx1150]==0.28.0+rocm10.0.0" "torchaudio==2.11.0.2+rocm10.0.0"python -m pip install --index-url https://stable.repo.amd.com/rocm/whl-next/ "torch[device-gfx1152]==2.13.0+rocm10.0.0" "torchvision[device-gfx1152]==0.28.0+rocm10.0.0" "torchaudio==2.11.0.2+rocm10.0.0"python -m pip install --index-url https://stable.repo.amd.com/rocm/whl-next/ "torch[device-gfx1100]==2.13.0+rocm10.0.0" "torchvision[device-gfx1100]==0.28.0+rocm10.0.0" "torchaudio==2.11.0.2+rocm10.0.0"python -m pip install --index-url https://stable.repo.amd.com/rocm/whl-next/ "torch[device-gfx1201]==2.13.0+rocm10.0.0" "torchvision[device-gfx1201]==0.28.0+rocm10.0.0" "torchaudio==2.11.0.2+rocm10.0.0"For other devices, please refer to ROCm 10.0.0 Documentation for full instructions.
ComfyUI
- Download the latest Windows ComfyUI installer from download.comfy.org.
- Choose your hardware setup: Select
AMD ROCm. - Choose where to install ComfyUI: Use the default path or your preferred folder.
- Desktop App Settings: We recommend unselecting “Automatic Updates” to ensure you are using the recommended version of this app.
- Press “Next” to begin installation.
Clone ComfyUI
git clone https://github.com/Comfy-Org/ComfyUI.git(Optional) Checkout a specific version
git checkout v0.19.2Install ComfyUI requirements
With the Python virtual environment activated, run:
cd ComfyUIpip install -r requirements.txtLaunching ComfyUI
To launch ComfyUI on Windows, click the ComfyUI Desktop Launcher which is found on your Desktop. Follow the steps to install the local version with AMD.
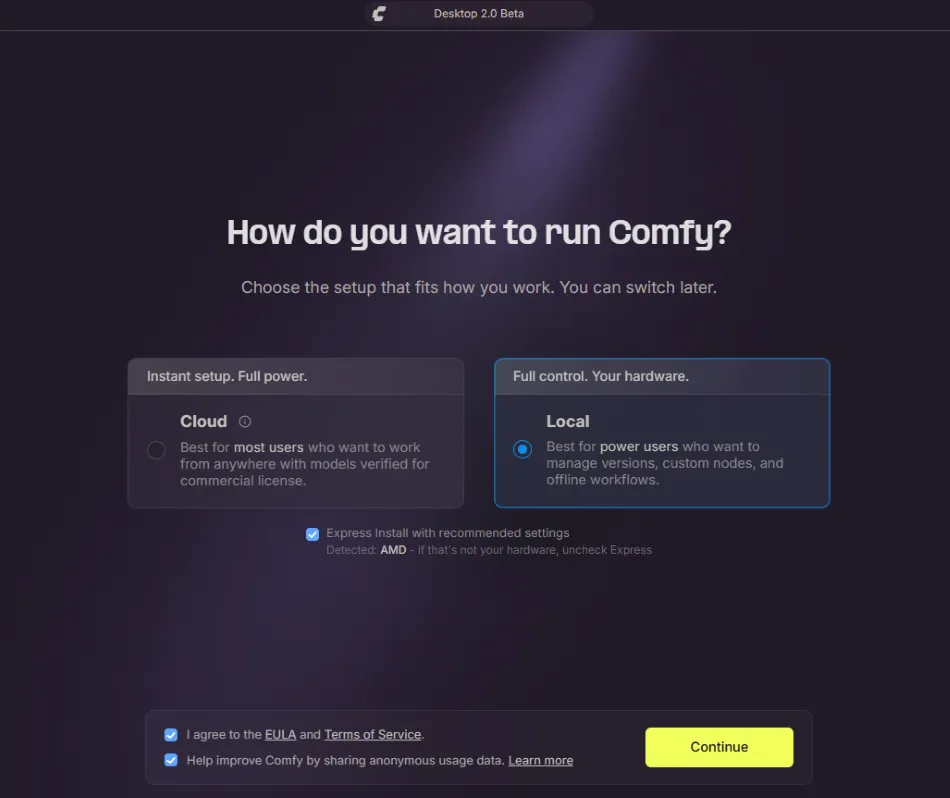
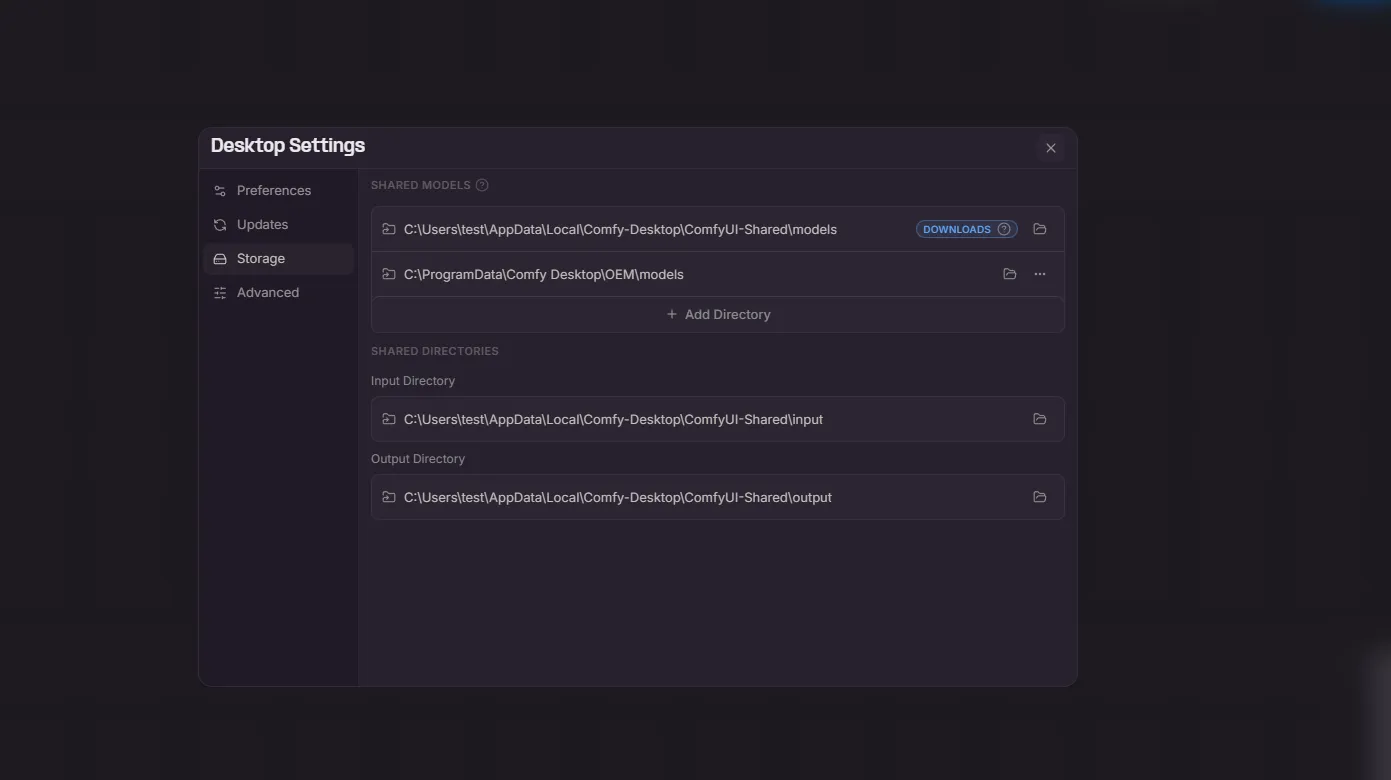
Then, click the ComfyUI button at the top-middle of the app. This will open a settings tab. Open the Storage tab and make sure the paths are set as follows to access the pre-installed models.
On the AMD Ryzen™ AI Halo, ComfyUI runs in a prebuilt container that requires no additional Python setup.
To launch ComfyUI on Linux, click the ComfyUI shortcut in the taskbar. It should open by itself in a browser window.
To launch ComfyUI on Windows, simply click the ComfyUI shortcut on your Desktop.
To launch ComfyUI:
- Ensure you are within the ComfyUI directory.
- Run
python3 main.py --use-pytorch-cross-attention
ComfyUI starts a local web server. Open your browser to http://127.0.0.1:8188 to access the interface.
Finding the Z-Image Turbo Template
Before generating images, you need to load the Z-Image Turbo template. Here’s how to find it:
-
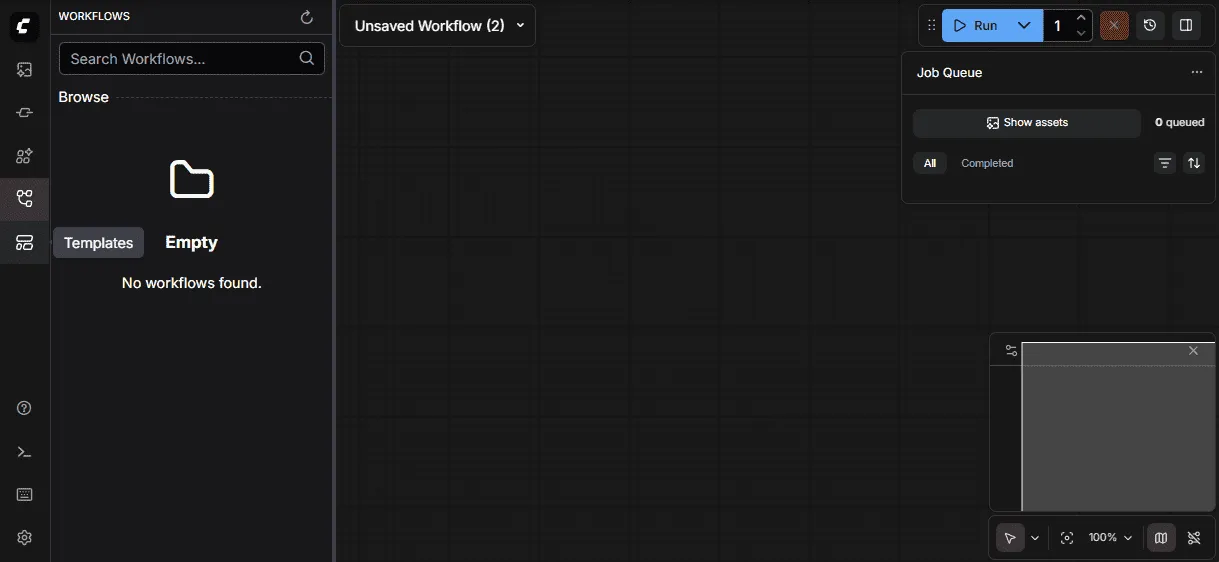
Look at the far left edge of the screen—there’s a vertical toolbar running from top to bottom on the leftmost side of the app.
-
Find the folder icon—in that left toolbar, look for an icon that looks like a folder. When you hover over it, it’s labeled “Templates.”
-
Click the folder icon—this opens the Templates panel.
-
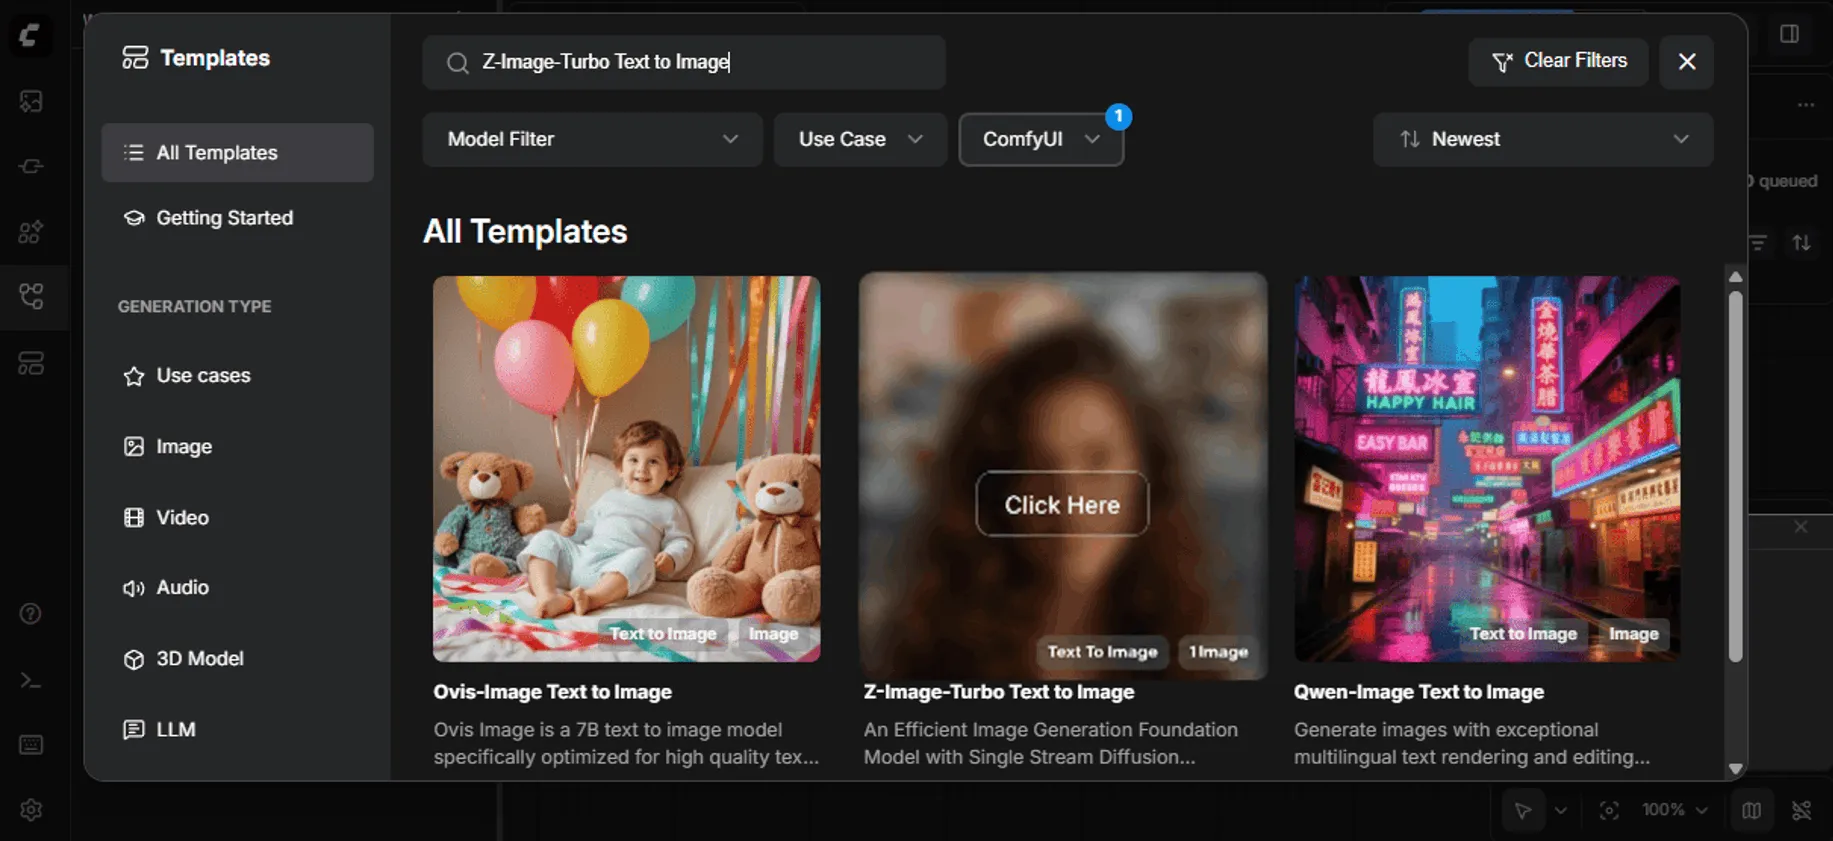
Search for “Z-Image Turbo”—use the search bar or scroll through the available templates to find the Z-Image Turbo Text To Image workflow, then click to load it.
Downloading Models
ComfyUI Models
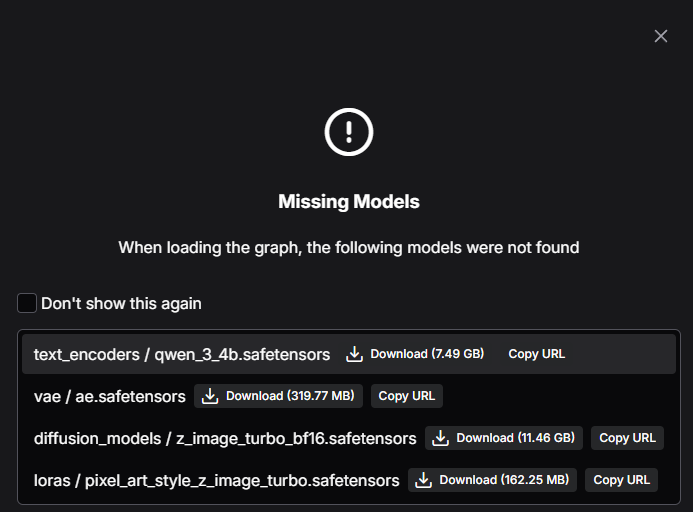
If you previously deleted pre-downloaded ComfyUI models or want to download those for the first time, simply press the Download button on each of the models when prompted that missing models have been detected.
You may need to manually place the model files in the correct locations.
Understanding the Interface
When the Z-Image Turbo template loads, you’ll see a canvas with 2 main nodes. The first node is called ‘Text to Image (Z-Image-Turbo)’, and the second node is for viewing the image.
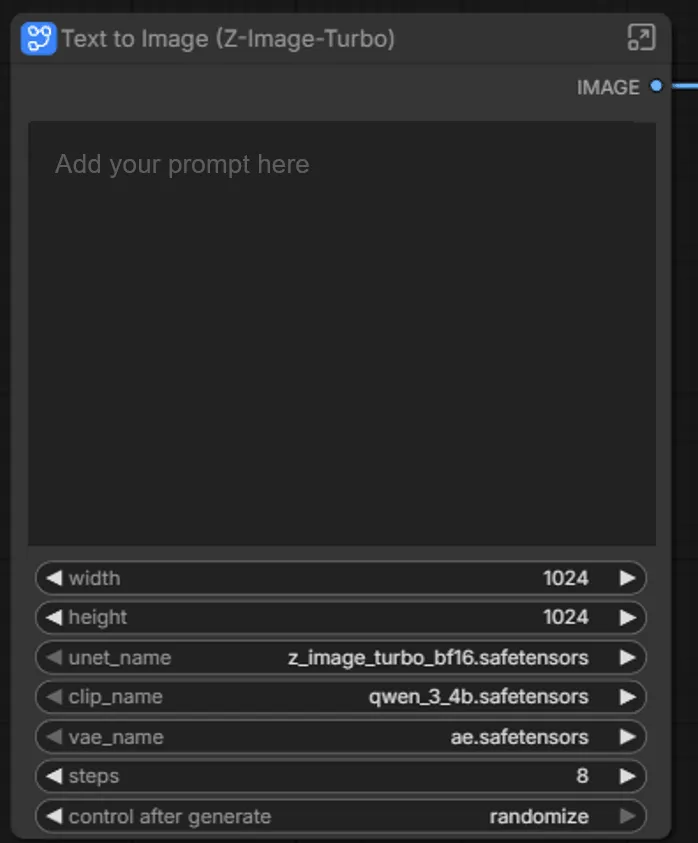
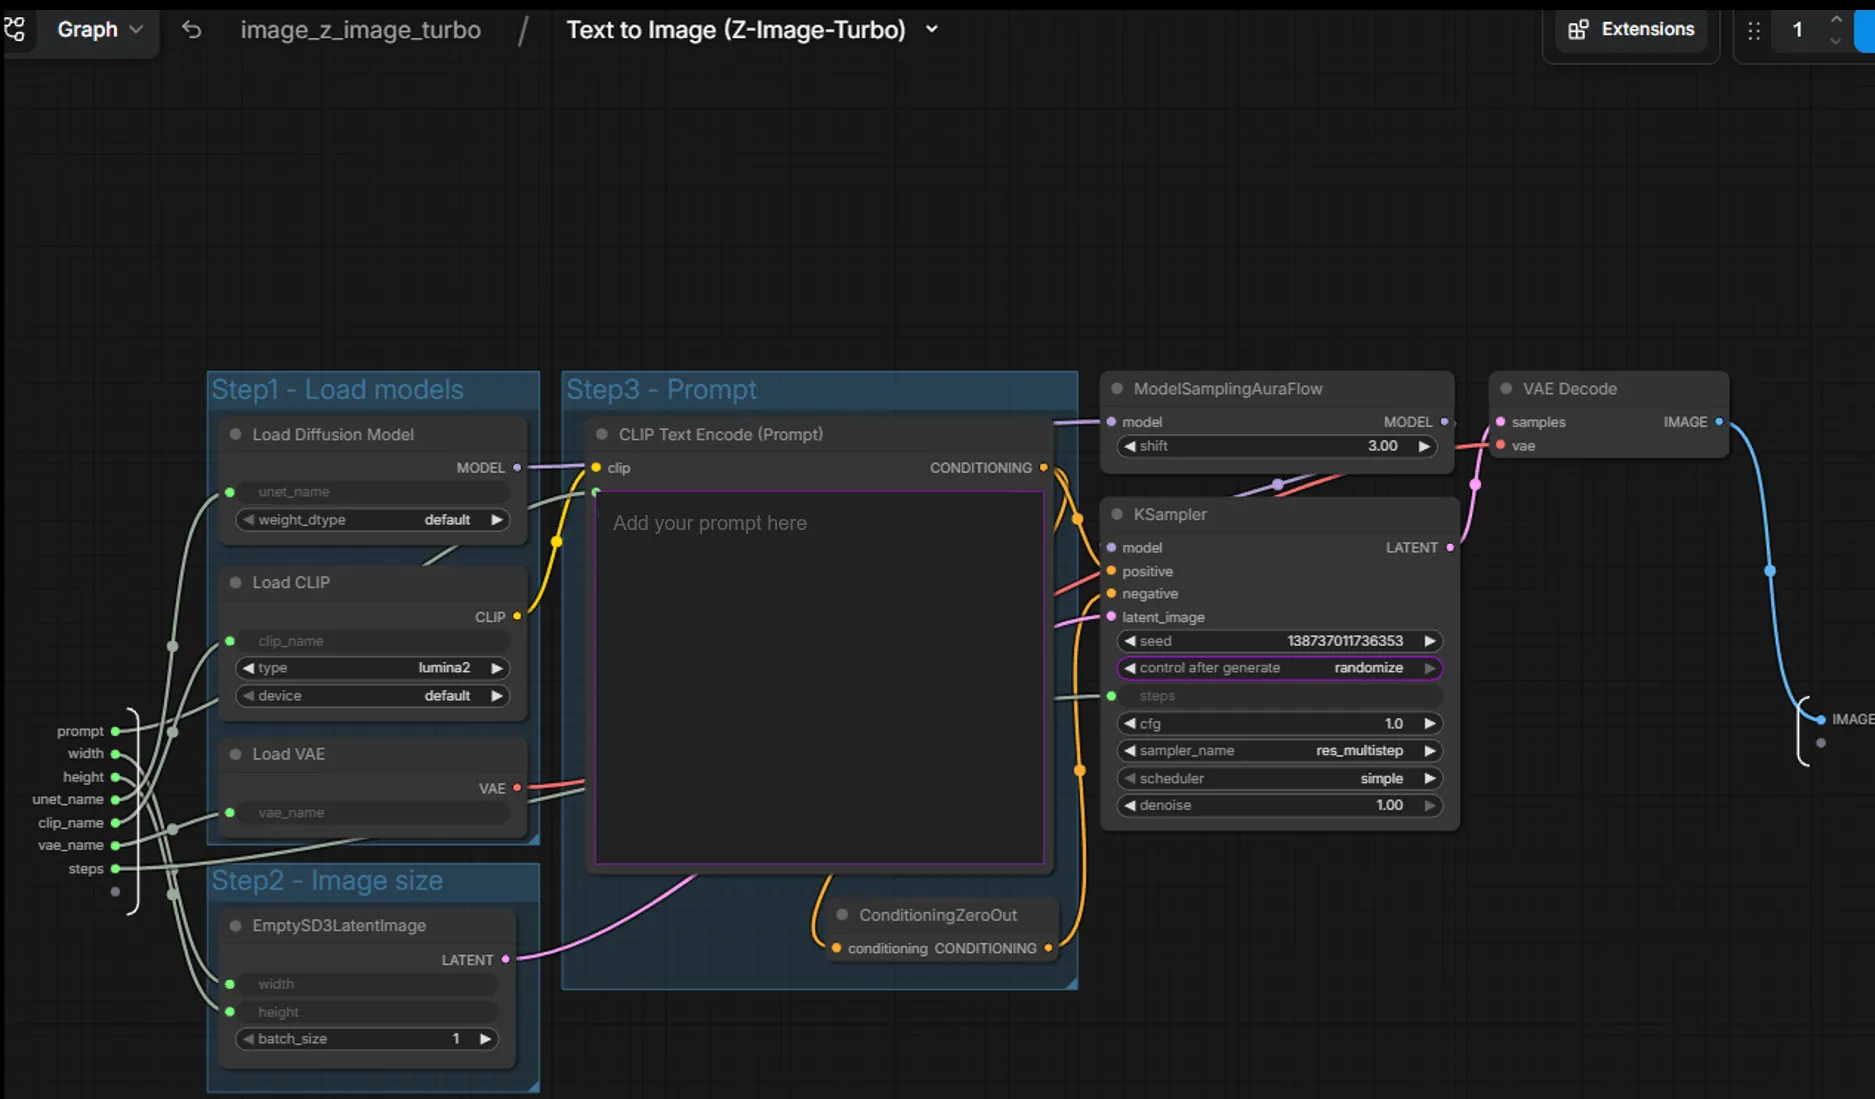
On the Z-Image node, click the top right button to expand the Node and see the subgraph.
Pipeline Components
The Z-Image Turbo workflow uses four key model components that work together:
| Component | Role |
|---|---|
| Text Encoder (Qwen 3 4B) | Converts your text prompt into embeddings the diffusion model understands |
| Diffusion Model (Z-Image Turbo) | The core neural network that iteratively denoises latent representations into images |
| VAE (Variational Autoencoder) | Encodes images to/from latent space (decodes the final latents into pixels) |
| LoRA (optional) | Lightweight adapters that modify style or subject without retraining the base model |
Each node in the workflow corresponds to one of these components. Data flows left-to-right: text → embeddings → guided denoising → latents → final image.
Generating Your First Image
The Z-Image Turbo model is already loaded. To generate an image:
- Enter your prompt in the main Z-Image Node. Be descriptive. Here is an example:
A photorealistic red fox sitting in a snowy forest clearing,morning light filtering through pine trees,detailed fur texture, bokeh background- (Optional): Confirm or tweak any other specific settings within the subgraph.
- Click the blue “Run Workflow” in the right corner (or press
Ctrl+Enter) - Watch the nodes highlight as each step executes
The entire workflow execution should complete in less than 30 seconds. Your generated image appears in the Save Image node and is saved to the output/ folder.
Adjusting Generation Parameters
KSampler Settings
The KSampler node controls the core diffusion process:
| Parameter | What It Controls | Recommended for Z-Image Turbo |
|---|---|---|
| steps | Number of denoising iterations | 4–10 (turbo models are distilled for fewer steps) |
| cfg | Classifier-free guidance scale—how closely to follow the prompt | 1.0–2.0 (turbo models use very low guidance) |
| sampler_name | Denoising algorithm | euler and res_multistep work well for turbo models |
| scheduler | Noise schedule curve | normal or simple |
| seed | Random seed for reproducibility | Set fixed values to iterate on a composition |
Image Size
To adjust output dimensions, find the Empty Latent Image node and modify width and height. Keep dimensions at or below 1024 pixels on the longest side for optimal quality.
ModelSamplingAuraFlow
The ModelSamplingAuraFlow node is a specialized sampling modifier that adjusts how the diffusion process handles noise scheduling. You’ll see this node connected to the model output in the Z-Image Turbo workflow.
| Parameter | What It Controls | Recommended Values |
|---|---|---|
| shift | Adjusts the noise schedule timing—higher values push more detail refinement to later steps | 1.0–4.0 (default is 3.0) |
When to adjust shift:
- Lower values (1.0–2.0): Faster convergence, good for simple compositions
- Higher values (3.0–4.0): More gradual refinement, can improve fine details in complex scenes
The AuraFlow sampling method is specifically designed for flow-matching models like Z-Image Turbo, ensuring proper noise distribution throughout the generation process.
Working with Workflows
Saving Workflows
Click the Save button in the menu to export your workflow as a JSON file. This captures:
- All nodes and their parameters
- All connections between nodes
- Current prompt text
Loading Workflows
Drag a workflow JSON file onto the canvas, or use Load from the menu. The Z-Image Turbo workflow you see by default is loaded from a saved workflow file.
Sharing Workflows
Workflows are self-contained—share the JSON file with colleagues, and they can reproduce your exact setup. This makes ComfyUI excellent for collaborative experimentation.
Next Steps
- Explore LoRA nodes: Apply style or subject adapters without retraining
- Add negative prompts: Connect a second CLIP Text Encode node to the negative conditioning input of KSampler to guide the model away from unwanted features like blur, artifacts, or watermarks
- Build custom workflows: Chain multiple generations, add upscaling, or create image variations
- Browse community workflows: ComfyUI Examples has many ready-to-use workflows
ComfyUI’s strength is experimentation: connect nodes differently, adjust parameters, and observe how each change affects the output. This hands-on exploration builds intuition for how diffusion models work.
For more information, check out the ComfyUI Documentation.
Need help with this playbook?
Run into an issue or have a question? Open a GitHub issue and our team will take a look.