- Generating Images with ComfyUI and Z Image Turbo
- Automating Workflows with n8n and Local LLMs
- Local LLM Coding with VSCode and Qwen3-Coder
- Running and Serving LLMs with LM Studio
- Running LLMs on PyTorch with AMD ROCm™ Software
- Building Custom GPU Kernels with PyTorch and AMD ROCm™
- Building Your First Agent with GAIA
- Chatting with LLMs in Open WebUI
- Clustering Two Ryzen™ AI Halos with RCCL
- Clustering Two Ryzen™ AI Halos with RPC
- Fine-Tuning LLMs with LLaMA Factory
- Fine-Tuning LLMs with PyTorch and AMD ROCm™ Software
- Fine-Tuning LLMs with Unsloth
- Getting Started with Lemonade
- Getting Started with Ollama
- Getting Started with vLLM
- Local Computer Vision with AMD Ryzen™ AI NPU
- Real-Time Speech-to-Speech Translation
- Remote Development with AMD Sync
- Running OpenClaw Locally with Lemonade Server
Building Custom GPU Kernels with PyTorch and AMD ROCm™
Write and optimize custom GPU kernels using PyTorch and AMD ROCm™ software

Overview
Write a GPU kernel from scratch, compile it, launch it on an AMD GPU, and watch utilization spike. This playbook shows how GPU computation actually works: write the kernel code, and execute it in parallel across thousands of threads.
What You’ll Learn
- How GPU kernels work: grids, blocks, threads, and the indexing model that maps them to data
- How the AMD ROCm/HIP stack lets you write CUDA-style code that runs on AMD GPUs without modification
- How to compile a kernel at runtime using
torch.cuda._compile_kernel - How to build a native C++ kernel extension with
CUDAExtension+ pybind11, importable from Python
- How GPU kernels work: grids, blocks, threads, and the indexing model that maps them to data
- How the AMD ROCm/HIP stack lets you write CUDA-style code that runs on AMD GPUs without modification
- How to compile a kernel at runtime using
torch.cuda._compile_kernel - How to build a native C++ kernel extension with
CUDAExtension+ pybind11, importable from Python - How to measure kernel execution time and monitor live GPU utilization with
amd-smi
This playbook covers two approaches for kernel development:
| Approach | Entry point |
|---|---|
| JIT Compilation | torch.cuda._compile_kernel, write a kernel as a Python string, with no build step |
| C++ Extension | CUDAExtension + pybind11: compile a .cu file into a native .pyd and import it |
| Approach | Entry point |
|---|---|
| JIT Compilation | torch.cuda._compile_kernel, write a kernel as a Python string, with no build step |
| C++ Extension | CUDAExtension + pybind11: compile a .cu file into a native .so and import it |
Both approaches run on AMD GPUs. This is possible because PyTorch’s ROCm build maps the entire CUDA API surface to HIP. This means torch.cuda, CUDAExtension, and CUDA kernel syntax all work on AMD hardware transparently.
Background
What is a GPU Kernel?
A GPU kernel is a function that runs in parallel across thousands of GPU threads simultaneously. Unlike a CPU function that executes once per call, a kernel is launched with a grid of blocks, each containing many threads, all executing the same code on different data.
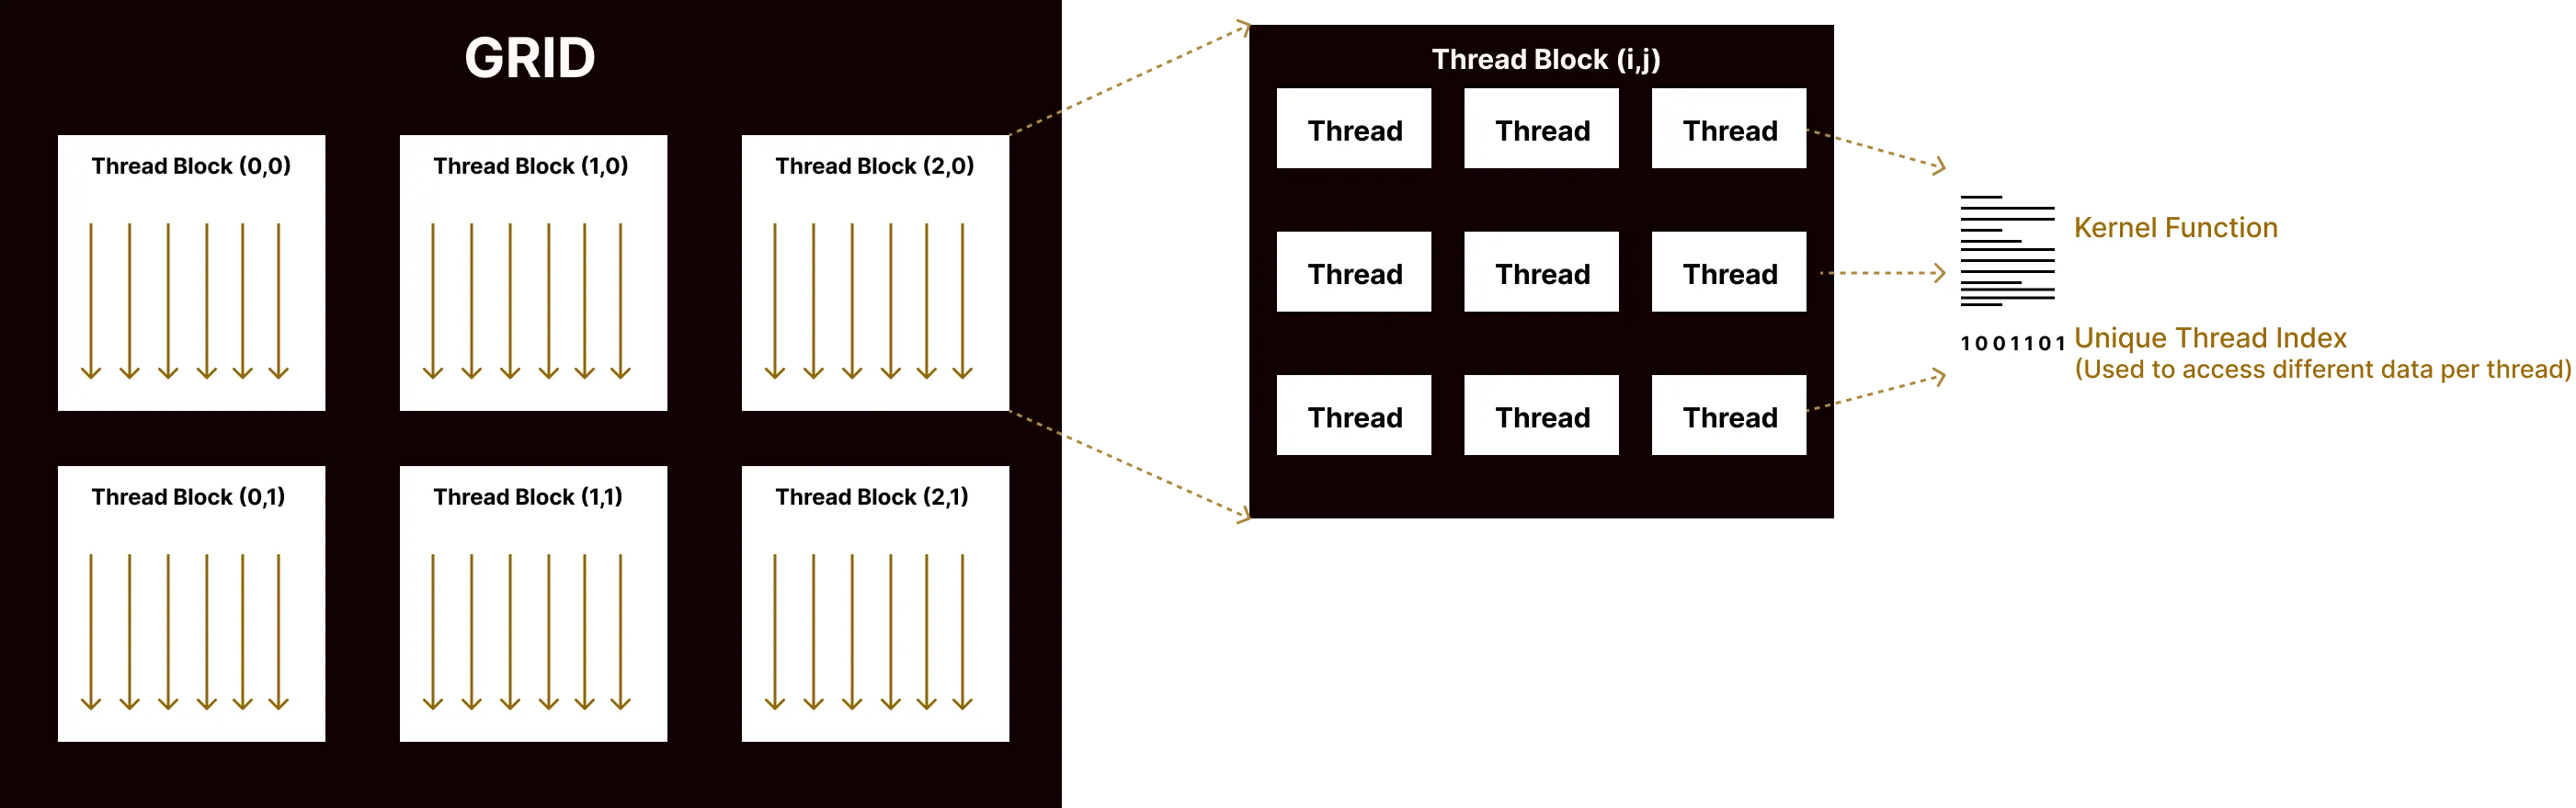
Thread Indexing Model
When launching a kernel you specify two dimensions:
| Variable | Meaning |
|---|---|
gridDim | Number of blocks in the grid |
blockDim | Number of threads per block |
Each thread has access to three built-in read-only variables:
| Variable | Meaning |
|---|---|
blockIdx.x | Which block this thread belongs to |
blockDim.x | Number of threads in one block |
threadIdx.x | Thread index within its block |
Global Thread ID
These variables are combined to compute a globally unique thread index:
int idx = blockIdx.x * blockDim.x + threadIdx.x;Total threads = gridDim.x * blockDim.x. Each thread processes one element independently. This is the foundation of data parallelism. The same operation runs on many elements at once, with no inter-thread dependency.
GPU Execution Model: Wavefronts
AMD GPUs execute threads in groups of 32 called wavefronts. All threads in a wavefront run the same instruction simultaneously. This affects optimal block size choices (256 threads = 8 wavefronts = good scheduling efficiency).
AMD GPU Programming: HIP + ROCm
ROCm is AMD’s open-source GPU compute stack (drivers, compilers, libraries, runtime). HIP sits on top, designed to be syntactically identical to CUDA. PyTorch’s ROCm build transparently maps torch.cuda.* to HIP, so the same code works on AMD GPUs.
PyTorch + AMD/HIP
PyTorch ships a ROCm build where the CUDA API surface (torch.cuda.*) is transparently backed by HIP. This means:
torch.cuda.is_available()works on AMD GPUs with ROCmtensor.to("cuda")allocates on the AMD GPUtorch.version.hipexposes the HIP version
PyTorch also exposes torch.cuda._compile_kernel(), a high-level shortcut to JIT-compile a raw kernel string and get back a callable, without needing a separate build step.
Check for Software Updates
Before starting, ensure your Ryzen AI Halo has the latest software installed. Open the AMD Ryzen™ AI Developer Center and check for available updates, both to the app itself and additional software.
Go to the Updates tab. If updates are available, install them and reboot before continuing.
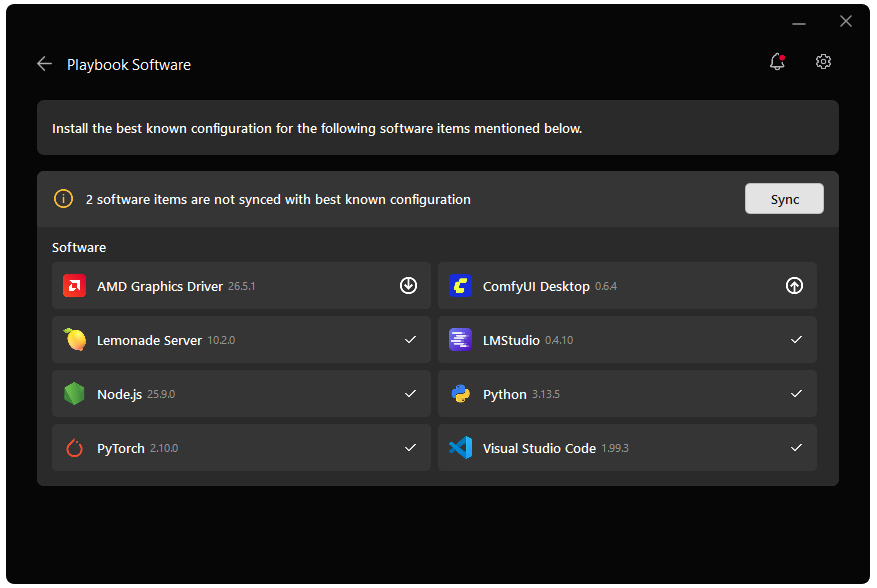
Go to the Manage tab. If updates are available, install them and reboot before continuing.

Installing Software Prerequisites
Prerequisites - Windows
- Install latest: AMD Adrenalin Software
Create a Virtual Environment
On Linux, open a terminal in the directory of your choice and follow the commands to create a venv with ROCm+Pytorch already installed.
sudo apt updatesudo apt install -y python3-venvpython3 -m venv kernel-env --system-site-packagessource kernel-env/bin/activateGrant your user access to GPU devices (log out and back in for this to take effect):
sudo usermod -aG render,video $LOGNAMEOn Linux, open a terminal in the directory of your choice and follow the commands to create a venv.
sudo apt updatesudo apt install -y python3-venvpython3 -m venv kernel-envsource kernel-env/bin/activateOn Windows, open a terminal in the directory of your choice and follow the commands to create a venv.
python -m venv kernel-envkernel-env\Scripts\activateInstalling Basic Dependencies
ROCm
Add the current user to the render and video groups.
sudo usermod -a -G render,video $LOGNAMERestart your system to apply the settings.
sudo rebootInstall ROCm in the created virtual environment.
python -m pip install --index-url https://repo.amd.com/rocm/whl/gfx1151/ "rocm[libraries,devel]"python -m pip install --index-url https://repo.amd.com/rocm/whl/gfx1150/ "rocm[libraries,devel]"python -m pip install --index-url https://repo.amd.com/rocm/whl/gfx1152/ "rocm[libraries,devel]"python -m pip install --index-url https://repo.amd.com/rocm/whl/gfx110X-all/ "rocm[libraries,devel]"python -m pip install --index-url https://repo.amd.com/rocm/whl/gfx120X-all/ "rocm[libraries,devel]"For further installation help, please see this link.
PyTorch
Install PyTorch with AMD ROCm™ software support in the created virtual environment:
python -m pip install --index-url https://repo.amd.com/rocm/whl/gfx1151/ "torch==2.11.0+rocm7.13.0" "torchvision==0.26.0+rocm7.13.0" "torchaudio==2.11.0+rocm7.13.0"python -m pip install --index-url https://repo.amd.com/rocm/whl/gfx1150/ "torch==2.11.0+rocm7.13.0" "torchvision==0.26.0+rocm7.13.0" "torchaudio==2.11.0+rocm7.13.0"python -m pip install --index-url https://repo.amd.com/rocm/whl/gfx1152/ "torch==2.11.0+rocm7.13.0" "torchvision==0.26.0+rocm7.13.0" "torchaudio==2.11.0+rocm7.13.0"python -m pip install --index-url https://repo.amd.com/rocm/whl/gfx110X-all/ "torch==2.11.0+rocm7.13.0" "torchvision==0.26.0+rocm7.13.0" "torchaudio==2.11.0+rocm7.13.0"python -m pip install --index-url https://repo.amd.com/rocm/whl/gfx120X-all/ "torch==2.11.0+rocm7.13.0" "torchvision==0.26.0+rocm7.13.0" "torchaudio==2.11.0+rocm7.13.0"For other devices, please refer to this link for full instructions.
AMD GPU Driver
Update to the latest AMD GPU driver using AMD Software: Adrenalin Edition™.
- Open
AMD Software: Adrenalin Editionfrom your Start menu or system tray. - Navigate to Driver and Software, click Manage Updates.
- If an update is available, follow the prompts to download and install.
AMD GPU Driver
Install the AMD GPU Driver (amdgpu) using the Radeon Software for Linux (RSL) flow. For instructions for your distribution, see Install the kernel driver.
ROCm
Add the current user to the render and video groups.
sudo usermod -a -G render,video $LOGNAMERestart your system to apply the settings.
sudo rebootInstall ROCm in the created virtual environment.
python -m pip install --index-url https://repo.amd.com/rocm/whl/gfx1151/ "rocm[libraries,devel]"python -m pip install --index-url https://repo.amd.com/rocm/whl/gfx1150/ "rocm[libraries,devel]"python -m pip install --index-url https://repo.amd.com/rocm/whl/gfx1152/ "rocm[libraries,devel]"python -m pip install --index-url https://repo.amd.com/rocm/whl/gfx110X-all/ "rocm[libraries,devel]"python -m pip install --index-url https://repo.amd.com/rocm/whl/gfx120X-all/ "rocm[libraries,devel]"For further installation help, please see this link.
PyTorch
Install PyTorch with AMD ROCm™ software support in the created virtual environment:
python -m pip install --index-url https://repo.amd.com/rocm/whl/gfx1151/ "torch==2.11.0+rocm7.13.0" "torchvision==0.26.0+rocm7.13.0" "torchaudio==2.11.0+rocm7.13.0"python -m pip install --index-url https://repo.amd.com/rocm/whl/gfx1150/ "torch==2.11.0+rocm7.13.0" "torchvision==0.26.0+rocm7.13.0" "torchaudio==2.11.0+rocm7.13.0"python -m pip install --index-url https://repo.amd.com/rocm/whl/gfx1152/ "torch==2.11.0+rocm7.13.0" "torchvision==0.26.0+rocm7.13.0" "torchaudio==2.11.0+rocm7.13.0"python -m pip install --index-url https://repo.amd.com/rocm/whl/gfx110X-all/ "torch==2.11.0+rocm7.13.0" "torchvision==0.26.0+rocm7.13.0" "torchaudio==2.11.0+rocm7.13.0"python -m pip install --index-url https://repo.amd.com/rocm/whl/gfx120X-all/ "torch==2.11.0+rocm7.13.0" "torchvision==0.26.0+rocm7.13.0" "torchaudio==2.11.0+rocm7.13.0"For other devices, please refer to this link for full instructions.
Install ROCm:
python -m pip install --index-url https://repo.amd.com/rocm/whl/gfx1151/ "rocm[libraries,devel]"Install PyTorch:
python -m pip install --index-url https://repo.amd.com/rocm/whl/gfx1151/ "torch==2.11.0+rocm7.13.0" "torchvision==0.26.0+rocm7.13.0" "torchaudio==2.11.0+rocm7.13.0"Installing Additional Dependencies
Install the Linux C/C++ build toolchain. This is a system-level dependency and is required for the C++ extension walkthroughs because CUDAExtension builds native .so modules from .cu files.
Run this once on the Linux machine, outside the created Python virtual environment:
sudo apt updatesudo apt install -y build-essential gcc g++After activating the kernel-env virtual environment, install the Python build dependencies:
python -m pip install "setuptools<82" wheel ninjaPlease ensure Visual Studio 2022 or newer is installed with the Desktop development with C++ workload.
Open a PowerShell terminal and run the following commands before building the C++ extension.
Step 1: Find the installed Visual Studio C++ environment
(A) Locate vswhere.exe, which is installed with the Visual Studio Installer
$VsWhere = "${env:ProgramFiles(x86)}\Microsoft Visual Studio\Installer\vswhere.exe"
if (-not (Test-Path $VsWhere)) {throw "vswhere.exe was not found. Install Visual Studio 2022 or newer with the Desktop development with C++ workload."}
(B) Find vcvars64.bat from Visual Studio 2022 or newer with C++ build tools
$Vcvars = & $VsWhere `  -latest `  -products * `  -requires Microsoft.VisualStudio.Component.VC.Tools.x86.x64 `  -find "VC\Auxiliary\Build\vcvars64.bat" |  Select-Object -First 1
if (-not $Vcvars) {throw "Could not find vcvars64.bat. Install Visual Studio 2022 or newer with the Desktop development with C++ workload."}
(C) Print the Visual Studio C++ Environment being used
Write-Host "Using Visual Studio C++ environment: $Vcvars"Step 2: Activate the Visual Studio C++ build environment
(A) Run vcvars64.bat and capture the environment it sets
This makes cl.exe, INCLUDE, LIB, LIBPATH, and Windows SDK paths available.
$VsEnv = cmd /c "`"$Vcvars`" && where cl && set" 2>&1$ExitCode = $LASTEXITCODE
if ($ExitCode -ne 0) {  $VsEnv | Out-Host  throw "Failed to activate the Visual Studio C++ environment. Exit code: $ExitCode"}
(B) Import the Visual Studio environment variables into this PowerShell session
$VsEnv | ForEach-Object { if ($_ -match '^([^=]+)=(.*)$') { [System.Environment]::SetEnvironmentVariable($matches[1], $matches[2], 'Process') }}Step 3: Verify that the Microsoft C++ compiler is available
where.exe clSet Environment Variables
rocm-sdk init # Initialize the devel libraries
PY_MM="$(python -c 'import sys; print(f"{sys.version_info.major}.{sys.version_info.minor}")')"export ROCM_HOME="$VIRTUAL_ENV/lib/python${PY_MM}/site-packages/_rocm_sdk_devel"export LD_LIBRARY_PATH="$ROCM_HOME/lib:$LD_LIBRARY_PATH"export PATH="$ROCM_HOME/bin:$PATH"
# Set compiler and build settingsexport CC=clangexport CXX=clangexport DISTUTILS_USE_SDK=1rocm-sdk init # Initialize the devel libraries
$ROCM_ROOT = (rocm-sdk path --root).Trim()$ROCM_BIN = (rocm-sdk path --bin).Trim()
$RocmPathEntries = @( $ROCM_BIN, "$ROCM_ROOT\bin", "$ROCM_ROOT\lib", "$ROCM_ROOT\lib\llvm\bin") | Where-Object { $_ -and (Test-Path $_) }
$env:PATH = (($RocmPathEntries + @($env:PATH)) -join ";")
$env:ROCM_HOME = $ROCM_ROOT$env:HIP_PATH = $ROCM_ROOT$env:ROCM_BIN = $ROCM_BIN$env:HIP_PLATFORM = "amd"
# Set compiler and build settings$env:CC = "clang-cl"$env:CXX = "clang-cl"$env:DISTUTILS_USE_SDK = "1"Verify that the AMD GPU is visible with:
amd-smiDownload Required Files
Create the following directory structure by making the 2 new folders and downloading the corresponding files:
| Directory | Files to Download | Description |
|---|---|---|
| Vector_Addition/ | JIT and C++ extension files for vector addition kernel | |
| Matrix_Multiplication/ | JIT and C++ extension files for matrix multiplication kernel |
Walkthroughs
Walkthrough 1: Vector Addition
Approach A: JIT Compilation
JIT (Just-In-Time) compilation means the kernel is written as a raw C++ string inside Python and compiled at runtime, without needing extra build steps.
To use , make sure it’s downloaded and run:
cd Vector_Addition # if not already inside the directorypython add_one_kernel.pyKey Code Snippets
import torch
# Snippet 1: Kernel source as a stringKERNEL_SOURCE = """extern "C"__global__ void add_one(float* data, int n) {    int idx = blockIdx.x * blockDim.x + threadIdx.x;    if (idx < n) {        for (int i = 0; i < 1000; i++)            data[idx] += 1.0f;    }}"""
# Snippet 2: Compile the kernel string. PyTorch calls hipcc under the hood with ROCmadd_one_kernel = torch.cuda._compile_kernel(KERNEL_SOURCE, "add_one")
x = torch.ones(100_000_000, dtype=torch.float32, device="cuda")n = x.numel()block_size = 256grid_size = (n + block_size - 1) // block_size
# Snippet 3: Launch: specify the grid/block dimensions and pass tensor arguments directlyfor _ in range(200):    add_one_kernel(        grid=(grid_size, 1, 1),        block=(block_size, 1, 1),        args=[x, n],    )
# Snippet 4: Test the outputprint("First 5 elements:", x[:5].cpu())#Expected output: tensor([200001., 200001., 200001., 200001., 200001.])What the workload does:
The kernel artificially adds extra work to demonstrate GPU utilization:
- 100,000,000 elements in the tensor
- Inner loop runs 1,000 times per element per kernel launch
- 200 kernel launches total
Math:
- Each element: gets incremented by 1 × 1,000 iterations × 200 launches = 200,000
- Final result: 1.0 (starting value) + 200,000 (additions) = 200,001.0
Why the inner loop?
- Without the
for (int i = 0; i < 1000; i++)loop, 200 launches would finish instantly and the monitoring tools wouldn’t capture meaningful GPU utilization. The artificial work makes each kernel run long enough for monitoring tools to measure performance.
Expected output:[The performance numbers will vary]
First 5 elements: tensor([200001., 200001., 200001., 200001., 200001.])Elapsed time: 2.753sPeak GPU Utilization: 93%Average GPU Utilization: 65.94%Expected output:
First 5 elements: tensor([200001., 200001., 200001., 200001., 200001.])Elapsed time: 2.753sNo GPU Usage captured.Nice work! You just ran your first GPU kernel.
Approach B: C++ Extension
The second approach is more manual: write the kernel and Python binding to a single .cu file, compile it natively using PyTorch’s build system, and import it into Python.
Download the following files if you haven’t already:
| File | Role |
|---|---|
| Kernel + launcher + pybind11 binding, everything in one file | |
Build script, uses CUDAExtension to compile the .cu into a .pyd | |
| Python script that runs the built artifacts |
| File | Role |
|---|---|
| Kernel + launcher + pybind11 binding, everything in one file | |
Build script, uses CUDAExtension to compile the .cu into a .so | |
| Python script that runs the built artifacts |
Step 1: The kernel, launcher, and binding ():
#include <torch/extension.h>#include <hip/hip_runtime.h>// GPU kernel, one thread per element__global__ void add_one(float* data, int n) {    int idx = blockIdx.x * blockDim.x + threadIdx.x;    if (idx < n) data[idx] += 1.0f;}
// Launcher, bridges torch::Tensor to raw pointer, sets grid/block, runs kernelvoid add_one_launcher(torch::Tensor tensor) {    int n = tensor.numel();    float* data = tensor.data_ptr<float>();    int block_size = 256;    int grid_size = (n + block_size - 1) / block_size;    add_one<<<grid_size, block_size>>>(data, n);    hipDeviceSynchronize();}
// Python binding, exposes add_one_launcher as add_one_ext.add_onePYBIND11_MODULE(TORCH_EXTENSION_NAME, m) { m.def("add_one", &add_one_launcher, "Add one kernel (HIP)");}Step 2: Build
pip install --no-build-isolation -v .CUDAExtension is a CUDA build helper from torch.utils.cpp_extension. With ROCm, PyTorch remaps CUDAExtension to use hipcc instead of nvcc. ROCm intercepts the build path and routes it through the HIP compiler, porting CUDA code to AMD.
This produces the following files:
build/: directory with the.pydfilesadd_one_kernel.hip: the HIP source generated by hipifying the.cufile; this is whathipccactually compiled
build/: directory with the.sofilesadd_one_kernel.hip: the HIP source generated by hipifying the.cufile; this is whathipccactually compiled
Step 3: Use from Python ():
Execute this script to see the kernel in action:
cd Vector_Addition # if not already in directorypython run_compiled_addition.pyExpected output:
Before: tensor([1., 1., 1., 1., 1., 1., 1., 1., 1., 1.], device='cuda:0')After: tensor([2., 2., 2., 2., 2., 2., 2., 2., 2., 2.], device='cuda:0')Walkthrough 2: Matrix Multiplication
Matrix multiplication computes C = A × B where:
- A is M×N (rows × columns)
- B is N×K
- C is M×K (the result)
Each output element is defined as:
Each element of C is calculated independently, making this perfect for GPU parallelism.
How It Maps to GPU Threads
Unlike vector addition (1D), matrix multiplication produces a 2D output, so we use a 2D grid of threads:
| Vector Addition | Matrix Multiplication | |
|---|---|---|
| Output shape | 1D array | 2D matrix (M×K) |
| Thread mapping | 1 thread → 1 element | 1 thread → 1 output element |
| Launch pattern | 1D grid: (grid_x, 1, 1) | 2D grid: (grid_x, grid_y, 1) |
| Block size | (256, 1, 1) | (16, 16, 1) = 256 threads |
Each thread computes one element of the output matrix C. Thread at position (row, col) computes C[row][col] by multiplying the corresponding row of A with the corresponding column of B.
Memory Layout: GPU memory is flat (1D), but matrices are stored row-by-row. To access A[row][col], the kernel uses A[row * N + col].
Approach A: JIT Compilation:
Like Walkthrough 1, the kernel is written as a raw C++ string inside Python and compiled at runtime via PyTorch’s built-in JIT.
To use , make sure it’s downloaded and run:
cd Matrix_Multiplication # if not already inside the directorypython matmul_kernel.pyKey Code Snippets
import torch
# Snippet 1: Kernel source as a stringKERNEL_SOURCE = """extern "C"__global__ void matmul(float* A, float* B, float* C, int M, int N, int K) {    int row = blockIdx.y * blockDim.y + threadIdx.y;    int col = blockIdx.x * blockDim.x + threadIdx.x;
    if (row < M && col < K) {        float sum = 0.0f;        for (int n = 0; n < N; n++) {            sum += A[row * N + n] * B[n * K + col];        }        C[row * K + col] = sum;    }}"""
# Snippet 2: Creating the Matrix - 2D indexing to map threads onto the M×K output matrix# Inputs: A is M x N, B is N x K, C is M x KM, N, K = 1024, 512, 768
A = torch.randn(M, N, dtype=torch.float32, device="cuda")B = torch.randn(N, K, dtype=torch.float32, device="cuda")C = torch.zeros(M, K, dtype=torch.float32, device="cuda")
BLOCK = 16grid_x = (K + BLOCK - 1) // BLOCKgrid_y = (M + BLOCK - 1) // BLOCK
# Snippet 3: Compile the kernel stringmatmul_kernel = torch.cuda._compile_kernel(KERNEL_SOURCE, "matmul")
# Snippet 4:. Launch with a 2D grid, grid_x covers columns (K), grid_y covers rows (M)BLOCK = 16matmul_kernel(    grid=(grid_x, grid_y, 1),    block=(BLOCK, BLOCK, 1),    args=[A, B, C, M, N, K],)
C_ref = torch.mm(A, B)max_err = (C - C_ref).abs().max().item()print(f"Max error vs torch.mm: {max_err:.6f}")
The script verifies the result against torch.mm with a small tolerance. Floating-point arithmetic on GPUs may produce small numerical differences compared to CPU implementations due to parallel reduction order.
Expected output:[The performance numbers will vary]
Elapsed time: 2.753sMax error vs torch.mm: 0.000160Peak GPU Utilization: 93%Average GPU Utilization: 65.94%Expected output:
Elapsed time: 2.753sMax error vs torch.mm: 0.000160No GPU Usage captured.Approach B: C++ Extension
The second approach is more manual: write the kernel and Python binding to a single .cu file, compile it natively using PyTorch’s build system, and import it into Python.
Download the following files if you haven’t already:
| File | Role |
|---|---|
| Kernel + launcher + pybind11 binding | |
Build script, uses CUDAExtension to compile the .cu into a .pyd | |
| Python script that runs the built artifacts |
| File | Role |
|---|---|
| Kernel + launcher + pybind11 binding | |
Build script, uses CUDAExtension to compile the .cu into a .so | |
| Python script that runs the built artifacts |
Step 1: The kernel, launcher, and binding ():
#include <torch/extension.h>#include <hip/hip_runtime.h>#define BLOCK 16
// GPU kernel, one thread per output element of C__global__ void matmul(float* A, float* B, float* C, int M, int N, int K) {    int row = blockIdx.y * blockDim.y + threadIdx.y;    int col = blockIdx.x * blockDim.x + threadIdx.x;
    if (row < M && col < K) {        float sum = 0.0f;        for (int n = 0; n < N; n++) {            sum += A[row * N + n] * B[n * K + col];        }        C[row * K + col] = sum;    }}
// Launcher, extracts dims from torch::Tensor, allocates C, sets 2D grid/blocktorch::Tensor matmul_launcher(torch::Tensor A, torch::Tensor B) {    int M = A.size(0), N = A.size(1), K = B.size(1);    auto C = torch::zeros({M, K}, A.options());
    dim3 block(BLOCK, BLOCK);    dim3 grid((K + BLOCK - 1) / BLOCK, (M + BLOCK - 1) / BLOCK);
    matmul<<<grid, block>>>(A.data_ptr<float>(), B.data_ptr<float>(),                            C.data_ptr<float>(), M, N, K);    hipDeviceSynchronize();    return C;}
// Python binding, exposes matmul_launcher as matmul_ext.matmulPYBIND11_MODULE(TORCH_EXTENSION_NAME, m) {    m.def("matmul", &matmul_launcher, "Naive matmul kernel (HIP): A(M,N) @ B(N,K) -> C(M,K)");}
Compared to add_one_launcher in Walkthrough 1, the launcher here:
- Takes two input tensors instead of one
- Derives all three dimensions (M, N, K) from tensor shapes, no manual size passing from Python
- Allocates and returns the output tensor C, rather than mutating in-place
- Uses
dim3for both grid and block to express the 2D launch shape
Step 2: Build
pip install --no-build-isolation -v .This produces the following files:
build/: directory with the.pydfilesmatmul_kernel.hip: the HIP source generated by hipifying the.cufile; this is whathipccactually compiled
build/: directory with the.sofilesmatmul_kernel.hip: the HIP source generated by hipifying the.cufile; this is whathipccactually compiled
Step 3: Use from Python ():
Execute this script to see the kernel in action:
cd Matrix_Multiplication # if not already in directorypython run_compiled_multiply.pyExpected output:
Result: tensor([[19., 22.], [43., 50.]])Awesome! You just implemented matrix multiplication on the GPU. This is a major milestone because matrix multiplication is the backbone of modern machine learning operations like:
- Neural network layers
- Attention mechanisms
- Embeddings
- Transformers
Next Steps
You’ve learned to write, compile, and launch GPU kernels using both JIT compilation and C++ extensions for basic parallel operations.
Performance optimizations:
- Shared memory tiling - Cache data blocks to reduce global memory access
- Memory coalescing - Optimize memory access patterns for bandwidth
Real-world algorithms:
- 2D Convolution - A small filter (kernel) slides across an image, computing each output pixel from a weighted sum of neighboring pixels. This introduces stencil computations and shared memory tiling, where threads reuse overlapping image regions to reduce global memory access.
- Softmax Function: Softmax converts a vector of numbers into probabilities that sum to 1, commonly used in neural network outputs. Implementing it efficiently on GPU introduces parallel reductions and numerical stability techniques while processing large vectors.
Production considerations:
- Error handling - Bounds checking and device management
- PyTorch integration - Custom operators with autograd support
Need help with this playbook?
Run into an issue or have a question? Open a GitHub issue and our team will take a look.