- Generating Images with ComfyUI and Z Image Turbo
- Automating Workflows with n8n and Local LLMs
- Local LLM Coding with VSCode and Qwen3-Coder
- Running and Serving LLMs with LM Studio
- Running LLMs on PyTorch with AMD ROCm™ Software
- Building Custom GPU Kernels with PyTorch and AMD ROCm™
- Building Your First Agent with GAIA
- Chatting with LLMs in Open WebUI
- Clustering Two Ryzen™ AI Halos with RCCL
- Clustering Two Ryzen™ AI Halos with RPC
- Fine-Tuning LLMs with LLaMA Factory
- Fine-Tuning LLMs with PyTorch and AMD ROCm™ Software
- Fine-Tuning LLMs with Unsloth
- Getting Started with Lemonade
- Getting Started with Ollama
- Getting Started with vLLM
- Local Computer Vision with AMD Ryzen™ AI NPU
- Real-Time Speech-to-Speech Translation
- Remote Development with AMD Sync
- Running OpenClaw Locally with Lemonade Server
Local Computer Vision with AMD Ryzen™ AI NPU
Build local perception capabilities using the CVML SDK on top of Ryzen AI and AMD ROCm™ software
Overview
The Ryzen AI CVML Library is an AMD C++ computer vision and machine learning toolkit that provides powerful, on-device perception capabilities — including depth estimation, face detection, and face mesh tracking. Built on top of the Ryzen AI drivers, the library automatically selects the best available hardware (GPU or NPU) for inference, letting you add AI features to C++ applications without worrying about model training or framework integration. All processing happens locally on your system, making it ideal for privacy-sensitive, low-latency applications.
This playbook teaches you how to set up the Ryzen AI CVML Library, build the included sample applications, and run face detection on a sample image.
What You’ll Learn
- How to install prerequisites and set up the Ryzen AI CVML Library on your system
- How the CVML C++ API works: contexts, feature objects, and image buffers
- How to build and run the included sample applications using CMake and OpenCV
- How to run face detection on an image with bounding boxes and landmarks
- How to integrate CVML features into your own C++ applications
Check for Software Updates
Before starting, ensure your Ryzen AI Halo has the latest software installed. Open the AMD Ryzen™ AI Developer Center and check for available updates, both to the app itself and additional software.
Go to the Updates tab. If updates are available, install them and reboot before continuing.
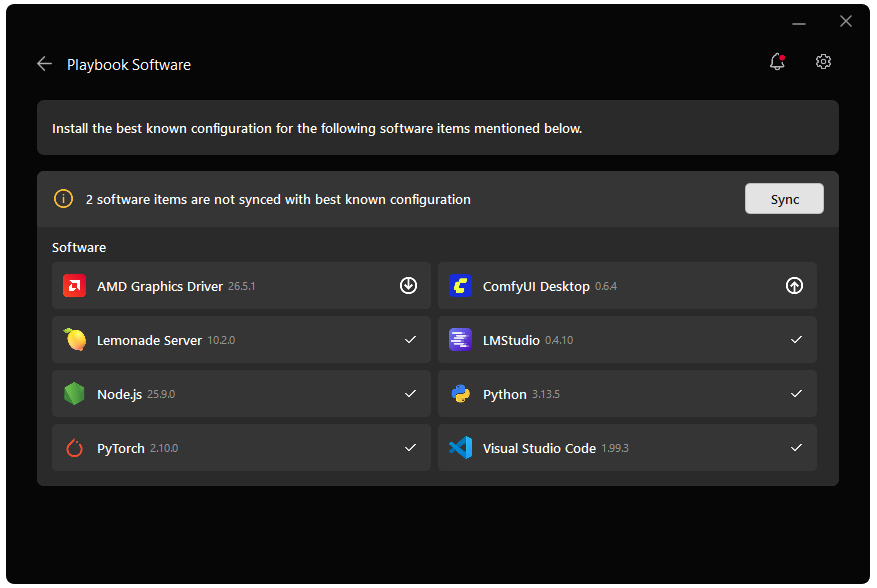
Go to the Manage tab. If updates are available, install them and reboot before continuing.

Installing Software Prerequisites
AMD GPU Driver
Update to the latest AMD GPU driver using AMD Software: Adrenalin Edition™.
- Open
AMD Software: Adrenalin Editionfrom your Start menu or system tray. - Navigate to Driver and Software, click Manage Updates.
- If an update is available, follow the prompts to download and install.
AMD GPU Driver
Install the AMD GPU Driver (amdgpu) using the Radeon Software for Linux (RSL) flow. For instructions for your distribution, see Install the kernel driver.
Additional Dependencies
Before starting, ensure you have the following:
- OpenCV 4.11 — download
opencv-4.11.0-windows.exe, run it, and extract to a local folder (e.g.C:\opencv) - CMake — download the Windows x86-64 MSI installer and during installation select “Add CMake to the system PATH for all users”
- Ryzen AI NPU driver — install the latest available version
- Visual Studio 2022 Community with the “Desktop development with C++” workload (includes MSVC compiler, Windows SDK, and C++ build tools)
- OpenCV 4.11 — must be built from source (apt packages on Ubuntu 22.04 and 24.04 do not provide version 4.11). See Building OpenCV from Source below.
- CMake — install via apt:
sudo apt install cmake- Ubuntu 22.04 or 24.04 (kernel >= 6.11.0-21-generic)
- Ryzen AI NPU driver (Linux installer — required for NPU inference)
- Vulkan SDK (installed in the Vulkan SDK section below)
Setting Up the CVML Library
Create an AMD account at account.amd.com if you don’t have one, then sign in to download the Ryzen AI CVML Library from the portal link below:
https://account.amd.com/en/forms/downloads/xef.html?filename=72293_Ryzen_AI_Library_26.05.20.zipAfter downloading, extract the package to a local directory (e.g., C:\RyzenAI-Library on Windows or ~/RyzenAI-Library on Linux) and set the AMD_CVML_SDK_ROOT environment variable to the extracted location:
set AMD_CVML_SDK_ROOT=C:\RyzenAI-Libraryexport AMD_CVML_SDK_ROOT=~/RyzenAI-LibraryThe library package contains the following structure:
| Folder | Contents |
|---|---|
cmake/ | Packaging info for CMake’s find_package function |
include/ | C++ header files (cvml-depth-estimation.h, cvml-face-detector.h, cvml-face-mesh.h, etc.) |
windows/ | Binary files for Windows (compile-time .LIB and runtime .DLL/.GRAPHLIB/.AMODEL files) |
linux/ | Binary files for Linux (compile and runtime .SO files) |
samples/ | Individual sample applications with source code |
Linux-Specific Setup
Building OpenCV from Source
Install OpenCV build dependencies:
sudo apt install unzip wget ubuntu-restricted-extras libunwind-dev libgstreamer1.0-dev libgstreamer-plugins-base1.0-dev libgtk2.0-dev libgtk-3-dev pkg-config ffmpegDownload, configure, and build OpenCV 4.11.0 with the contrib modules (reference: OpenCV Linux install tutorial):
wget -O opencv-4.11.0.zip https://github.com/opencv/opencv/archive/4.11.0.zipwget -O opencv_contrib-4.11.0.zip https://github.com/opencv/opencv_contrib/archive/4.11.0.zipunzip opencv-4.11.0.zipunzip opencv_contrib-4.11.0.zipmkdir -p build && cd build
cmake -DBUILD_opencv_world=ON \  -DBUILD_SHARED_LIBS=ON \  -DCMAKE_INSTALL_PREFIX=install \  -DOPENCV_EXTRA_MODULES_PATH=../opencv_contrib-4.11.0/modules ../opencv-4.11.0 \  -DWITH_GSTREAMER=ON \  -DHIGHGUI_ENABLE_PLUGINS=ON
cmake --build . --target install
Shared libraries are installed under <build>/install/lib/. Use the install directory as OPENCV_INSTALL_ROOT in later steps.
Vulkan SDK
Install the Vulkan SDK:
UBUNTU_CODENAME=$(. /etc/os-release; echo "$UBUNTU_CODENAME")wget -qO- https://packages.lunarg.com/lunarg-signing-key-pub.asc | sudo tee /etc/apt/trusted.gpg.d/lunarg.ascsudo wget -qO /etc/apt/sources.list.d/lunarg-vulkan-1.3.296-$UBUNTU_CODENAME.list https://packages.lunarg.com/vulkan/1.3.296/lunarg-vulkan-1.3.296-$UBUNTU_CODENAME.listsudo apt updatesudo apt install vulkan-sdkIf you are running Ubuntu 22.04, also update the MESA Vulkan drivers:
sudo apt update && sudo apt upgradesudo add-apt-repository ppa:kisak/kisak-mesa -ysudo apt updatesudo apt upgradeAdditional Ubuntu 24.04 Dependencies
If you are running Ubuntu 24.04, install additional required packages:
sudo apt install libavcodec-dev libavformat-dev libswscale-dev libnsl2 gstreamer1.0-plugins-good gstreamer1.0-plugins-bad gstreamer1.0-plugins-ugly -y
DEP_PKG_LIST="https://launchpad.net/ubuntu/+archive/primary/+files/libmpdec3_2.5.1-2build2_amd64.deb \    https://launchpad.net/ubuntu/+archive/primary/+files/libpython3.10-minimal_3.10.4-3_amd64.deb \    https://launchpad.net/ubuntu/+archive/primary/+files/libpython3.10-stdlib_3.10.4-3_amd64.deb \    https://launchpad.net/ubuntu/+archive/primary/+files/libpython3.10_3.10.4-3_amd64.deb \    https://launchpad.net/ubuntu/+archive/primary/+files/libprotobuf23_3.12.4-1ubuntu7_amd64.deb \    https://launchpad.net/ubuntu/+archive/primary/+files/libgoogle-glog0v5_0.5.0+really0.4.0-2_amd64.deb \    https://launchpad.net/ubuntu/+archive/primary/+files/libtiff5_4.3.0-6_amd64.deb \    https://launchpad.net/ubuntu/+archive/primary/+files/libilmbase25_2.5.7-2_amd64.deb \    https://launchpad.net/ubuntu/+archive/primary/+files/libopenexr25_2.5.7-1_amd64.deb"
for pkg in $DEP_PKG_LISTdo    echo $pkg    wget $pkg    sudo dpkg -i *.deb    rm *.debdone
Core Concepts
The CVML Library provides a simple C++ API where each perception feature (depth estimation, face detection, face mesh) has its own header file and feature object. You don’t work with raw models — the library handles model loading, preprocessing, and inference automatically.
Available Features
| Feature | Header File | Description |
|---|---|---|
| Depth Estimation | cvml-depth-estimation.h | Generates per-pixel depth maps from RGB images |
| Face Detection | cvml-face-detector.h | Detects faces with bounding boxes, landmarks (eyes, nose, mouth), and confidence scores |
| Face Mesh | cvml-face-mesh.h | Tracks detailed facial geometry with dense mesh points |
Programming Model
Every CVML application follows the same four-step pattern:
- Create a Context — The
amd::cvml::Contextmanages shared resources like logging and inference backend selection. - Create a Feature Object — Instantiate the specific feature (e.g.,
amd::cvml::DepthEstimation) against the context. - Wrap Input Data — Use
amd::cvml::Imageto encapsulate your RGB image buffer without copying data. - Execute — Call the feature’s processing method and read the results.
// Step 1: Create contextauto context = amd::cvml::CreateContext();
// Step 2: Create feature objectamd::cvml::DepthEstimation depth_estimation(context);
// Step 3: Wrap input image (RGB, uint8, no copy)amd::cvml::Image input(amd::cvml::Image::Format::kRGB,                       amd::cvml::Image::DataType::kUint8,                       width, height, data_pointer);
// Step 4: Executeamd::cvml::Image output(amd::cvml::Image::Format::kGrayScale,                        amd::cvml::Image::DataType::kFloat32,                        width, height, nullptr);depth_estimation.GenerateDepthMap(input, &output);
// Cleanupcontext->Release();
Inference Backend
The library automatically selects the best hardware (GPU or NPU) for each operation. You can also set the backend explicitly:
// Let the library choose the best hardware (default)context->SetInferenceBackend(amd::cvml::Context::InferenceBackend::AUTO);Building the Sample Applications
The CVML Library includes ready-to-build sample applications for each feature. Let’s build them all at once.
-
Set the
OPENCV_INSTALL_ROOTenvironment variable to point to your OpenCV installation:
rem Set the OpenCV path (Windows)rem Point to the build subfolder inside your OpenCV installationrem (e.g. if you extracted OpenCV to C:\opencv, use C:\opencv\build)rem CMake's find_package needs this folder to locate OpenCVConfig.cmakeset OPENCV_INSTALL_ROOT=C:\opencv\build# Set the OpenCV path (Linux)export OPENCV_INSTALL_ROOT=/path/to/opencv-
Build the samples with CMake:
rem Build the samples (Windows)cd samplesmkdir buildcmake -S %CD% -B %CD%\build -DOPENCV_INSTALL_ROOT=%OPENCV_INSTALL_ROOT% -DCMAKE_PREFIX_PATH=%OPENCV_INSTALL_ROOT%cmake --build %CD%\build --config Release# Build the samples (Linux)cd samplesmkdir buildcmake -S $PWD -B $PWD/build -DOPENCV_INSTALL_ROOT="$OPENCV_INSTALL_ROOT" -DCMAKE_PREFIX_PATH="$OPENCV_INSTALL_ROOT"cmake --build $PWD/build --config ReleaseAfter a successful build, the executables are located in:
samples\build\cvml-sample-face-detection\Release\cvml-sample-face-detection.exesamples\build\cvml-sample-depth-estimation\Release\cvml-sample-depth-estimation.exesamples\build\cvml-sample-face-mesh\Release\cvml-sample-face-mesh.exesamples/build/cvml-sample-face-detection/cvml-sample-face-detectionsamples/build/cvml-sample-depth-estimation/cvml-sample-depth-estimationsamples/build/cvml-sample-face-mesh/cvml-sample-face-mesh-
Before running any sample, ensure the CVML runtime files are accessible:
rem Add the CVML runtime folder to PATH (Windows)set PATH=%CD%\..\windows;%PATH%rem Add OpenCV runtime libraries to PATHset PATH=%OPENCV_INSTALL_ROOT%\x64\vc16\bin;%PATH%# Add the CVML runtime folder to LD_LIBRARY_PATH (Linux)export LD_LIBRARY_PATH=$PWD/../linux:$LD_LIBRARY_PATHexport LD_LIBRARY_PATH=/opt/xilinx/xrt/lib:$LD_LIBRARY_PATH# Add OpenCV runtime libraries to LD_LIBRARY_PATHexport LD_LIBRARY_PATH=$OPENCV_INSTALL_ROOT/lib:$LD_LIBRARY_PATHRunning Face Detection
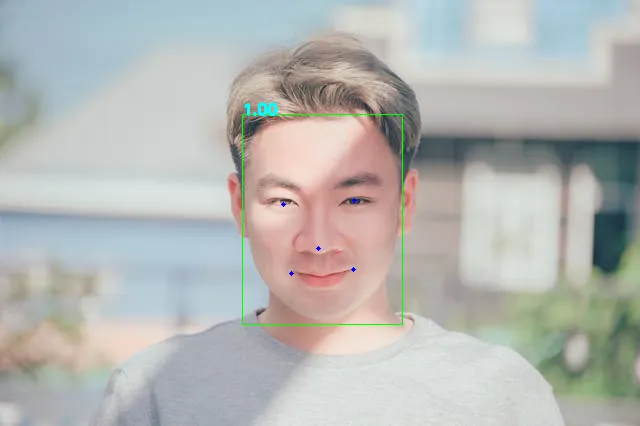
The face detection sample detects faces in an image, video, or live camera feed. It draws bounding boxes, confidence scores, and five facial landmarks (two eyes, nose, and two mouth edges) on each detected face.
First, navigate to the face detection executable folder:
cd build\cvml-sample-face-detection\Releasecd build/cvml-sample-face-detectionThen download a sample image to use as input (photo by Jopwell, free to use via Pexels):
curl -L -o sample_face.jpg "https://images.pexels.com/photos/895863/pexels-photo-895863.jpeg?cs=srgb&dl=pexels-jopwell-895863.jpg&fm=jpg"Run face detection on the sample image:
cvml-sample-face-detection.exe -i sample_face.jpg./cvml-sample-face-detection -i sample_face.jpgA window will appear showing the image with bounding boxes around detected faces, confidence scores, and facial landmark points (eyes, nose, mouth edges).
Save the annotated output to a file:
cvml-sample-face-detection.exe -i sample_face.jpg -o output_face.jpg./cvml-sample-face-detection -i sample_face.jpg -o output_face.jpgUse the precise model for higher accuracy (at the cost of speed):
cvml-sample-face-detection.exe -i sample_face.jpg -m precise./cvml-sample-face-detection -i sample_face.jpg -m preciseThe face detection feature offers two model variants:
| Model | Speed | Accuracy | Best For |
|---|---|---|---|
fast (default) | Higher FPS | Good | Real-time camera applications |
precise | Lower FPS | Best | Photo analysis, high-accuracy needs |
Integrating CVML into Your Own Application
To use the CVML Library in your own C++ project, add it via CMake’s find_package:
find_package(RyzenAILibrary REQUIRED PATHS ${AMD_CVML_SDK_ROOT})
# Link against the CVML librariestarget_link_libraries(${PROJECT_NAME} ${RyzenAILibrary_LIBS})
Where AMD_CVML_SDK_ROOT points to the root of the Ryzen AI CVML Library folder. Then include the appropriate header for the feature you want:
#include <cvml-face-detector.h> // for face detection#include <cvml-depth-estimation.h> // for depth estimation#include <cvml-face-mesh.h> // for face meshNext Steps
For each sample below, navigate to its executable folder first, following the same pattern as the Running Face Detection section above (e.g. cd build\cvml-sample-depth-estimation\Release on Windows or cd build/cvml-sample-depth-estimation on Linux). On Windows, append .exe to each command (e.g. cvml-sample-depth-estimation.exe).
- Try Depth Estimation: Run
cvml-sample-depth-estimation -i sample_face.jpgto generate a colorized depth map — closer objects appear in warm colors, distant ones in cool colors - Explore Face Mesh: Run
cvml-sample-face-mesh -i sample_face.jpgto see dense facial geometry tracking with detailed mesh points - Process video files: Use the
-iand-oflags on any sample to process videos (e.g.,cvml-sample-face-detection -i video.mp4 -o output.mp4) - Compare model variants: Try
-m precisevs the default-m faston face detection to see the accuracy/speed tradeoff firsthand - Build your own app: Use the CMake integration and C++ API to add CVML features to your own C++ applications
- Combine features: Chain face detection with depth estimation in the same application for richer scene understanding
- Browse the source: Read the Ryzen AI CVML Library on GitHub for header documentation, additional samples, and API details
Need help with this playbook?
Run into an issue or have a question? Open a GitHub issue and our team will take a look.