- Generating Images with ComfyUI and Z Image Turbo
- Automating Workflows with n8n and Local LLMs
- Local LLM Coding with VSCode and Qwen3-Coder
- Running and Serving LLMs with LM Studio
- Running LLMs on PyTorch with AMD ROCm™ Software
- Building Custom GPU Kernels with PyTorch and AMD ROCm™
- Building Your First Agent with GAIA
- Chatting with LLMs in Open WebUI
- Clustering Two Ryzen™ AI Halos with RCCL
- Clustering Two Ryzen™ AI Halos with RPC
- Fine-Tuning LLMs with LLaMA Factory
- Fine-Tuning LLMs with PyTorch and AMD ROCm™ Software
- Fine-Tuning LLMs with Unsloth
- Getting Started with Lemonade
- Getting Started with Ollama
- Getting Started with vLLM
- Local Computer Vision with AMD Ryzen™ AI NPU
- Real-Time Speech-to-Speech Translation
- Remote Development with AMD Sync
- Running OpenClaw Locally with Lemonade Server
Fine-Tuning LLMs with Unsloth
Use Unsloth for memory-efficient fine-tuned LLMs™

Overview
This playbook shows how to fine-tune a language model locally with Unsloth on AMD hardware.
It uses a short Supervised Fine-Tuning (SFT) example with LoRA adapters on unsloth/gemma-4-E4B-it, using a subset of the mlabonne/FineTome-100k dataset. The goal is to give you a simple end-to-end workflow that covers setup, training, inference, and saving the fine-tuned result.
The example is designed to be practical and easy to modify, so you can use it as a starting point for your own datasets and models.
What You’ll Learn
- How to set up the Unsloth environment
- How to fine-tune a LLM using SFT with Unsloth
- How to save the fine-tuned result in local storage
Why Unsloth?
Unsloth makes LLM fine-tuning easier to run on local hardware by reducing memory usage and speeding up training compared to a standard setup.
In this playbook, we use Unsloth together with LoRA-based SFT. That means the base model stays mostly frozen, while a much smaller set of adapter weights is trained. This is a good fit for local development because it is lighter than full fine-tuning and faster to iterate on.
Unsloth also supports other training approaches, including QLoRA and reinforcement learning workflows. This playbook focuses on the simplest path first: a small LoRA fine-tuning example that users can run, understand, and extend.
Setting the Memory Configuration
For the Ryzen AI Halo, the dedicated GPU memory defaults to 64GB, which is sufficient for most workloads. For larger models or longer contexts, increasing this to 96GB may help. To adjust, open AMD Software: Adrenalin Edition™ and navigate to Performance → Tuning → AMD Variable Graphics Memory. Reboot for the changes to take effect.
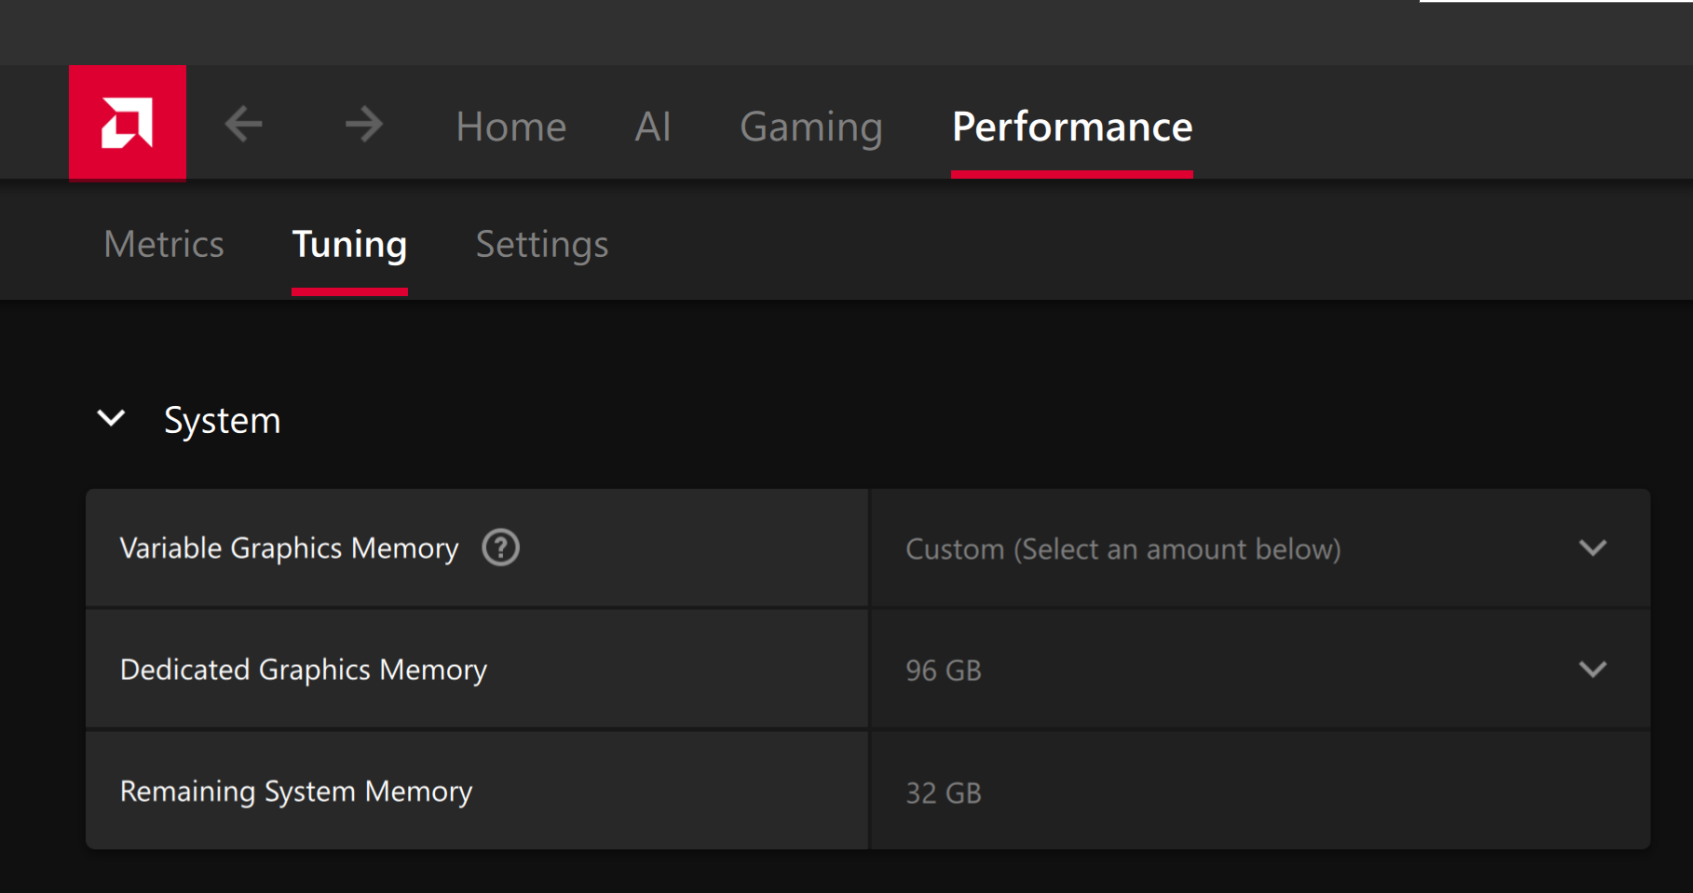
To change the dedicated GPU memory value, open AMD Software: Adrenalin Edition™ and navigate to Performance → Tuning → AMD Variable Graphics Memory. Reboot for the changes to take effect.
On Linux, to run larger models, increase the shared memory pool available to the GPU. This might involve setting the BIOS dedicated GPU memory to the minimum, so that the shared memory pool can be maximized.
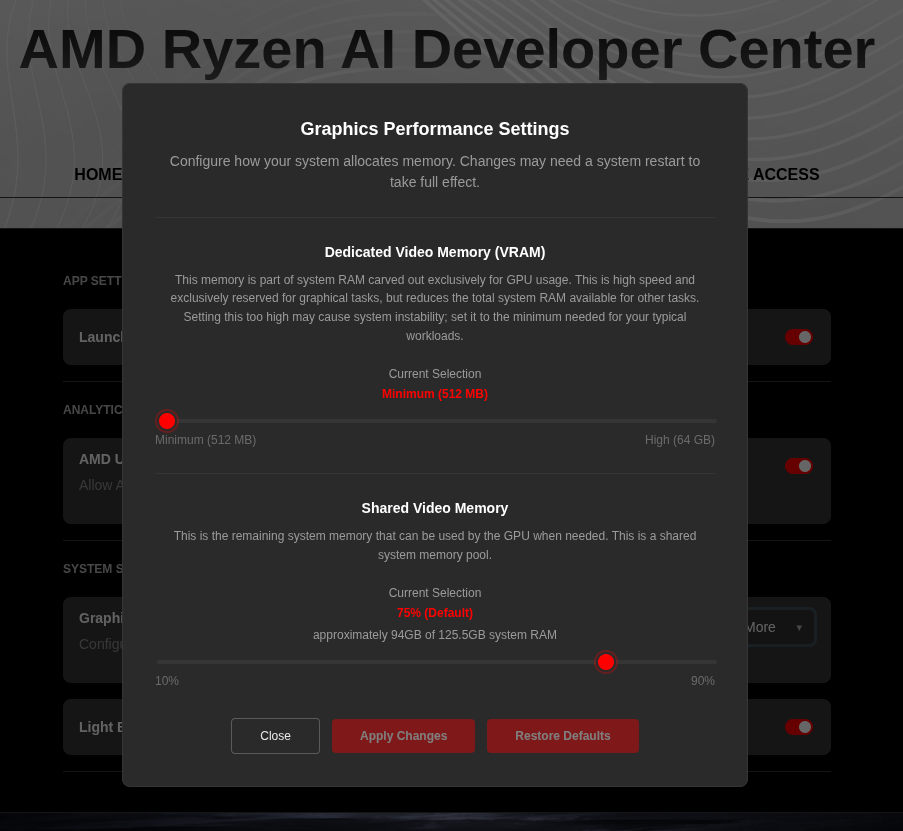
For the AMD Ryzen™ AI Halo, the default is 96GB shared. To modify this, open the AMD Ryzen™ AI Developer Center and go to the Settings tab. Under Graphics Performance Settings, increase the Shared Video Memory slider, then click Apply Changes and reboot for the changes to take effect.
Increase the shared memory pool by changing the kernel’s Translation Table Manager (TTM) page setting. AMD recommends setting the minimum dedicated VRAM in the BIOS (0.5 GB) so the maximum amount is available as shared memory.
- Install the
pipxutility and add the path for pipx-installed wheels to the system search path:
sudo apt install pipxpipx ensurepath- Install the
amd-debug-toolswheel from PyPI:
pipx install amd-debug-tools- Query the current shared memory settings:
amd-ttm- Increase the shared memory allocation (units in GB):
amd-ttm --set <NUM>- Reboot for the changes to take effect.
Check for Software Updates
Before starting, ensure your Ryzen AI Halo has the latest software installed. Open the AMD Ryzen™ AI Developer Center and check for available updates, both to the app itself and additional software.
Go to the Updates tab. If updates are available, install them and reboot before continuing.
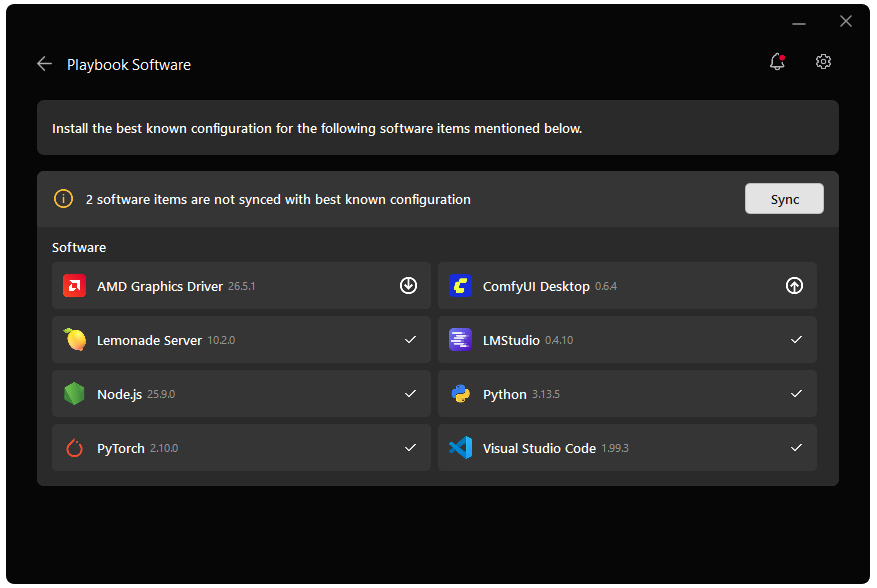
Go to the Manage tab. If updates are available, install them and reboot before continuing.

Installing Software Prerequisites
Create a Virtual Environment
Open a terminal and create a venv with AMD ROCm™ software and PyTorch already installed:
sudo apt updatepython3 -m venv unsloth-env --system-site-packagessource unsloth-env/bin/activateGrant your user access to GPU devices (log out and back in for this to take effect):
sudo usermod -aG render,video $LOGNAMEOpen a terminal and create a venv:
sudo apt updatesudo apt install -y python3-venvpython3 -m venv unsloth-envsource unsloth-env/bin/activateOpen a PowerShell terminal and create a virtual environment:
python -m venv unsloth-env --system-site-packages.\unsloth-env\Scripts\activateOpen a PowerShell terminal and create a virtual environment:
python -m venv unsloth-env.\unsloth-env\Scripts\activateInstalling Basic Dependencies
PyTorch
Install PyTorch with AMD ROCm™ software support in the created virtual environment:
python -m pip install --index-url https://repo.amd.com/rocm/whl/gfx1151/ "torch==2.11.0+rocm7.13.0" "torchvision==0.26.0+rocm7.13.0" "torchaudio==2.11.0+rocm7.13.0"python -m pip install --index-url https://repo.amd.com/rocm/whl/gfx1150/ "torch==2.11.0+rocm7.13.0" "torchvision==0.26.0+rocm7.13.0" "torchaudio==2.11.0+rocm7.13.0"python -m pip install --index-url https://repo.amd.com/rocm/whl/gfx1152/ "torch==2.11.0+rocm7.13.0" "torchvision==0.26.0+rocm7.13.0" "torchaudio==2.11.0+rocm7.13.0"python -m pip install --index-url https://repo.amd.com/rocm/whl/gfx110X-all/ "torch==2.11.0+rocm7.13.0" "torchvision==0.26.0+rocm7.13.0" "torchaudio==2.11.0+rocm7.13.0"python -m pip install --index-url https://repo.amd.com/rocm/whl/gfx120X-all/ "torch==2.11.0+rocm7.13.0" "torchvision==0.26.0+rocm7.13.0" "torchaudio==2.11.0+rocm7.13.0"For other devices, please refer to this link for full instructions.
AMD GPU Driver
Update to the latest AMD GPU driver using AMD Software: Adrenalin Edition™.
- Open
AMD Software: Adrenalin Editionfrom your Start menu or system tray. - Navigate to Driver and Software, click Manage Updates.
- If an update is available, follow the prompts to download and install.
AMD GPU Driver
Install the AMD GPU Driver (amdgpu) using the Radeon Software for Linux (RSL) flow. For instructions for your distribution, see Install the kernel driver.
Additional Dependencies
pip install "unsloth[amd] @ git+https://github.com/unslothai/unsloth.git"pip install "unsloth[amd] @ git+https://github.com/unslothai/unsloth.git"pip install triton-windowsDownload the Unsloth Fine-Tuning Script
Instead of manually executing each step, this playbook provides a clean, end-to-end script here: .
Run the following code to execute the script:
python test_unsloth.pyThe rest of the playbook will conceptually go through each major step of the script.
How It Works
The test_unsloth.py script performs the following steps:
- Load Model: Loads unsloth/gemma-4-E4B-it using FastModel.
- Prepare Data: Standardizes the dataset (e.g., FineTome-100k) and applies the Gemma-4 chat template.
- Apply LoRA: Adds adapters to language, attention, and MLP modules for efficient training.
- Train: Uses SFTTrainer with response-only loss masking.
- Inference: Runs a quick generation test to verify performance.
- Save: Exports LoRA adapters locally.
Key Configuration
You can modify the following constants to customize your run:
MODEL_NAME = "unsloth/gemma-4-E4B-it"MAX_SEQ_LEN = 1024DATASET_NAME = "mlabonne/FineTome-100k"OUTPUT_DIR = "gemma_4_lora"Example of the Unsloth welcome message and output when loading the model weights:
Prepare Dataset
We use a subset of:
mlabonne/FineTome-100kThe dataset is:
- Converted into chat format
- Processed using the Gemma-4 chat template
- Cleaned to remove duplicate BOS tokens
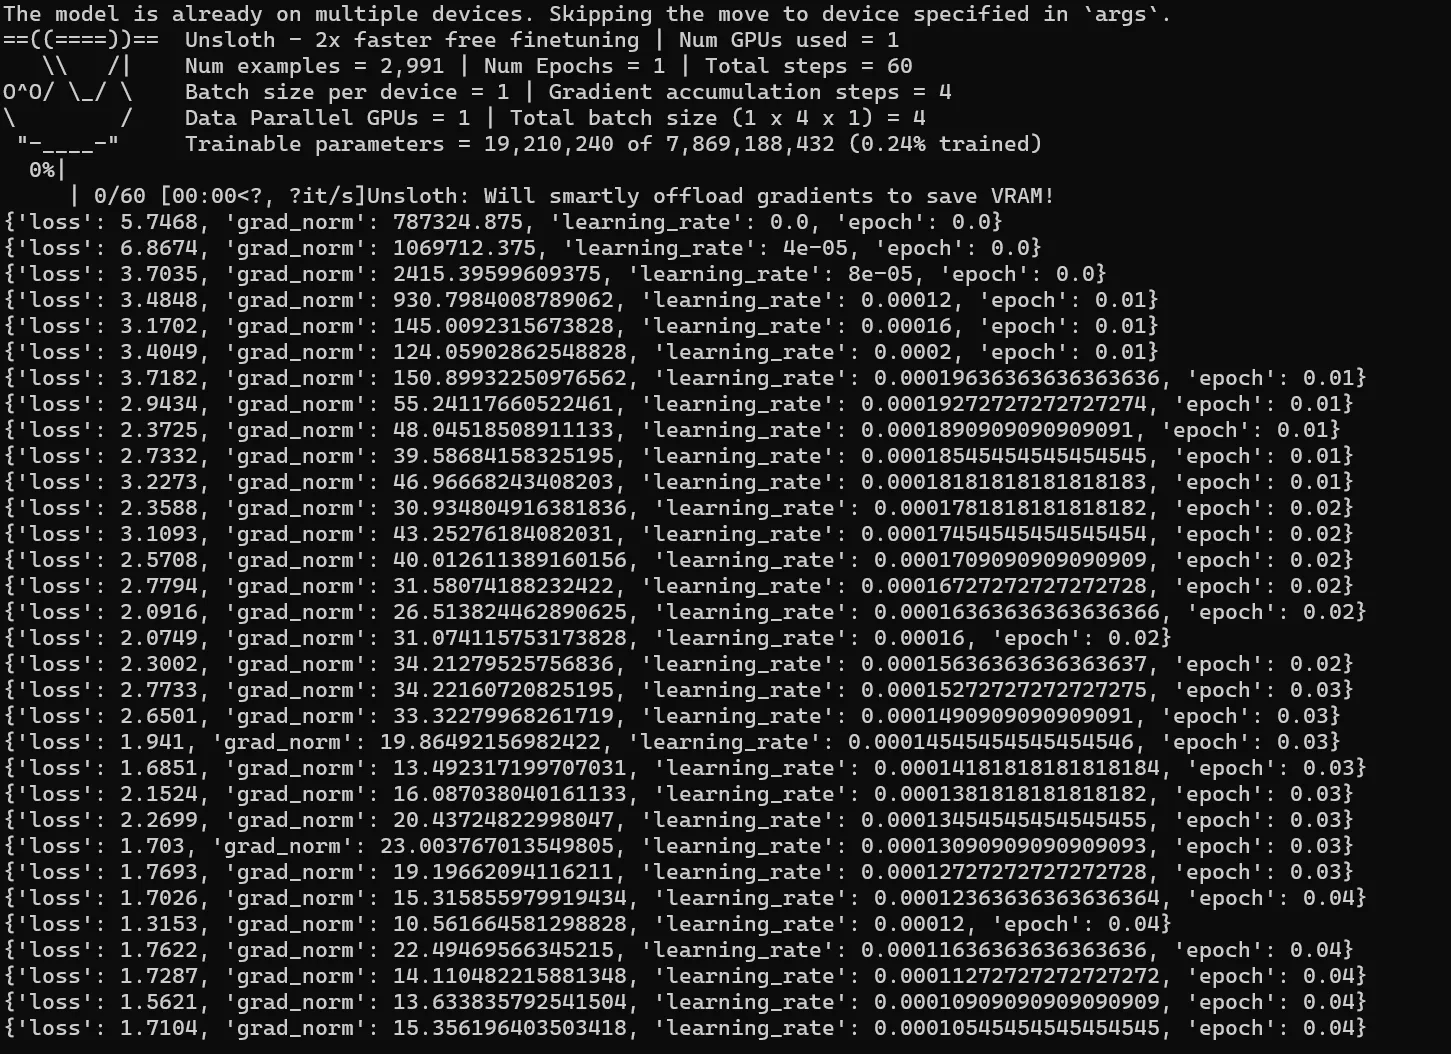
Train the Model
The script runs a short training demo, with the following parameters:
- ~50 steps
- Small batch size
- Gradient accumulation
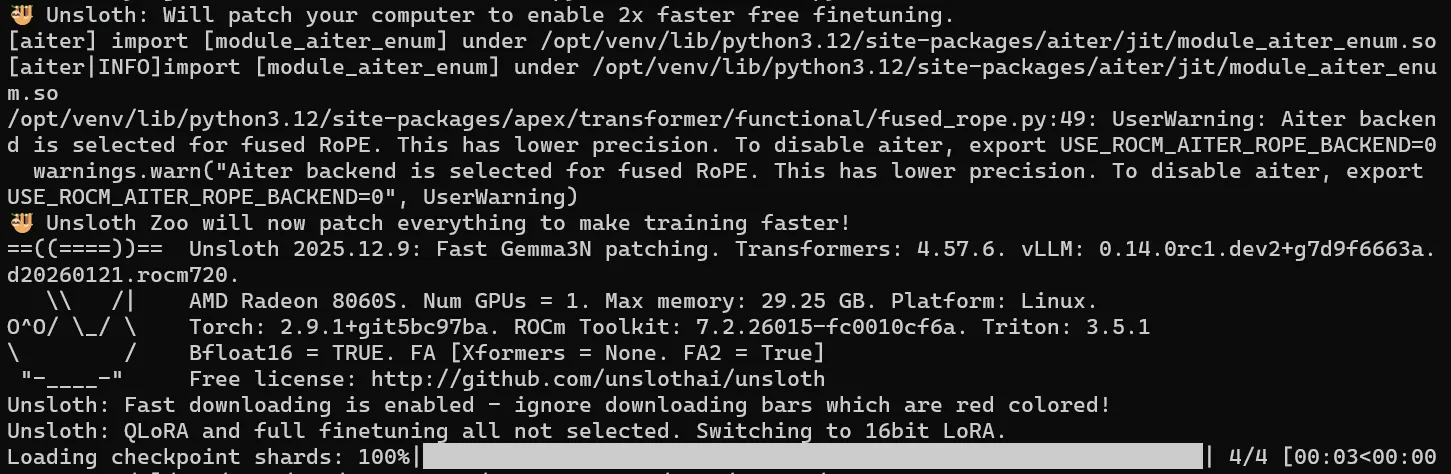
During training, you will see logs such as:
Saving and Deployment
Local Saving (LoRA)
The script automatically saves LoRA adapters to the OUTPUT_DIR.
model.save_pretrained("gemma_4_lora")tokenizer.save_pretrained("gemma_4_lora")Save merged model (for vLLM)
For deployment with vLLM, merge the adapters into a full model:
model.save_pretrained_merged("gemma-4-finetune", tokenizer)Export GGUF (for llama.cpp)
Convert directly to GGUF for local inference:
model.save_pretrained_gguf("gemma_4_finetune", tokenizer, quantization_method="Q8_0")Known Warnings
These warnings are printed by Unsloth at startup on Windows ROCm and are all safe to ignore:
| Warning | Reason | Safe to ignore? |
|---|---|---|
bitsandbytes library load error | bitsandbytes has no Windows ROCm build | Yes — this playbook uses adamw_torch, not bnb |
No ROCm platform found for torch.distributed | ROCm-on-Windows lacks distributed training | Yes — single-GPU training is unaffected |
Unsloth: WARNING! You are using an unsupported platform | Unsloth flags non-Linux builds | Yes — Windows ROCm works for single-GPU SFT |
triton is not available | Triton has no Windows build | Yes — Unsloth falls back to PyTorch kernels |
Training will proceed correctly despite these warnings.
Next Steps
- Try Unsloth Studio, an intuitive GUI for Unsloth
- Train on your own specific datasets
- Try finetuning with different hyperparameters
- Deploy with vLLM or llama.cpp
- Try QLoRA for a lower-memory setup
Resources
Below are some additional resources to learn more about Unsloth and finetuning:
Need help with this playbook?
Run into an issue or have a question? Open a GitHub issue and our team will take a look.