- Generating Images with ComfyUI and Z Image Turbo
- Automating Workflows with n8n and Local LLMs
- Local LLM Coding with VSCode and Qwen3-Coder
- Running and Serving LLMs with LM Studio
- Running LLMs on PyTorch with AMD ROCm™ Software
- Building Custom GPU Kernels with PyTorch and AMD ROCm™
- Building Your First Agent with GAIA
- Chatting with LLMs in Open WebUI
- Clustering Two Ryzen™ AI Halos with RCCL
- Clustering Two Ryzen™ AI Halos with RPC
- Fine-Tuning LLMs with LLaMA Factory
- Fine-Tuning LLMs with PyTorch and AMD ROCm™ Software
- Fine-Tuning LLMs with Unsloth
- Getting Started with Lemonade
- Getting Started with Ollama
- Getting Started with vLLM
- Local Computer Vision with AMD Ryzen™ AI NPU
- Real-Time Speech-to-Speech Translation
- Remote Development with AMD Sync
- Running OpenClaw Locally with Lemonade Server
Real-Time Speech-to-Speech Translation
Build a real-time speech-to-speech translation on your local hardware.
Overview
The AMD ROCm™ software and PyTorch stack create a unified ecosystem for on-device AI. It works for both Windows and Linux with official support for a wide range of devices including Ryzen™ AI APUs and Radeon™ GPUs.
This playbook will teach you how to run low-latency, expressive, and private speech-to-speech translation entirely on the edge.
What You’ll Learn
- How to set up speech-to-speech environment
- How to write Python code to load and use speech-speech models
- How to run and experiment with the Gradio UI
Why use real-time speech-to-speech translation?
- Removes friction between translation and language barriers
- Conveys tone, emotion, and intent without awkward pauses
- Enables global collaboration and faster decision-making
Setting the Memory Configuration
For the Ryzen AI Halo, the dedicated GPU memory defaults to 64GB, which is sufficient for most workloads. For larger models or longer contexts, increasing this to 96GB may help. To adjust, open AMD Software: Adrenalin Edition™ and navigate to Performance → Tuning → AMD Variable Graphics Memory. Reboot for the changes to take effect.
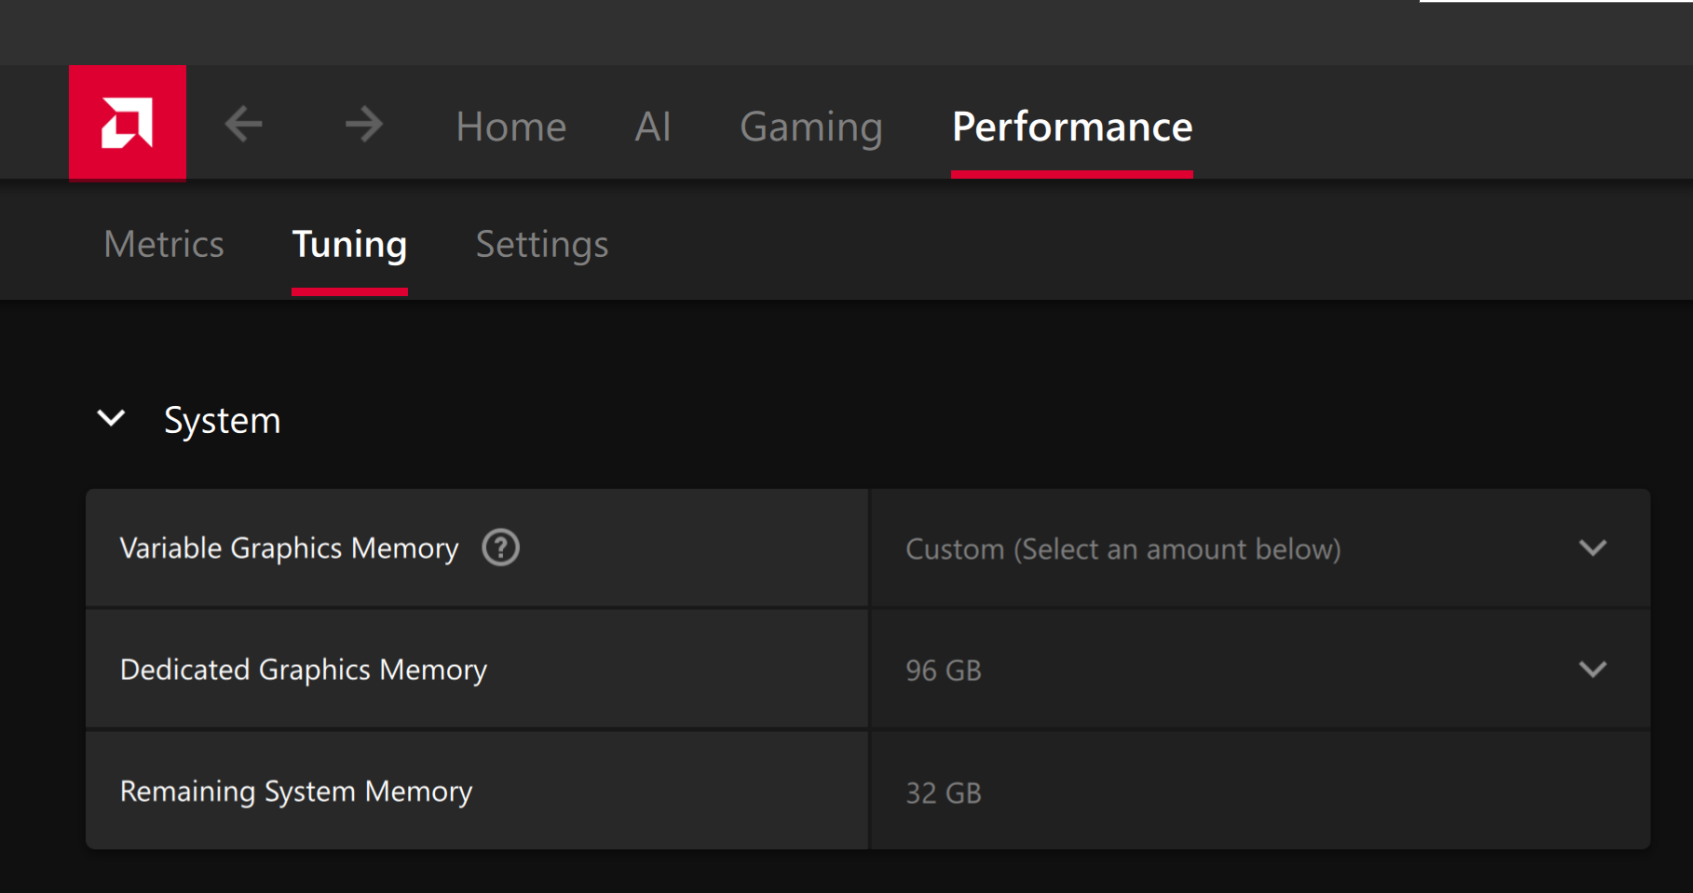
To change the dedicated GPU memory value, open AMD Software: Adrenalin Edition™ and navigate to Performance → Tuning → AMD Variable Graphics Memory. Reboot for the changes to take effect.
On Linux, to run larger models, increase the shared memory pool available to the GPU. This might involve setting the BIOS dedicated GPU memory to the minimum, so that the shared memory pool can be maximized.
For the AMD Ryzen™ AI Halo, the default is 96GB shared. To modify this, open the AMD Ryzen™ AI Developer Center and go to the Settings tab. Under Graphics Performance Settings, increase the Shared Video Memory slider, then click Apply Changes and reboot for the changes to take effect.

Increase the shared memory pool by changing the kernel’s Translation Table Manager (TTM) page setting. AMD recommends setting the minimum dedicated VRAM in the BIOS (0.5 GB) so the maximum amount is available as shared memory.
- Install the
pipxutility and add the path for pipx-installed wheels to the system search path:
sudo apt install pipxpipx ensurepath- Install the
amd-debug-toolswheel from PyPI:
pipx install amd-debug-tools- Query the current shared memory settings:
amd-ttm- Increase the shared memory allocation (units in GB):
amd-ttm --set <NUM>- Reboot for the changes to take effect.
Check for Software Updates
Before starting, ensure your Ryzen AI Halo has the latest software installed. Open the AMD Ryzen™ AI Developer Center and check for available updates, both to the app itself and additional software.
Go to the Updates tab. If updates are available, install them and reboot before continuing.
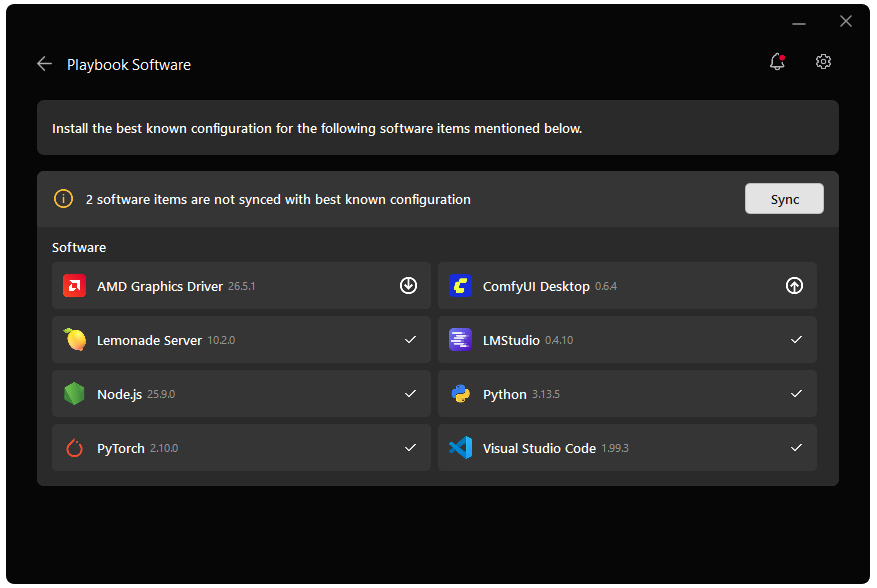
Go to the Manage tab. If updates are available, install them and reboot before continuing.

Installing Software Prerequisites
Create a Virtual Environment
On Linux, open a terminal and run the following prompt to create a venv with ROCm+Pytorch already installed:
sudo apt updatesudo apt install -y python3-venvpython3 -m venv s2st-env --system-site-packagessource s2st-env/bin/activateGrant your user access to GPU devices (log out and back in for this to take effect):
sudo usermod -aG render,video $LOGNAMEOn Linux, open a terminal and run the following prompt to create a venv:
sudo apt updatesudo apt install -y python3-venvpython3 -m venv s2st-envsource s2st-env/bin/activateOn Windows, open a terminal in the directory of your choice and follow the commands to create a venv with ROCm+Pytorch already installed:
python -m venv s2st-env --system-site-packagess2st-env\Scripts\activateOn Windows, open a terminal in the directory of your choice and follow the commands to create a venv:
python -m venv s2st-envs2st-env\Scripts\activateInstalling Basic Dependencies
AMD GPU Driver
Update to the latest AMD GPU driver using AMD Software: Adrenalin Edition™.
- Open
AMD Software: Adrenalin Editionfrom your Start menu or system tray. - Navigate to Driver and Software, click Manage Updates.
- If an update is available, follow the prompts to download and install.
AMD GPU Driver
Install the AMD GPU Driver (amdgpu) using the Radeon Software for Linux (RSL) flow. For instructions for your distribution, see Install the kernel driver.
PyTorch
Install PyTorch with AMD ROCm™ software support in the created virtual environment:
python -m pip install --index-url https://repo.amd.com/rocm/whl/gfx1151/ "torch==2.11.0+rocm7.13.0" "torchvision==0.26.0+rocm7.13.0" "torchaudio==2.11.0+rocm7.13.0"python -m pip install --index-url https://repo.amd.com/rocm/whl/gfx1150/ "torch==2.11.0+rocm7.13.0" "torchvision==0.26.0+rocm7.13.0" "torchaudio==2.11.0+rocm7.13.0"python -m pip install --index-url https://repo.amd.com/rocm/whl/gfx1152/ "torch==2.11.0+rocm7.13.0" "torchvision==0.26.0+rocm7.13.0" "torchaudio==2.11.0+rocm7.13.0"python -m pip install --index-url https://repo.amd.com/rocm/whl/gfx110X-all/ "torch==2.11.0+rocm7.13.0" "torchvision==0.26.0+rocm7.13.0" "torchaudio==2.11.0+rocm7.13.0"python -m pip install --index-url https://repo.amd.com/rocm/whl/gfx120X-all/ "torch==2.11.0+rocm7.13.0" "torchvision==0.26.0+rocm7.13.0" "torchaudio==2.11.0+rocm7.13.0"For other devices, please refer to this link for full instructions.
Additional Dependencies
Install m4t dependencies using pip:
pip install transformers==4.57.1 safetensors==0.6.2 tiktoken==0.9.0 accelerate soundfile==0.13.1 sentencepiece protobuf gradio scipy==1.15.3Set up the speech-to-speech demo
Learn about seamless-m4t-v2
Check out the model card on Hugging Face for more information.
This is the technical architecture of the speech-speech models:

Download Scripts
This playbook includes ready-to-use scripts. Please download all of them to the same directory as the environment you created.
| Script | Description | Usage |
|---|---|---|
| Basic LLM text generation | python infer.py | |
| input1.wav | Example Audio file | N/A |
| Language Support File | N/A | |
| Intuitive UI for Speech Translation | python gradio_demo.py --no-share |
Starting with infer.py
To execute the script, run
python infer.pyExplaining the Code
Snippet 1: Importing the necessary dependencies
import osos.environ["HIP_VISIBLE_DEVICES"] = "0"
import timeimport numpy as npimport scipy.io.wavfileimport soundfile as sfimport torchimport torchaudio
from transformers import AutoProcessor, SeamlessM4Tv2Model
DEFAULT_TARGET_LANGUAGE = "eng"
INPUT_AUDIO_PATH = "./input1.wav"OUTPUT_AUDIO_PATH = "./out1.wav"
# Automatically downloads + caches via Hugging FaceMODEL_ID = "facebook/seamless-m4t-v2-large"
TARGET_SAMPLE_RATE = 16_000
Snippet 2: Loading the models from HuggingFace
This function takes in a model ID and downloads the model if not already downloaded. It then returns the processor and model for the next function to use.
def load_model(model_id: str, device: torch.device):    start = time.time()
    print("Loading model (downloads automatically on first run)...")
    processor = AutoProcessor.from_pretrained(model_id)
    dtype = torch.float16 if device.type == "cuda" else torch.float32
    model = SeamlessM4Tv2Model.from_pretrained(model_id, torch_dtype=dtype).to(device)
    elapsed = time.time() - start    print(f"Model loading duration: {elapsed:.2f} seconds")
    return processor, model
Snippet 3: Input audio clip .wav file and preprocess it
This function loads the audio clip and resamples it to the target rate.
def preprocess_audio(audio_path: str, target_sr: int = TARGET_SAMPLE_RATE) -> torch.Tensor:
    audio_np, orig_freq = sf.read(audio_path, dtype="float32", always_2d=True)
    # Convert to tensor [channels, samples]    audio = torch.from_numpy(audio_np.T)
    # Resample if needed    if orig_freq != target_sr:        audio = torchaudio.functional.resample(audio, orig_freq=orig_freq, new_freq=target_sr)
    # Convert stereo -> mono    if audio.shape[0] > 1:        audio = torch.mean(audio, dim=0, keepdim=True)
    return audio
Snippet 4: Run inference
This function runs inference with the model and returns the generated output.
def run_inference(model, processor, audio: torch.Tensor, device: torch.device, target_lang: str = DEFAULT_TARGET_LANGUAGE):
    start = time.time()
    audio_inputs = processor(        audio=audio.squeeze(0).cpu().numpy(),        sampling_rate=TARGET_SAMPLE_RATE,        return_tensors="pt",    )
    audio_inputs = {        k: v.to(device) if isinstance(v, torch.Tensor) else v        for k, v in audio_inputs.items()    }
    with torch.inference_mode():        output = model.generate(**audio_inputs, tgt_lang=target_lang)[0]
    audio_array = output.float().cpu().numpy().squeeze()
    elapsed = time.time() - start    print(f"Inference duration: {elapsed:.2f} seconds")
    return audio_array, elapsed
Snippet 5: Save the translated file
This function saves the audio array to a .WAV file.
def save_audio(audio_array: np.ndarray, output_path: str, sample_rate: int):    if np.issubdtype(audio_array.dtype, np.floating):        max_abs = np.max(np.abs(audio_array)) if audio_array.size else 0.0
        if max_abs > 1.0:            audio_array = audio_array / max_abs
        audio_array = (audio_array * 32767.0).clip(-32768, 32767).astype(np.int16)
    scipy.io.wavfile.write(output_path, rate=sample_rate, data=audio_array)
    print(f"Output saved to: {output_path}")
Running the Gradio UI demo:
Now that you have run a basic script example, the following instructions provide a helpful UI that builds upon the code we have written and makes live speech-speech translation easy.
Run Gradio Locally
python ./gradio_demo.py --no-shareThen, open your web browser at http://127.0.0.1:7860 to access the UI.
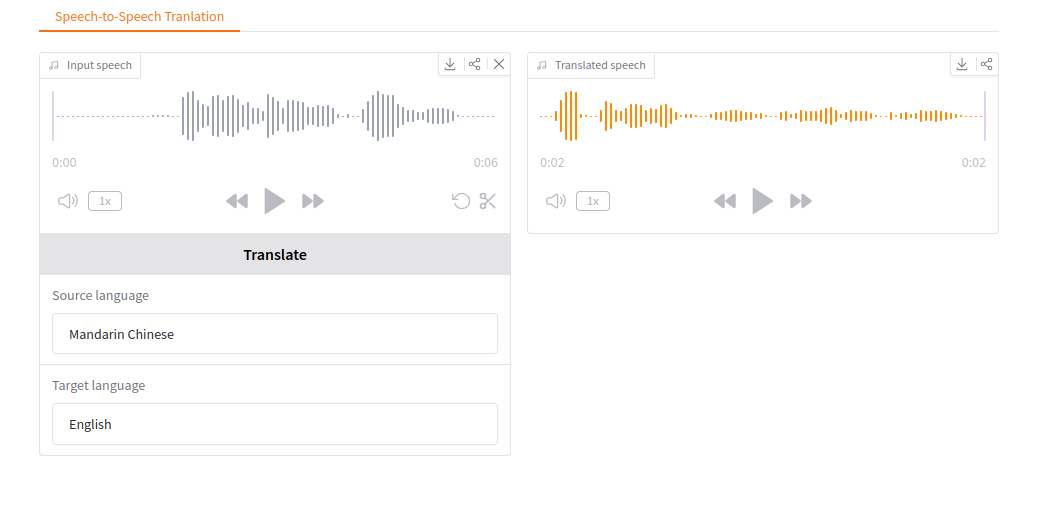
Gradio UI example:
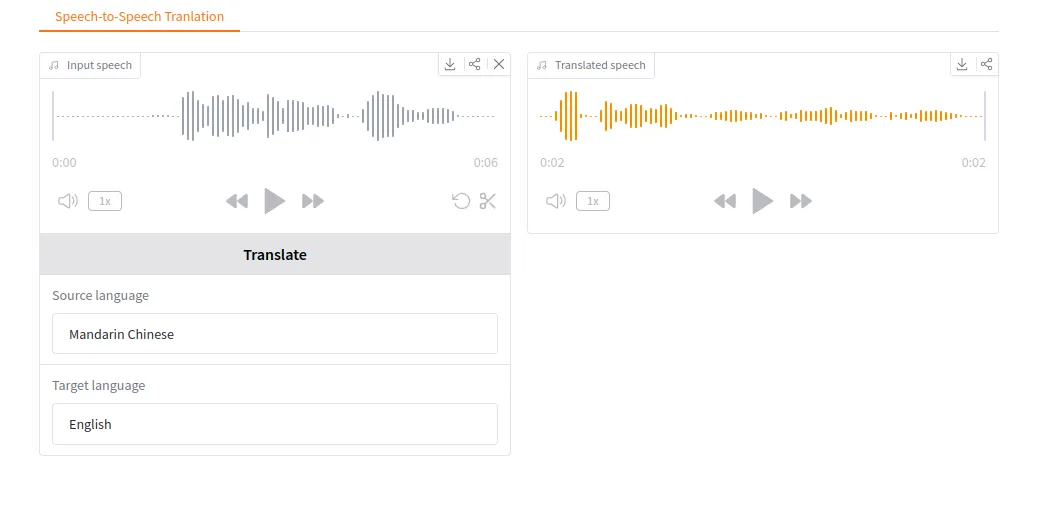
Next Steps
- Mix and match between dozens of languages for quick translation.
- Share your demo with others: Add —share to create a public link that anyone can access remotely, or deploy permanently using Hugging Face Spaces
Resources
Below are some additional resources to learn more about speech-to-speech translation:
- The repo is here https://huggingface.co/facebook/seamless-m4t-v2-large
- Research academia related to “Seamless: Multilingual Expressive and Streaming Speech Translation”
- Gradio sharing and deployment: Sharing Your App Guide and Deploy to Hugging Face Spaces
Need help with this playbook?
Run into an issue or have a question? Open a GitHub issue and our team will take a look.