- Generating Images with ComfyUI and Z Image Turbo
- Automating Workflows with n8n and Local LLMs
- Local LLM Coding with VSCode and Qwen3-Coder
- Running and Serving LLMs with LM Studio
- Running LLMs on PyTorch with AMD ROCm™ Software
- Building Custom GPU Kernels with PyTorch and AMD ROCm™
- Building Your First Agent with GAIA
- Chatting with LLMs in Open WebUI
- Clustering Two Ryzen™ AI Halos with RCCL
- Clustering Two Ryzen™ AI Halos with RPC
- Fine-Tuning LLMs with LLaMA Factory
- Fine-Tuning LLMs with PyTorch and AMD ROCm™ Software
- Fine-Tuning LLMs with Unsloth
- Getting Started with Lemonade
- Getting Started with Ollama
- Getting Started with vLLM
- Local Computer Vision with AMD Ryzen™ AI NPU
- Real-Time Speech-to-Speech Translation
- Remote Development with AMD Sync
- Running OpenClaw Locally with Lemonade Server
Chatting with LLMs in Open WebUI
Use Open WebUI to chat with LLMs locally.

Overview
Open WebUI is a self-hosted, browser-based interface that provides a familiar chatbot experience while acting as a frontend for one or more AI model servers. Instead of being tied to one provider, Open WebUI can connect to any backend that exposes an OpenAI-compatible API, so you can swap models and capabilities without switching UIs.
In this playbook, we use Lemonade as the backend because it exposes a unified OpenAI-compatible endpoint supporting multiple modalities:
- Large Language Models (LLMs) for text generation
- Vision models for image understanding
- Stable Diffusion for image generation
- Audio transcription models for speech-to-text
This setup enables you to explore the complete multimodal workflow end-to-end.
What You’ll Learn
By the end, you’ll be able to:
- Connect Open WebUI to a local OpenAI-compatible backend (Lemonade)
- Chat with a local LLM from your browser
- Upload an image and ask a vision model questions about it
- Generate images from text prompts using Stable Diffusion models (SDXL-Turbo / SDXL)
- Understand the mental model so you can use other backends (Ollama, vLLM, llama.cpp server, etc.)
Core Concepts (Mental Model)
The Three Components
| Piece | What it does | Examples |
|---|---|---|
| Frontend (UI) | The web app you interact with | Open WebUI |
| Backend (Model Server) | Hosts models and exposes HTTP endpoints | Lemonade, Ollama, vLLM, llama.cpp server, OpenAI-compatible servers |
| Models | The actual LLM / Vision / Diffusion / Audio models | CodeLlama, DeepSeek, Gemma-MM, SDXL, SD-Turbo, Whisper |
Why “OpenAI-compatible API” matters
Open WebUI is built around standard OpenAI-style endpoints, like:
- Chat:
/chat/completions - Models list:
/models - Image generation:
/images/generations - Audio transcription:
/audio/transcriptions
Lemonade exposes these under http://localhost:13305/api/v1/...
If a backend supports those endpoints, Open WebUI can talk to it with minimal setup. That’s why we can switch backends without changing our workflow.
Two services, two ports
Throughout this playbook you’ll work with two separate services:
| Service | URL | What you do there |
|---|---|---|
| Lemonade (GUI) | http://localhost:13305 | Browse, download, and manage models |
| Open WebUI | http://localhost:8080 | Chat, upload images, generate images — the user-facing UI |
Lemonade runs the models; Open WebUI is the interface you interact with. Use the Lemonade GUI to download your models first, then use them from Open WebUI.
Setting the Memory Configuration
For the Ryzen AI Halo, the dedicated GPU memory defaults to 64GB, which is sufficient for most workloads. For larger models or longer contexts, increasing this to 96GB may help. To adjust, open AMD Software: Adrenalin Edition™ and navigate to Performance → Tuning → AMD Variable Graphics Memory. Reboot for the changes to take effect.
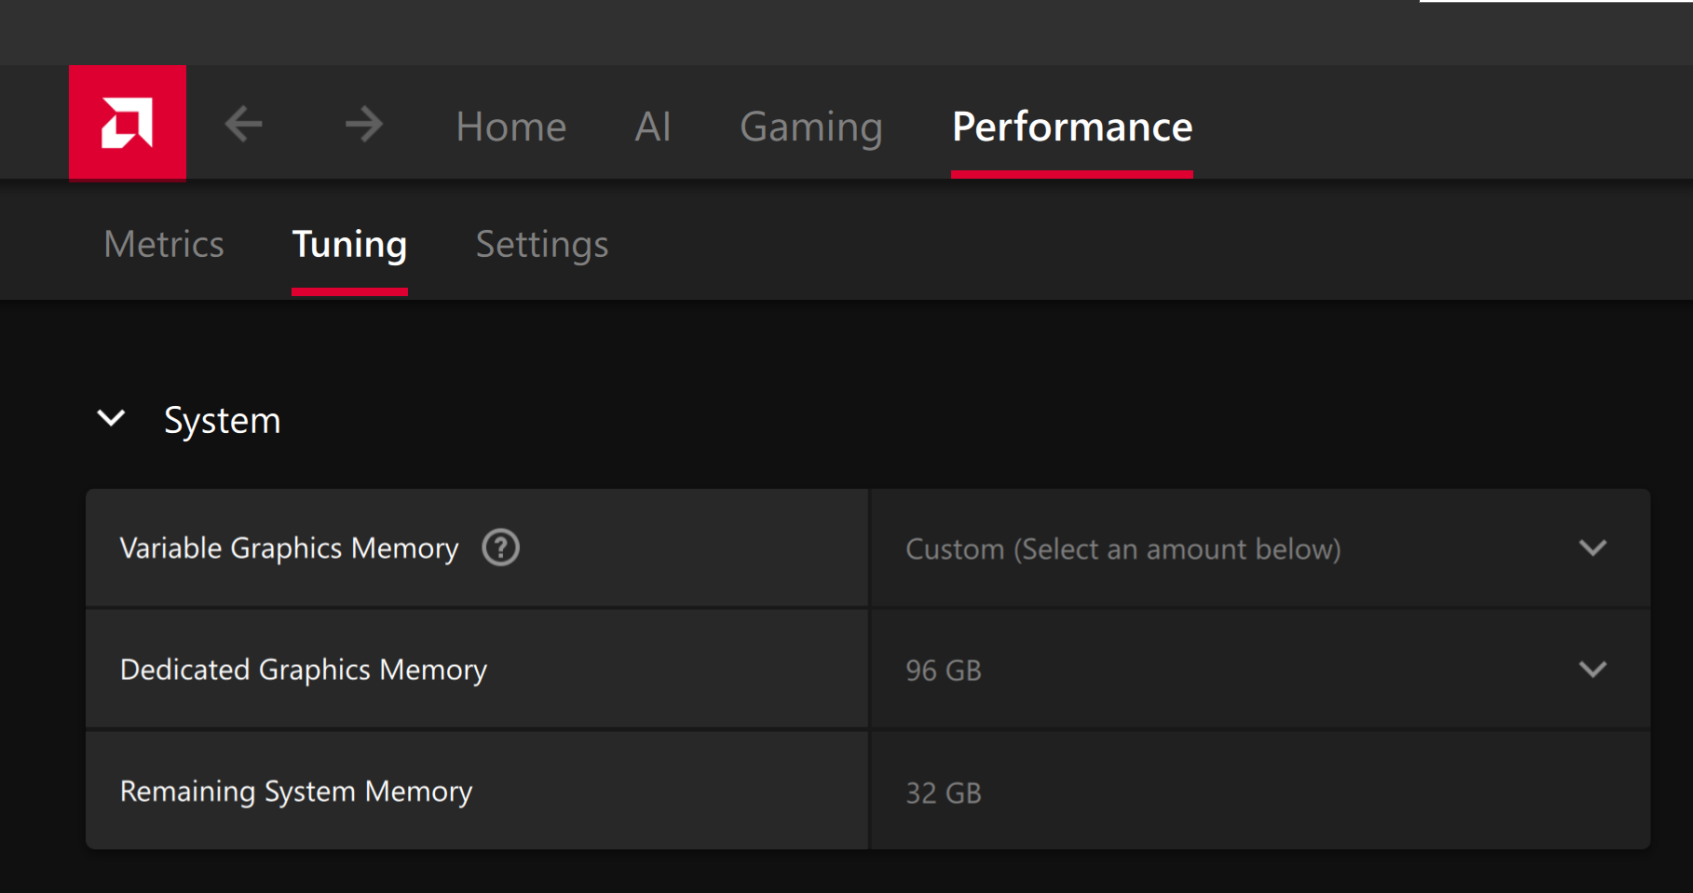
To change the dedicated GPU memory value, open AMD Software: Adrenalin Edition™ and navigate to Performance → Tuning → AMD Variable Graphics Memory. Reboot for the changes to take effect.
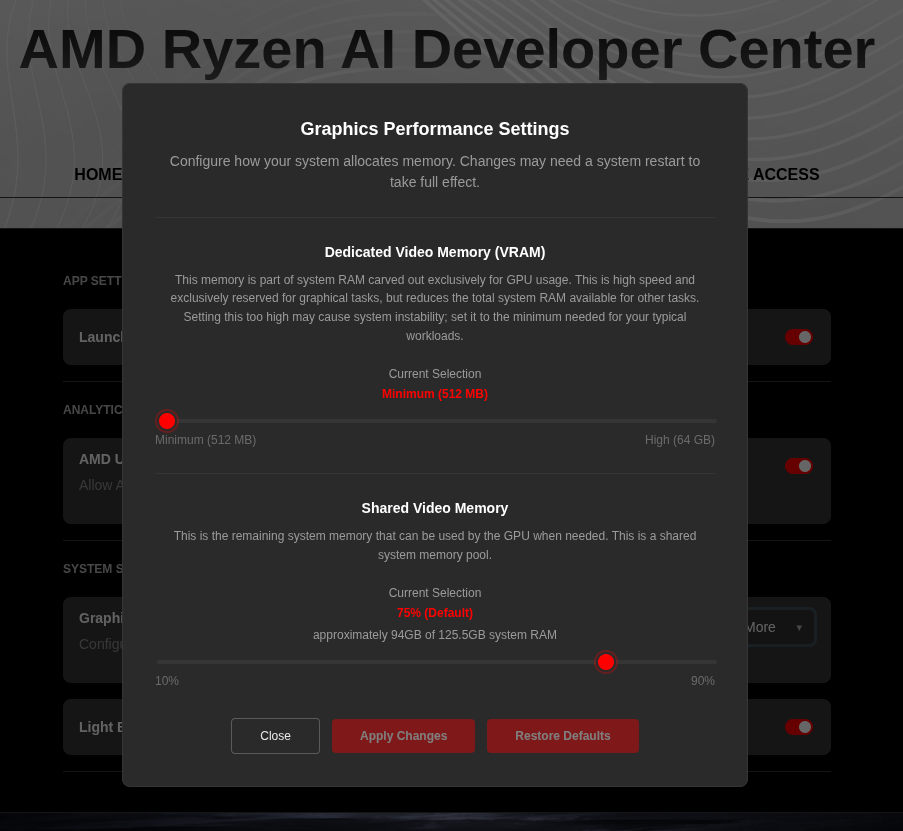
On Linux, to run larger models, increase the shared memory pool available to the GPU. This might involve setting the BIOS dedicated GPU memory to the minimum, so that the shared memory pool can be maximized.
For the AMD Ryzen™ AI Halo, the default is 96GB shared. To modify this, open the AMD Ryzen™ AI Developer Center and go to the Settings tab. Under Graphics Performance Settings, increase the Shared Video Memory slider, then click Apply Changes and reboot for the changes to take effect.
Increase the shared memory pool by changing the kernel’s Translation Table Manager (TTM) page setting. AMD recommends setting the minimum dedicated VRAM in the BIOS (0.5 GB) so the maximum amount is available as shared memory.
- Install the
pipxutility and add the path for pipx-installed wheels to the system search path:
sudo apt install pipxpipx ensurepath- Install the
amd-debug-toolswheel from PyPI:
pipx install amd-debug-tools- Query the current shared memory settings:
amd-ttm- Increase the shared memory allocation (units in GB):
amd-ttm --set <NUM>- Reboot for the changes to take effect.
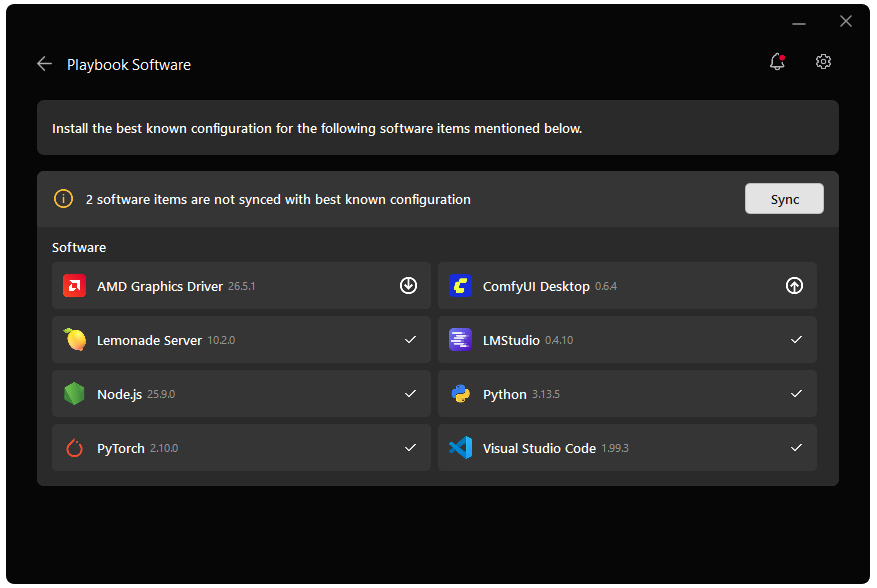
Check for Software Updates
Before starting, ensure your Ryzen AI Halo has the latest software installed. Open the AMD Ryzen™ AI Developer Center and check for available updates, both to the app itself and additional software.
Go to the Updates tab. If updates are available, install them and reboot before continuing.
Go to the Manage tab. If updates are available, install them and reboot before continuing.

One-Time Setup
This playbook needs Lemonade running as the backend and, on Linux, a container engine (Podman) to run Open WebUI. Set these up before installing Open WebUI.
Lemonade
Installing Lemonade
Download the latest installer from lemonade-server.ai and run the .msi file.
After installation:
- The
lemonadeCLI is added to your system PATH automatically - Lemonade server is expected to run in the background automatically
You can also install silently from the command line:
msiexec /i lemonade-server-minimal.msi /qnUbuntu:
sudo add-apt-repository ppa:lemonade-team/stablesudo apt install lemonade-serverArch Linux (AUR):
yay -S lemonade-serverFor other distributions or to install from source, see the full installation options.
Verifying Lemonade Installation
Open a terminal and run:
lemonade --versionYou should see output like:
lemonade version x.y.zIf you see a version number, Lemonade is installed correctly and ready to go.
For quick reference, here are common Lemonade CLI commands:
| Command | What it does |
|---|---|
lemonade --help | Shows all available commands and flags. |
lemonade --version | Prints the installed Lemonade version. |
lemonade status | Confirms whether the Lemonade server is running and reachable. The default OpenAI-compatible API base URL is http://localhost:13305/api/v1. |
lemonade list | Lists models available to your Lemonade setup. |
lemonade pull <MODEL_NAME> | Downloads a model without launching it. |
lemonade run <MODEL_NAME> | Downloads the model if needed, then starts it for inference/chat. |
lemonade run <MODEL_NAME> --llamacpp rocm | Starts a llama.cpp model with the ROCm backend. |
lemonade run <MODEL_NAME> --llamacpp vulkan | Starts a llama.cpp model with the Vulkan backend. |
lemonade config | Displays the current Lemonade configuration values. |
lemonade config set llamacpp.backend=rocm | Sets the default llama.cpp backend to ROCm. |
For the latest Lemonade server options or troubleshooting, please refer to the official Lemonade documentation.
AMD GPU Driver
Update to the latest AMD GPU driver using AMD Software: Adrenalin Edition™.
- Open
AMD Software: Adrenalin Editionfrom your Start menu or system tray. - Navigate to Driver and Software, click Manage Updates.
- If an update is available, follow the prompts to download and install.
AMD GPU Driver
Install the AMD GPU Driver (amdgpu) using the Radeon Software for Linux (RSL) flow. For instructions for your distribution, see Install the kernel driver.
Lemonade
Installing Lemonade
Download the latest installer from lemonade-server.ai and run the .msi file.
After installation:
- The
lemonadeCLI is added to your system PATH automatically - Lemonade server is expected to run in the background automatically
You can also install silently from the command line:
msiexec /i lemonade-server-minimal.msi /qnUbuntu:
sudo add-apt-repository ppa:lemonade-team/stablesudo apt install lemonade-serverArch Linux (AUR):
yay -S lemonade-serverFor other distributions or to install from source, see the full installation options.
Verifying Lemonade Installation
Open a terminal and run:
lemonade --versionYou should see output like:
lemonade version x.y.zIf you see a version number, Lemonade is installed correctly and ready to go.
For quick reference, here are common Lemonade CLI commands:
| Command | What it does |
|---|---|
lemonade --help | Shows all available commands and flags. |
lemonade --version | Prints the installed Lemonade version. |
lemonade status | Confirms whether the Lemonade server is running and reachable. The default OpenAI-compatible API base URL is http://localhost:13305/api/v1. |
lemonade list | Lists models available to your Lemonade setup. |
lemonade pull <MODEL_NAME> | Downloads a model without launching it. |
lemonade run <MODEL_NAME> | Downloads the model if needed, then starts it for inference/chat. |
lemonade run <MODEL_NAME> --llamacpp rocm | Starts a llama.cpp model with the ROCm backend. |
lemonade run <MODEL_NAME> --llamacpp vulkan | Starts a llama.cpp model with the Vulkan backend. |
lemonade config | Displays the current Lemonade configuration values. |
lemonade config set llamacpp.backend=rocm | Sets the default llama.cpp backend to ROCm. |
For the latest Lemonade server options or troubleshooting, please refer to the official Lemonade documentation.
Podman
Podman is containerization software for Linux.
Step 1: Install the core Podman engine and the standalone Compose V2 parsing plugin.
sudo apt update && sudo apt install -y podman docker-compose-plugin podman-composeStep 2: Verify Podman and Compose
podman --versionpodman-compose --versionStep 3: Enable the system-wide Podman API socket so the Compose plugin can communicate with the container runtime.
sudo systemctl enable --now podman.socketStep 4: Run a temporary test container to verify the engine can successfully pull and execute images.
sudo podman run --rm docker.io/library/hello-worldAMD GPU Driver
Update to the latest AMD GPU driver using AMD Software: Adrenalin Edition™.
- Open
AMD Software: Adrenalin Editionfrom your Start menu or system tray. - Navigate to Driver and Software, click Manage Updates.
- If an update is available, follow the prompts to download and install.
AMD GPU Driver
Install the AMD GPU Driver (amdgpu) using the Radeon Software for Linux (RSL) flow. For instructions for your distribution, see Install the kernel driver.
Lemonade
Installing Lemonade
Download the latest installer from lemonade-server.ai and run the .msi file.
After installation:
- The
lemonadeCLI is added to your system PATH automatically - Lemonade server is expected to run in the background automatically
You can also install silently from the command line:
msiexec /i lemonade-server-minimal.msi /qnUbuntu:
sudo add-apt-repository ppa:lemonade-team/stablesudo apt install lemonade-serverArch Linux (AUR):
yay -S lemonade-serverFor other distributions or to install from source, see the full installation options.
Verifying Lemonade Installation
Open a terminal and run:
lemonade --versionYou should see output like:
lemonade version x.y.zIf you see a version number, Lemonade is installed correctly and ready to go.
For quick reference, here are common Lemonade CLI commands:
| Command | What it does |
|---|---|
lemonade --help | Shows all available commands and flags. |
lemonade --version | Prints the installed Lemonade version. |
lemonade status | Confirms whether the Lemonade server is running and reachable. The default OpenAI-compatible API base URL is http://localhost:13305/api/v1. |
lemonade list | Lists models available to your Lemonade setup. |
lemonade pull <MODEL_NAME> | Downloads a model without launching it. |
lemonade run <MODEL_NAME> | Downloads the model if needed, then starts it for inference/chat. |
lemonade run <MODEL_NAME> --llamacpp rocm | Starts a llama.cpp model with the ROCm backend. |
lemonade run <MODEL_NAME> --llamacpp vulkan | Starts a llama.cpp model with the Vulkan backend. |
lemonade config | Displays the current Lemonade configuration values. |
lemonade config set llamacpp.backend=rocm | Sets the default llama.cpp backend to ROCm. |
For the latest Lemonade server options or troubleshooting, please refer to the official Lemonade documentation.
Podman
Podman is containerization software for Linux.
Step 1: Install the core Podman engine and the standalone Compose V2 parsing plugin.
sudo apt update && sudo apt install -y podman docker-compose-plugin podman-composeStep 2: Verify Podman and Compose
podman --versionpodman-compose --versionStep 3: Enable the system-wide Podman API socket so the Compose plugin can communicate with the container runtime.
sudo systemctl enable --now podman.socketStep 4: Run a temporary test container to verify the engine can successfully pull and execute images.
sudo podman run --rm docker.io/library/hello-worldDownloading Models in Lemonade
Before installing Open WebUI, make sure the models you want to use are downloaded and ready in Lemonade.
- Open the Lemonade GUI at
http://localhost:13305. - Browse the available models and download the ones you want to use (e.g., an LLM for chat, a vision model, and/or a Stable Diffusion model for image generation).
- Confirm the API is reachable by visiting
http://localhost:13305/api/v1/modelsin your browser — you should see your downloaded models listed.
Models must be downloaded in Lemonade (
localhost:13305) before they can appear in Open WebUI (localhost:8080). If a model isn’t showing up in Open WebUI later, come back here and check Lemonade first.
Installing Open WebUI
1. Install Python 3.12
Open WebUI requires Python 3.12 — it does not install on Python 3.13+. The Windows Python Launcher (py) lets you install 3.12 side by side with any existing Python version without conflicts.
winget install Python.Python.3.12Close and reopen your terminal after installing, then verify:
py -3.12 --version2. Create a virtual environment and install Open WebUI
mkdir openwebuicd openwebuipy -3.12 -m venv openwebui-venv.\openwebui-venv\Scripts\activatepip install open-webui beautifulsoup4We are now going to use Podman service to containerize our Open WebUI installation.
Please download the following into a directory of your choice:
In that directory, run the following command:
podman compose up -dThis pulls the Open WebUI image and writes to persistent storage.
Launch Open WebUI by typing localhost:8080 into your browser address bar.
Starting Open WebUI Server
- Run the following command to launch the Open WebUI HTTP server:
open-webui serve- In a browser, navigate to
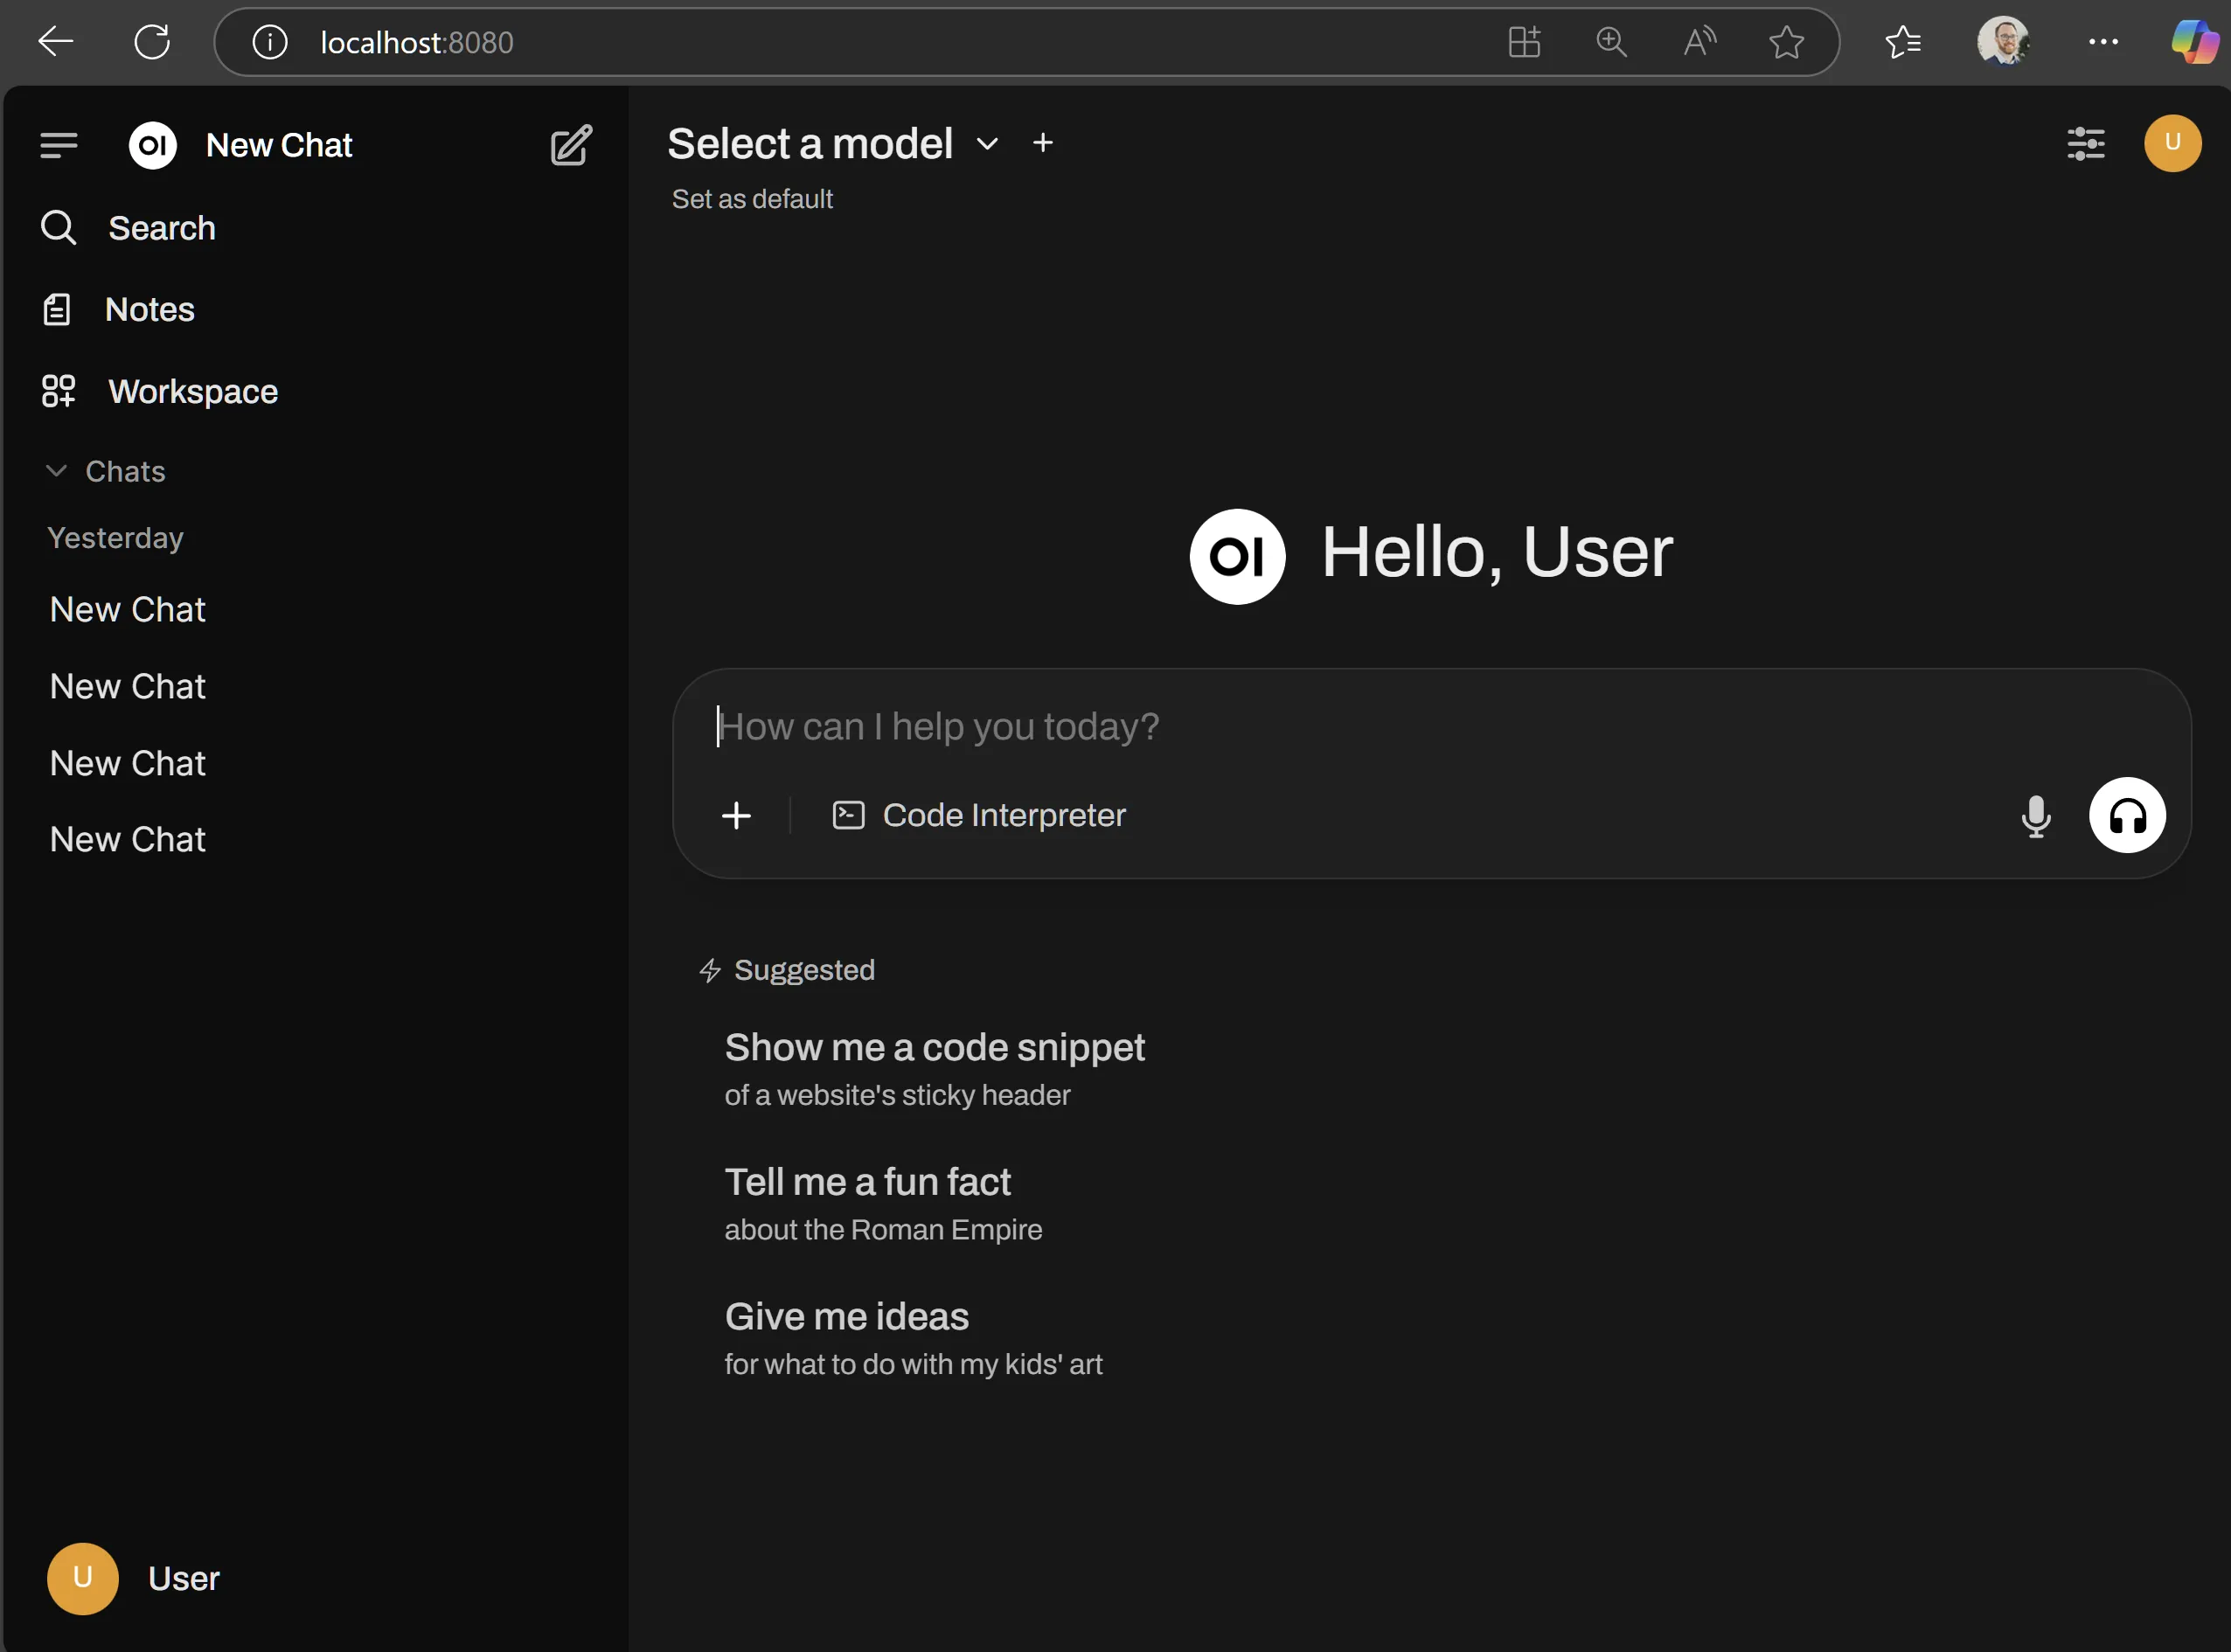
http://localhost:8080. - Open WebUI will ask you to create a local administrator account. Once you are signed in, you will see the chat interface.
Keep the terminal window open. Closing it stops Open WebUI.
The container runs in the background. From the directory containing
compose.yml, manage it withpodman compose down(stop) andpodman compose up -d(start). Your accounts and settings persist in theopen_webui_datavolume.
Connecting Open WebUI to Lemonade
Now that both services are running — Lemonade on localhost:13305 and Open WebUI on localhost:8080 — connect them so Open WebUI can use Lemonade’s models.
In Open WebUI:
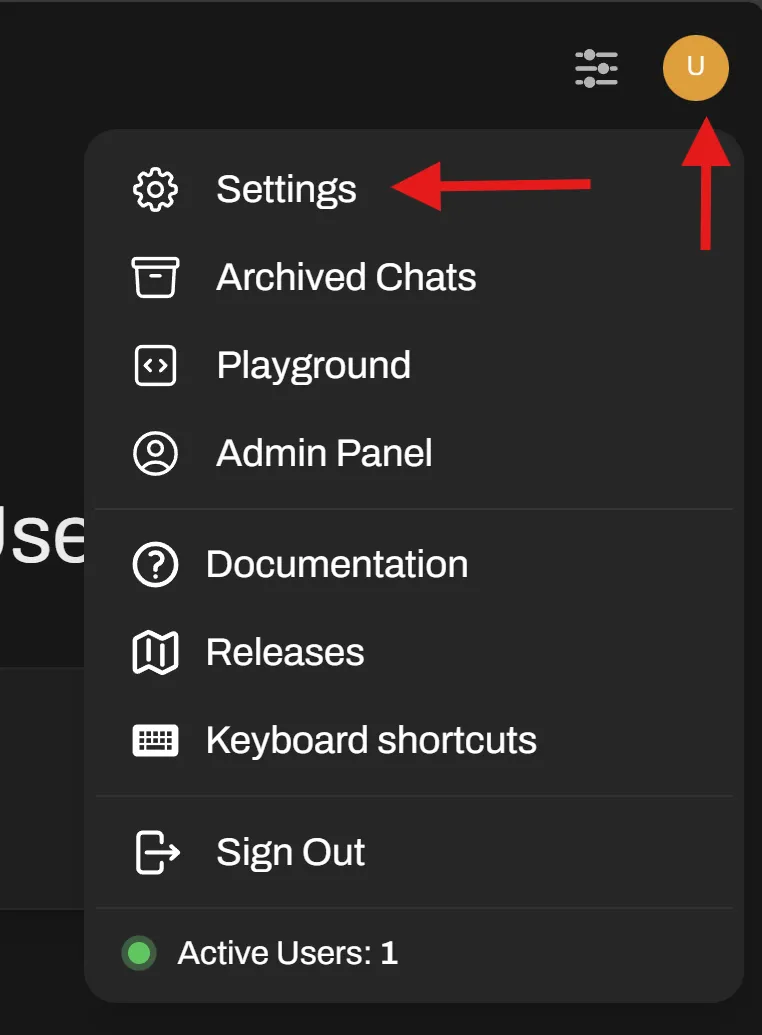
-
Click the user profile icon in the top-right corner, then select Settings.
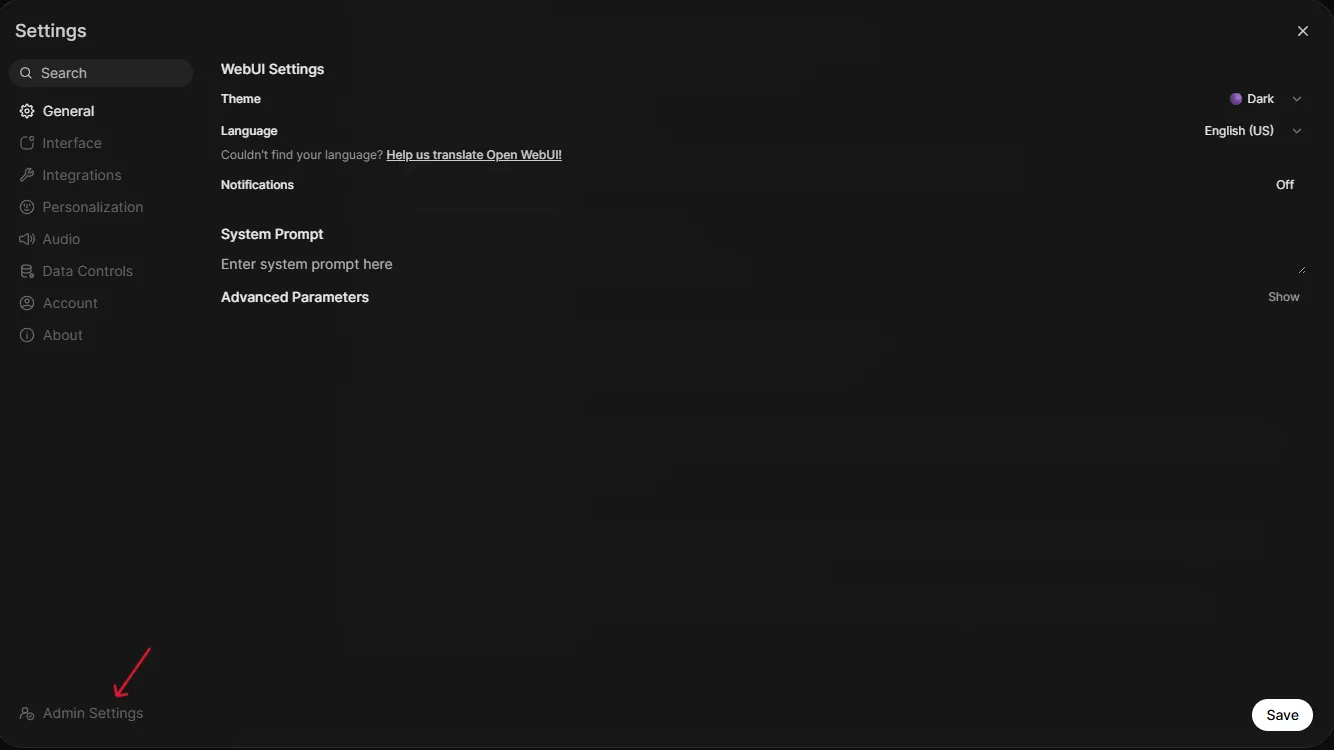
-
In the Settings panel, click Admin Settings at the bottom-left.
-
In the Admin Settings sidebar, click Connections (or navigate directly to
http://localhost:8080/admin/settings/connections).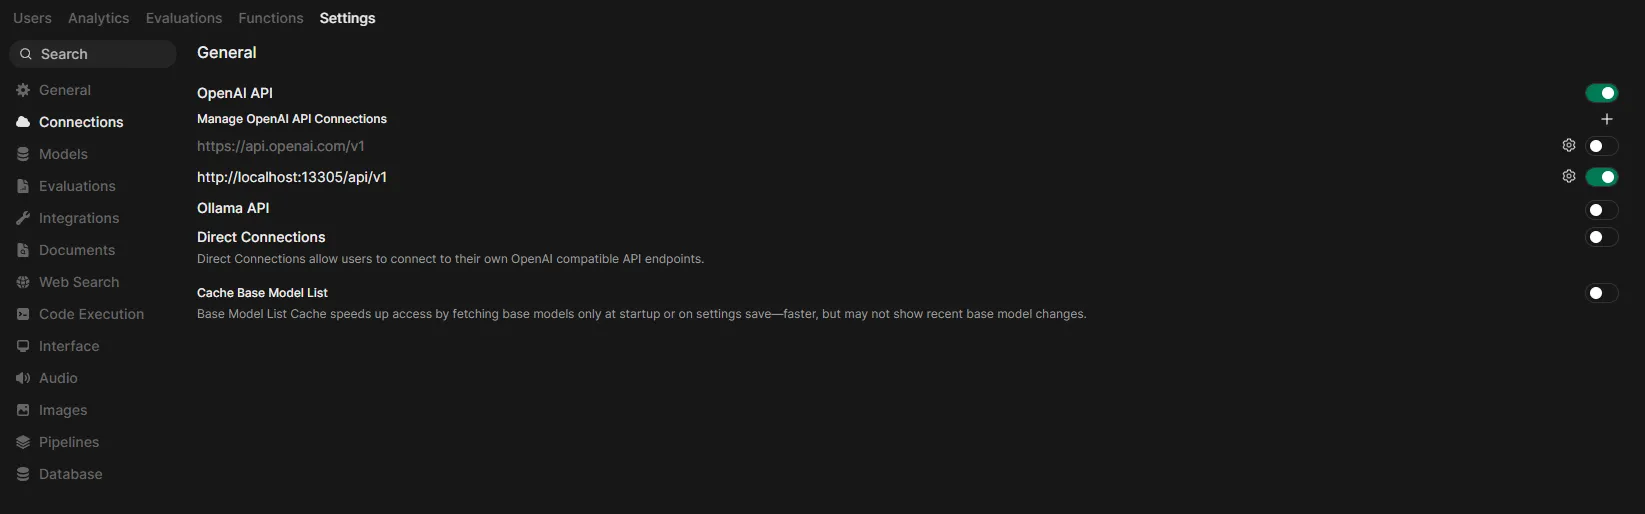
-
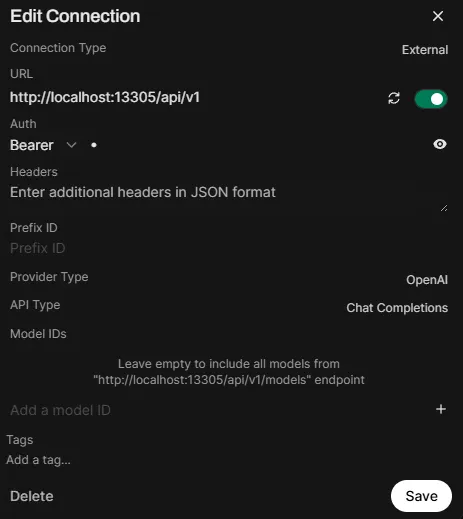
Under OpenAI API, add a new connection:
- Base URL:
http://localhost:13305/api/v1 - API Key:
-(a single dash works for local)
- Base URL:
-
Ensure that under “Manage OpenAI API Connections”, only
http://localhost:13305/api/v1is enabled. Disable any other connections (e.g., the default OpenAI one). -
Click Save.
-
(Recommended) Disable automatic generation features to keep Open WebUI responsive with local LLMs. Go to Admin Settings → Settings → Interface and turn off:
- Title Generation
- Follow Up Generation
- Tags Generation
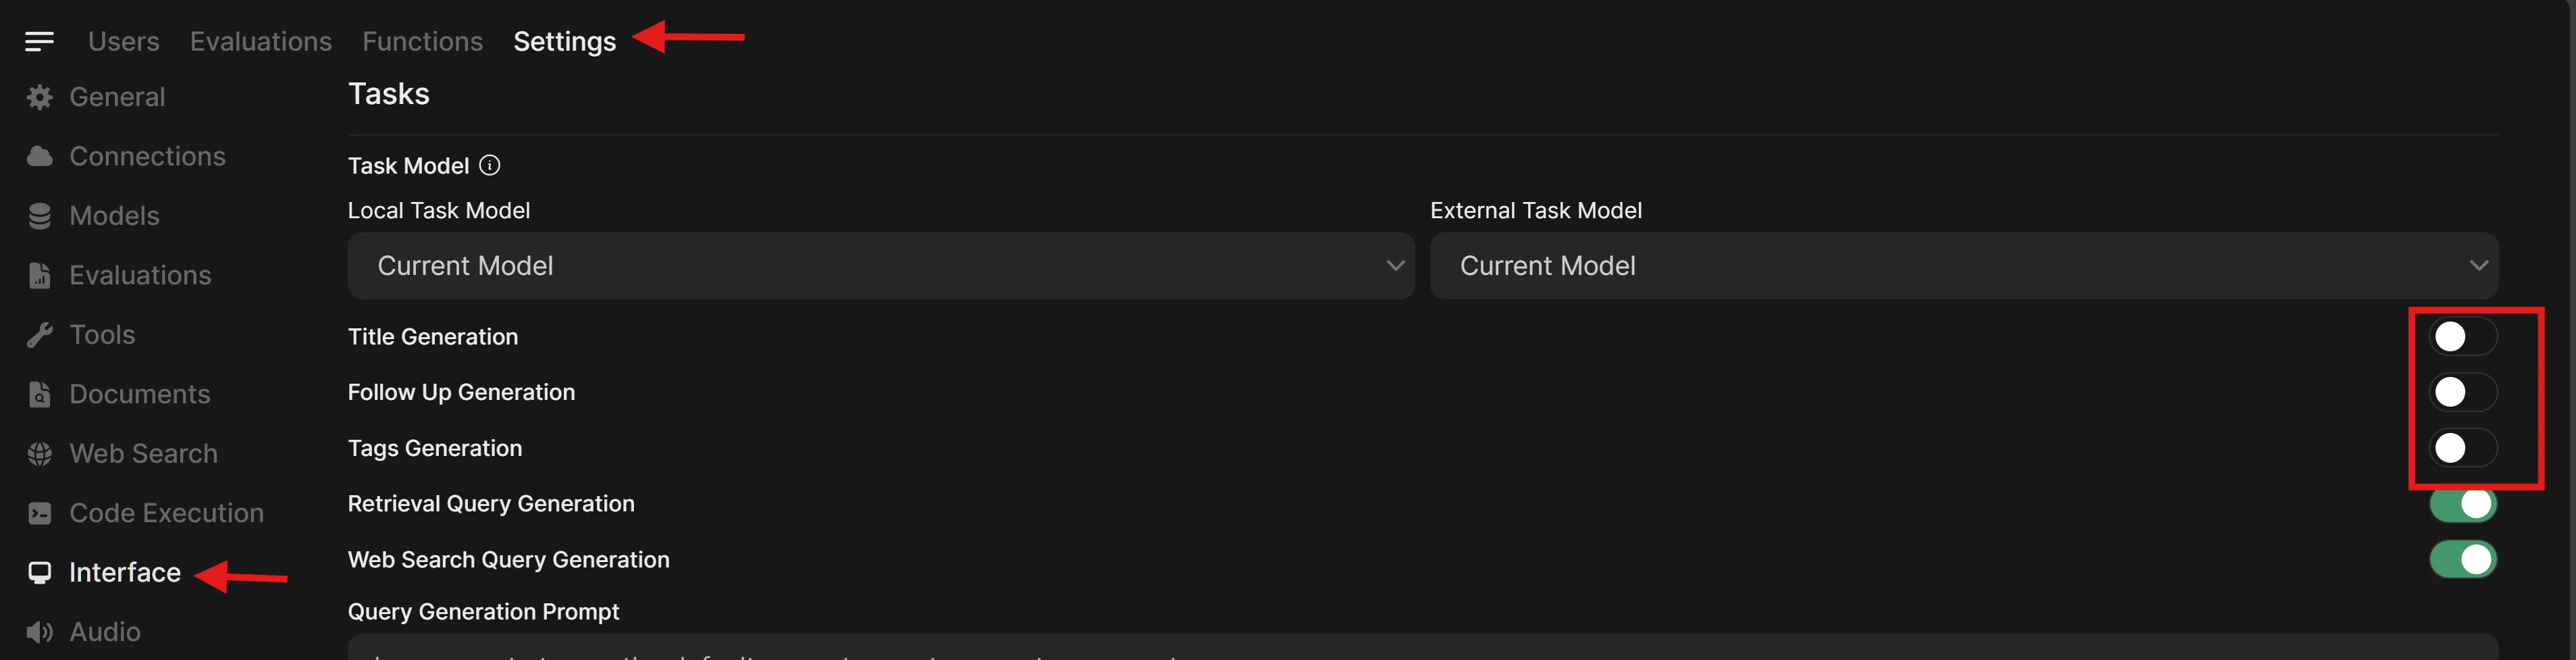
-
Click Save, then return to
http://localhost:8080. -
Click the model dropdown — you should see the models you downloaded from Lemonade.
Main Activities
Now, you’re all set up. Let’s look at three interesting things to do.
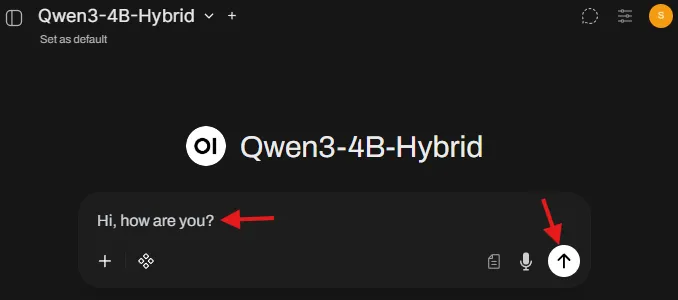
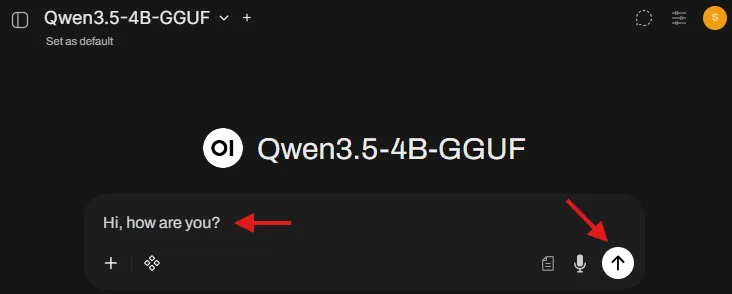
Activity 1: Chat with a Local LLM
-
Click the dropdown menu in the top-left of the interface. This will display the Lemonade models you have installed. Select one to proceed. (example:
Qwen3-4B-Hybrid).
-
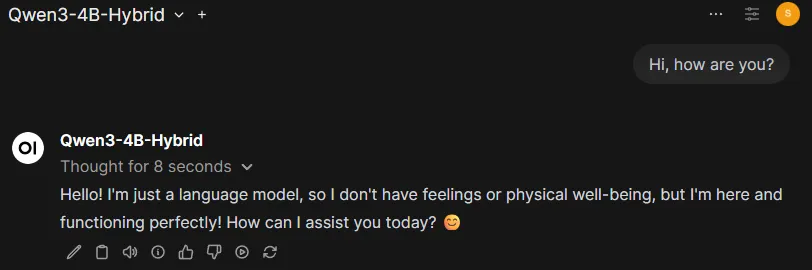
Enter a message to the LLM and click send (or hit Enter). The LLM will take a few seconds to load into memory and then you will see the response stream in.
-
Click the dropdown menu in the top-left of the interface. This will display the Lemonade models you have installed. Select one to proceed. (example:
Qwen3.5-4B-GGUF).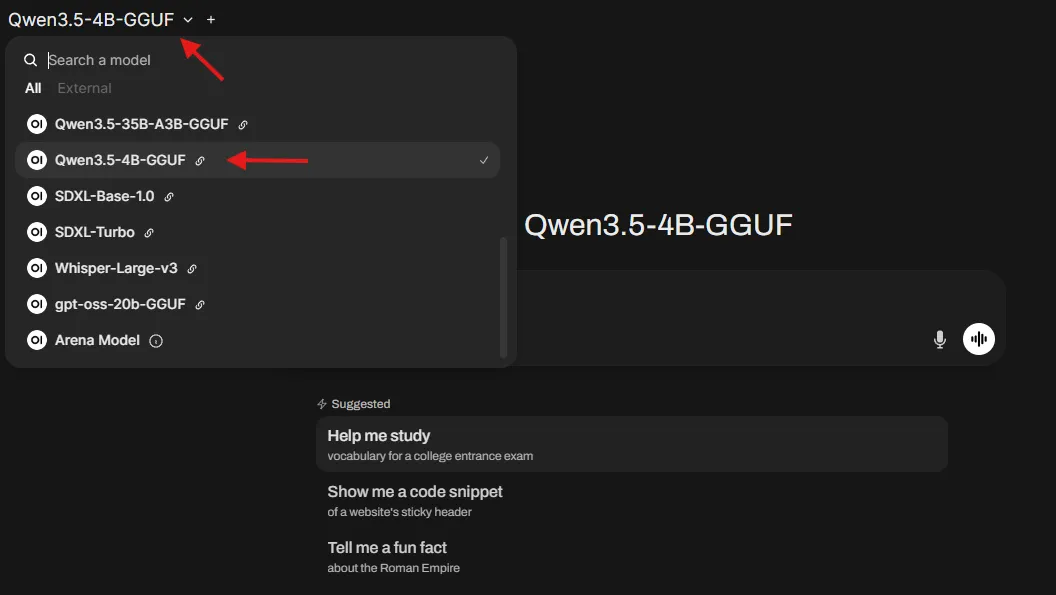
-
Enter a message to the LLM and click send (or hit Enter). The LLM will take a few seconds to load into memory and then you will see the response stream in.
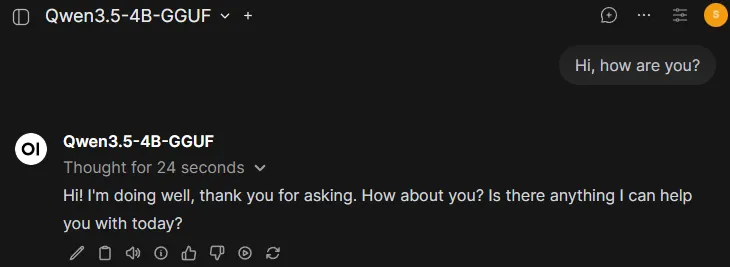
-
The model will respond in the chat.
-
At this time, open
Task Manageron your system. You will see high GPU or NPU utilization based on whether the model you selected is Hybrid or NPU respectively. Using the task manager, you can confirm that you’re running the model locally.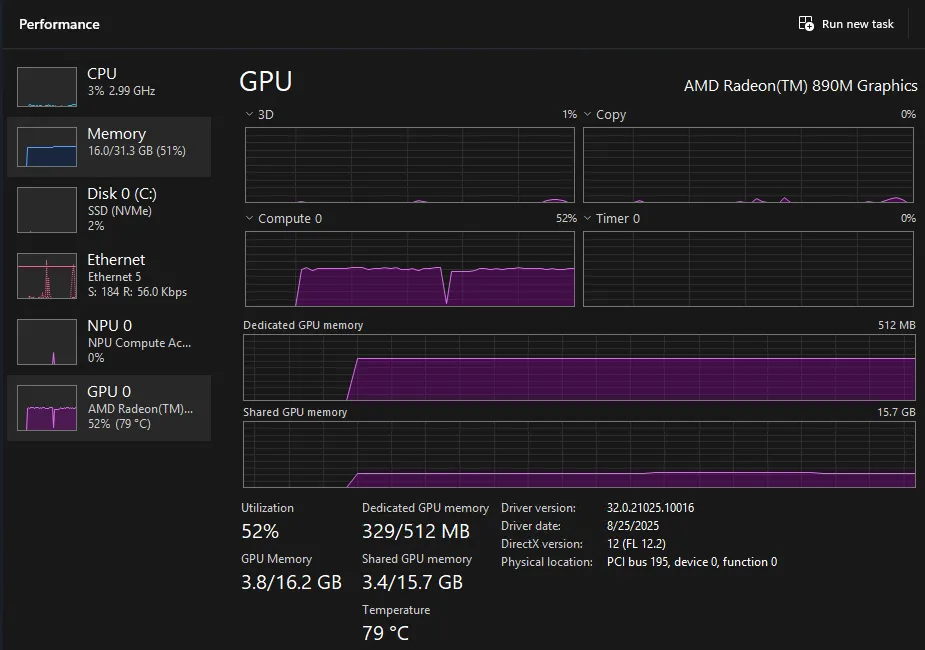
-
Click the dropdown menu in the top-left of the interface. This will display the Lemonade models you have installed. Select one to proceed. (example:
Qwen3.5-4B-GGUF). -
Enter a message to the LLM and click send (or hit Enter). The LLM will take a few seconds to load into memory and then you will see the response stream in.
-
The model will respond in the chat.
This validates that Open WebUI can send requests to Lemonade using the OpenAI-compatible chat endpoint.
Activity 2: Upload an Image and Ask Questions (Vision)
This requires a model that supports image input (a Vision or Multimodal model).
-
Click the filter icon, select “By Category,” then choose a model from the Vision section (e.g.,
Qwen3.5-4B-GGUF)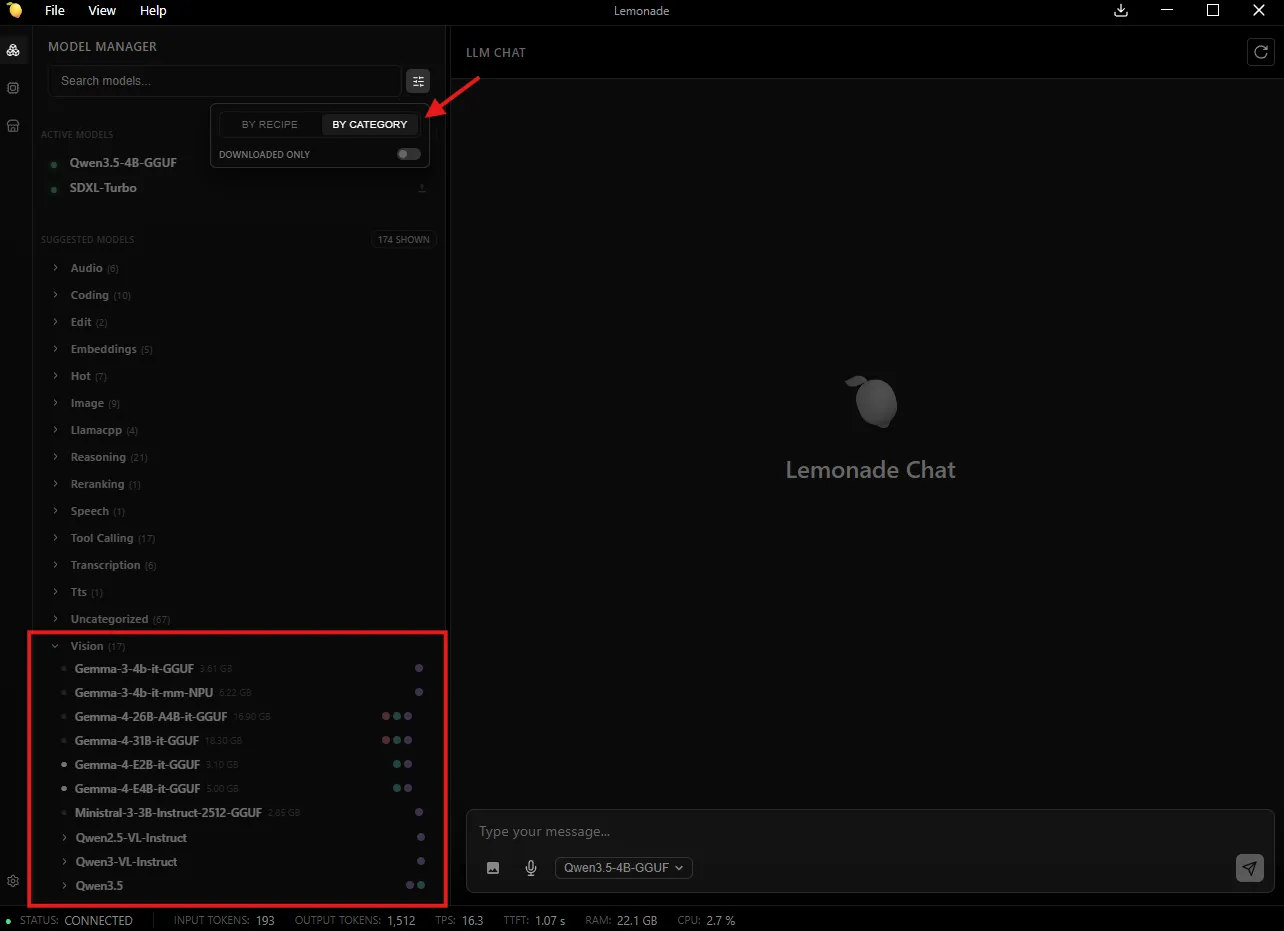
-
Click the
+button in the message box and upload an image -
Ask something that forces true image understanding:
Do you think this is a well-designed GUI?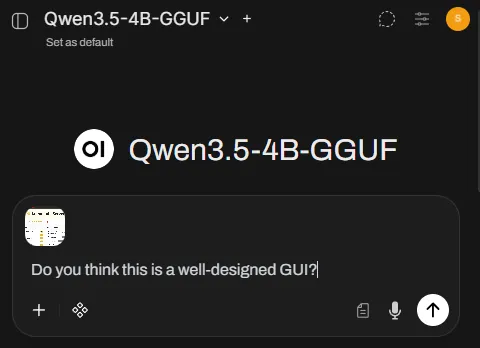
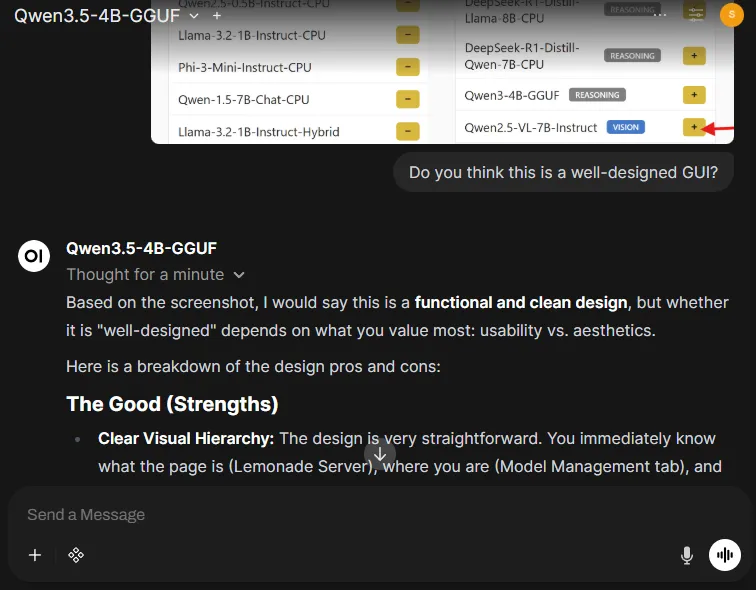
-
The model answers based on the image content, not generic text.
This demonstrates that Open WebUI can send multimodal requests (text + image) through the backend (Lemonade) to a vision model.
Activity 3: Generate an Image from a Text Prompt (Stable Diffusion)
Stable Diffusion models don’t support text generation, they only generate images through the Images API.
Step 1: Configure Image Generation in Open WebUI
-
In the Lemonade GUI (
http://localhost:13305), search forSDXL-Turbo(fast) orSDXL-Base-1.0(higher quality) and download it. -
Go to Admin Settings → Images (http://localhost:8080/admin/settings/images)
-
Set:
- Image Generation: ON
- Image Generation Engine: Default (OpenAI)
- OpenAI API Base URL:
http://localhost:13305/api/v1 - OpenAI API Key:
- - Model:
SDXL-TurboorSDXL-Base-1.0
-
If you want to add more parameters, add them to the text field as JSON. For example:
{ "steps": 4, "cfg_scale": 1 }. See available parameters at Image Generation (Stable Diffusion CPP).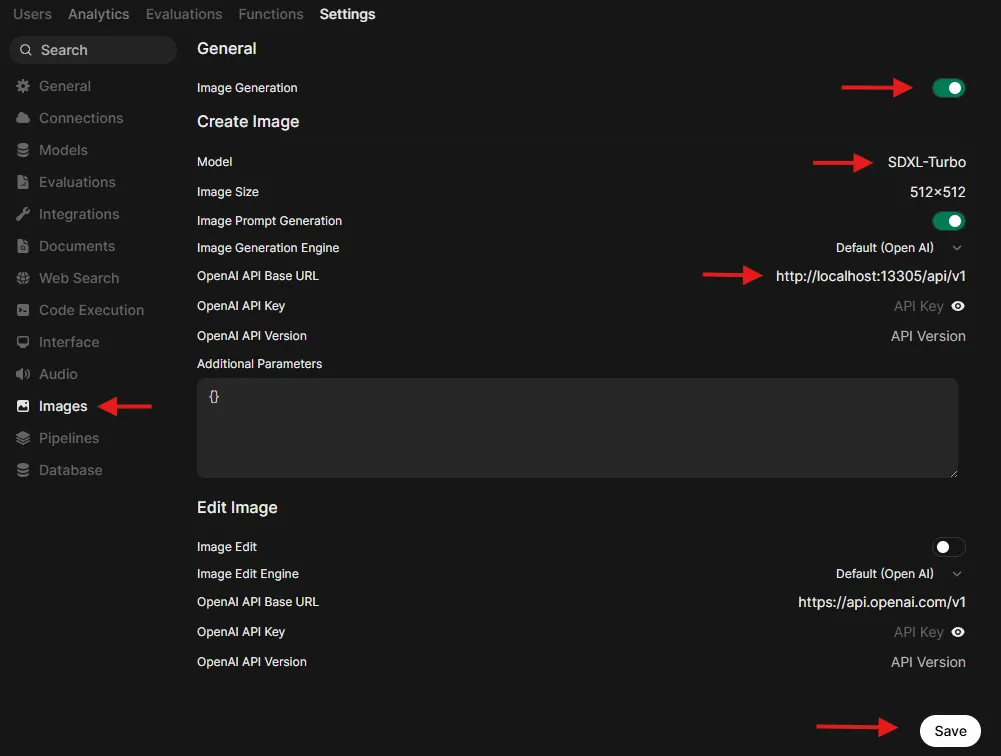
-
Save
Step 2: Allow Image Generation for the model
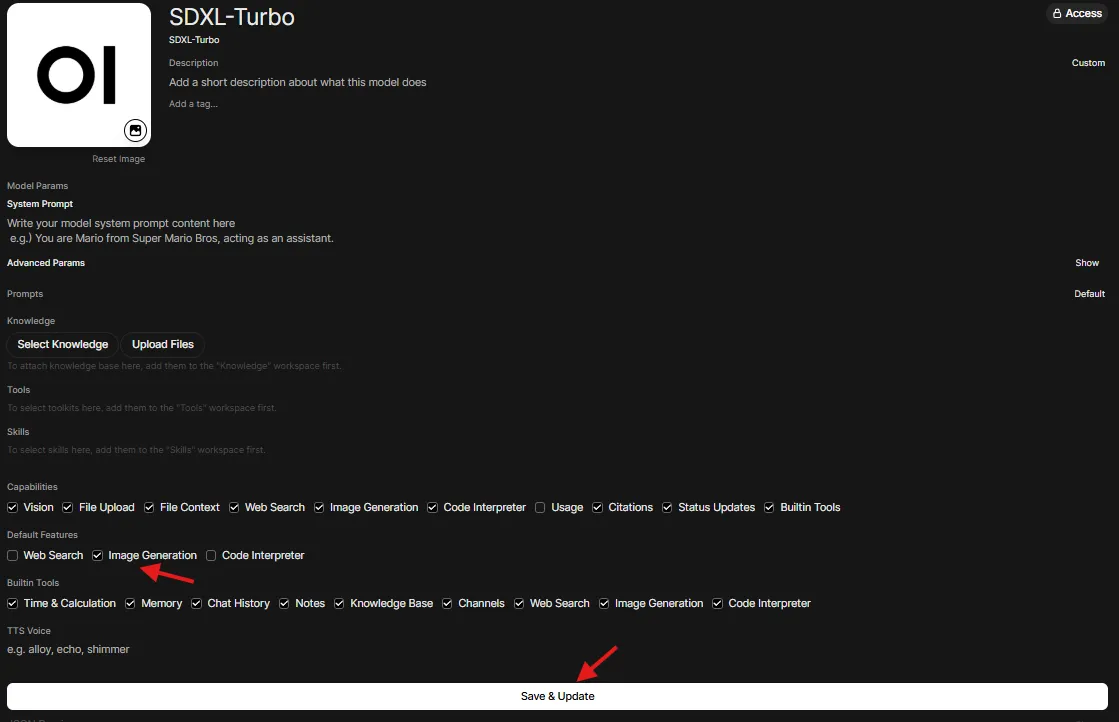
This step ensures that you enable Image Generation as a capability for your model.
-
Go to Admin Settings → Models (http://localhost:8080/admin/settings/models) and choose your model
-
Turn on
Image Generation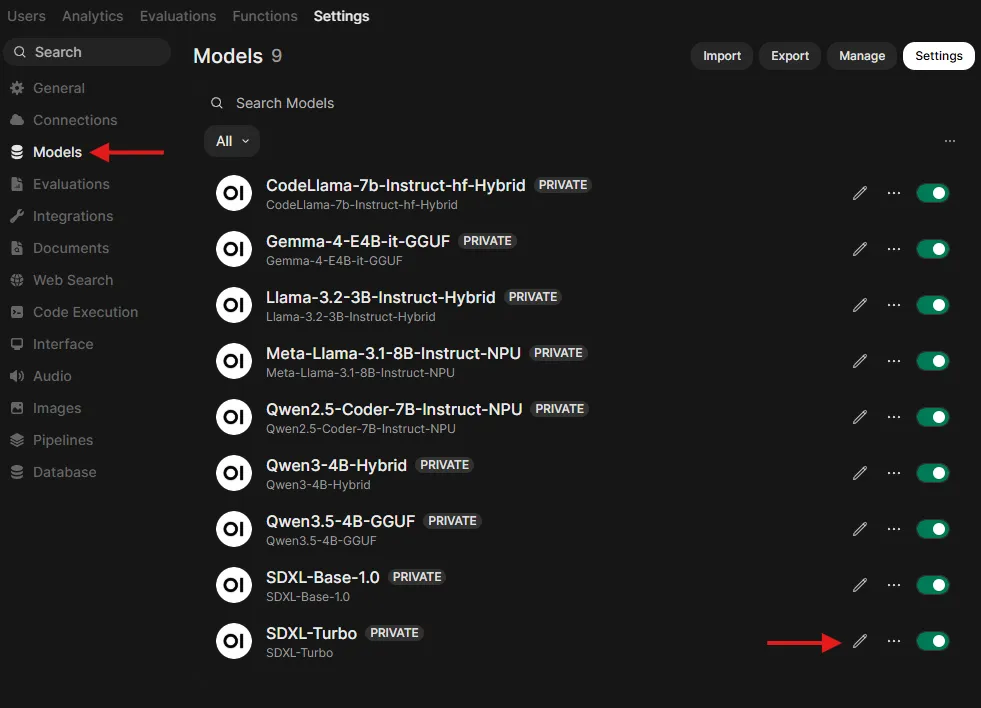
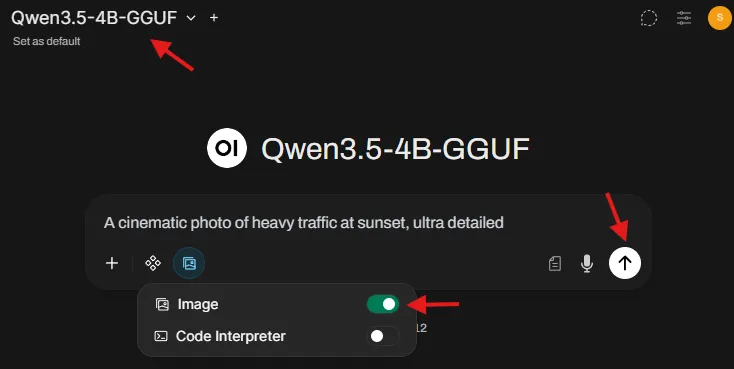
Step 3: Generate an image from the chat screen
-
Go back to chat at
http://localhost:8080. -
Select a Text Generation LLM in the model dropdown (example: Qwen, Llama). Do not select a Stable Diffusion model as this is a chat model selector.
-
In the message area, click on Integrations, and toggle Image ON.
-
Use a prompt like:
A cinematic photo of heavy traffic at sunset, ultra detailed. -
An image is generated and appears in the chat.
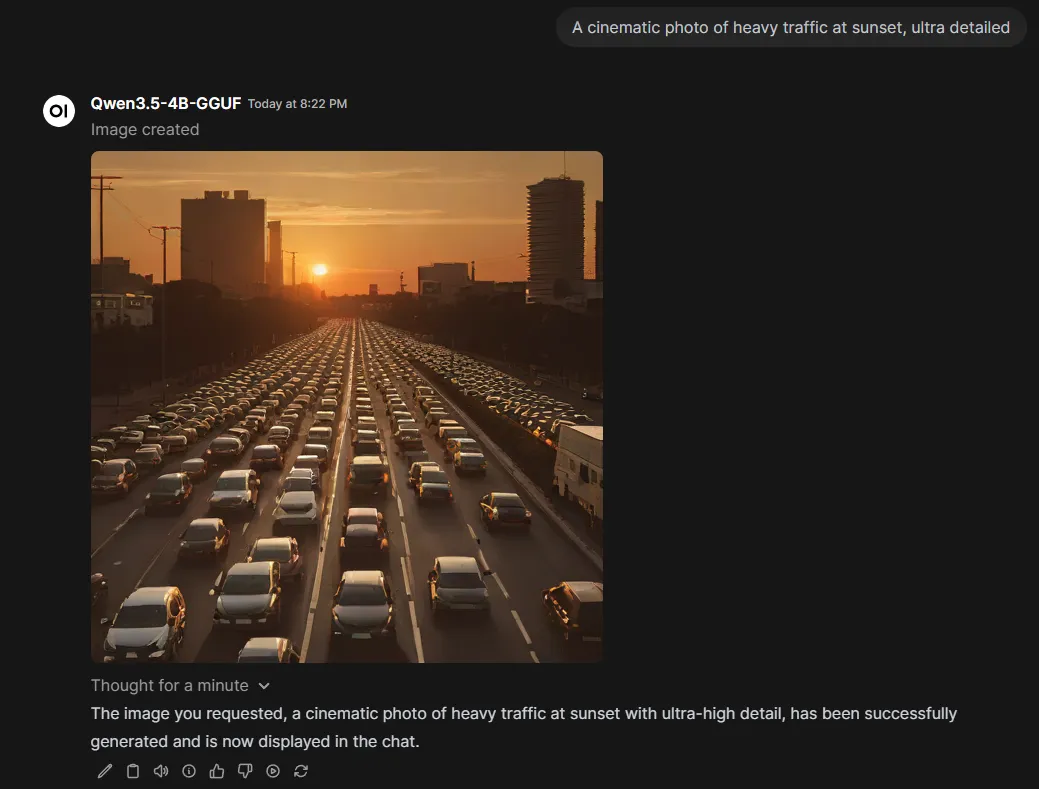
This establishes that Open WebUI can coordinate a “two-part” workflow:
- The LLM helps refine the prompt
- The image is generated via Lemonade’s Images endpoint using Stable Diffusion
Activity 3: Generate an Image from a Text Prompt (Stable Diffusion)
Stable Diffusion models don’t support text generation, they only generate images through the Images API.
Step 1: Configure Image Generation in Open WebUI
-
In the Lemonade GUI (
http://localhost:13305), search forSDXL-Turbo(fast) orSDXL-Base-1.0(higher quality) and download it. -
Go to Admin Settings → Images (http://localhost:8080/admin/settings/images)
-
Set:
- Image Generation: ON
- Image Generation Engine: Default (OpenAI)
- OpenAI API Base URL:
http://localhost:13305/api/v1 - OpenAI API Key:
- - Model:
SDXL-TurboorSDXL-Base-1.0
-
If you want to add more parameters, add them to the text field as JSON. For example:
{ "steps": 4, "cfg_scale": 1 }. See available parameters at Image Generation (Stable Diffusion CPP). -
Save
Step 2: Allow Image Generation for the model
This step ensures that you enable Image Generation as a capability for your model.
-
Go to Admin Settings → Models (http://localhost:8080/admin/settings/models) and choose your model
-
Turn on
Image Generation
Step 3: Generate an image from the chat screen
-
Go back to chat at
http://localhost:8080. -
Select a Text Generation LLM in the model dropdown (example: Qwen, Llama). Do not select a Stable Diffusion model as this is a chat model selector.
-
In the message area, click on Integrations, and toggle Image ON.
-
Use a prompt like:
A cinematic photo of heavy traffic at sunset, ultra detailed. -
An image is generated and appears in the chat.
This establishes that Open WebUI can coordinate a “two-part” workflow:
- The LLM helps refine the prompt
- The image is generated via Lemonade’s Images endpoint using Stable Diffusion
Troubleshooting
”No models show up in Open WebUI”
- First, check Lemonade: open
http://localhost:13305/api/v1/modelsin a browser and confirm your models are listed and downloaded - Then, check the Open WebUI connection: go to Admin Settings → Connections at
http://localhost:8080/admin/settings/connectionsand verify the Base URL ishttp://localhost:13305/api/v1
”This model does not support chat completion” error message
- You selected an image model (SDXL-Turbo / SDXL-Base-1.0) in the chat model dropdown.
- Fix: select an LLM for chat, and use the Image toggle + Images settings for generation.

Image generation errors/timeouts
- Start with
SDXL-Turbofirst (fast, fewer steps) - Once working, switch the image model to
SDXL-Base-1.0for quality
Next Steps
You now have a working ‘local AI stack’, a single UI controlling multiple model types through a standard API.
Here are three expansions that unlock entirely new workflows:
1. Speech-to-Text with Whisper
Try turning audio into text using a Whisper model, then feed it into an LLM for summarization, action items, or rewriting. This is the foundation for meeting notes and voice-driven assistants.
2. Python Coding inside Open WebUI
Use Open WebUI’s built-in code execution experience to run Python snippets, inspect outputs, and iterate faster—without leaving the UI. Reference
3. HTML Rendering inside Open WebUI
Render HTML outputs directly in the interface. This is surprisingly powerful for building quick prototypes, formatted reports, and interactive snippets. Reference
References
Need help with this playbook?
Run into an issue or have a question? Open a GitHub issue and our team will take a look.