- Generating Images with ComfyUI and Z Image Turbo
- Automating Workflows with n8n and Local LLMs
- Local LLM Coding with VSCode and Qwen3-Coder
- Running and Serving LLMs with LM Studio
- Running LLMs on PyTorch with AMD ROCm™ Software
- Building Custom GPU Kernels with PyTorch and AMD ROCm™
- Building Your First Agent with GAIA
- Chatting with LLMs in Open WebUI
- Clustering Two Ryzen™ AI Halos with RCCL
- Clustering Two Ryzen™ AI Halos with RPC
- Fine-Tuning LLMs with LLaMA Factory
- Fine-Tuning LLMs with PyTorch and AMD ROCm™ Software
- Fine-Tuning LLMs with Unsloth
- Getting Started with Lemonade
- Getting Started with Ollama
- Getting Started with vLLM
- Local Computer Vision with AMD Ryzen™ AI NPU
- Real-Time Speech-to-Speech Translation
- Remote Development with AMD Sync
- Running DeepSeek V4 Flash with ds4
- Running Hermes Agent Locally with Lemonade Server
- Running OpenClaw Locally with Lemonade Server
Automating Workflows with n8n and Local LLMs
Build an AI-powered news summarizer using n8n and Lemonade.
Overview
n8n is a workflow automation platform that lets you connect apps and services using a visual node-based editor.
This playbook teaches you how to set up an AI-powered financial news summarizer that scrapes the AP News business section, extracts key headlines, and uses a local LLM running on your system to generate an investor-focused summary.
What You’ll Learn
- How to install and launch n8n
- Importing and configuring a pre-built workflow
- Connecting to Lemonade using the native n8n integration
- Understanding workflow nodes and data flow
What is Lemonade?
Lemonade is a local LLM serving platform built for AMD hardware. It provides an OpenAI-compatible API that runs entirely on your machine—your data never leaves your device.
In this playbook, we use Lemonade to serve a local LLM that n8n connects to for AI-powered tasks.
n8n includes a native Lemonade node (Lemonade Chat Model) that provides a first-class integration - no need for manual configuration. This makes connecting your local LLM to automation workflows straightforward.
Setting the Memory Configuration
For the Ryzen AI Halo, the dedicated GPU memory defaults to 64GB, which is sufficient for most workloads. For larger models or longer contexts, increasing this to 96GB may help. To adjust, open AMD Software: Adrenalin Edition™ and navigate to Performance → Tuning → AMD Variable Graphics Memory. Reboot for the changes to take effect.
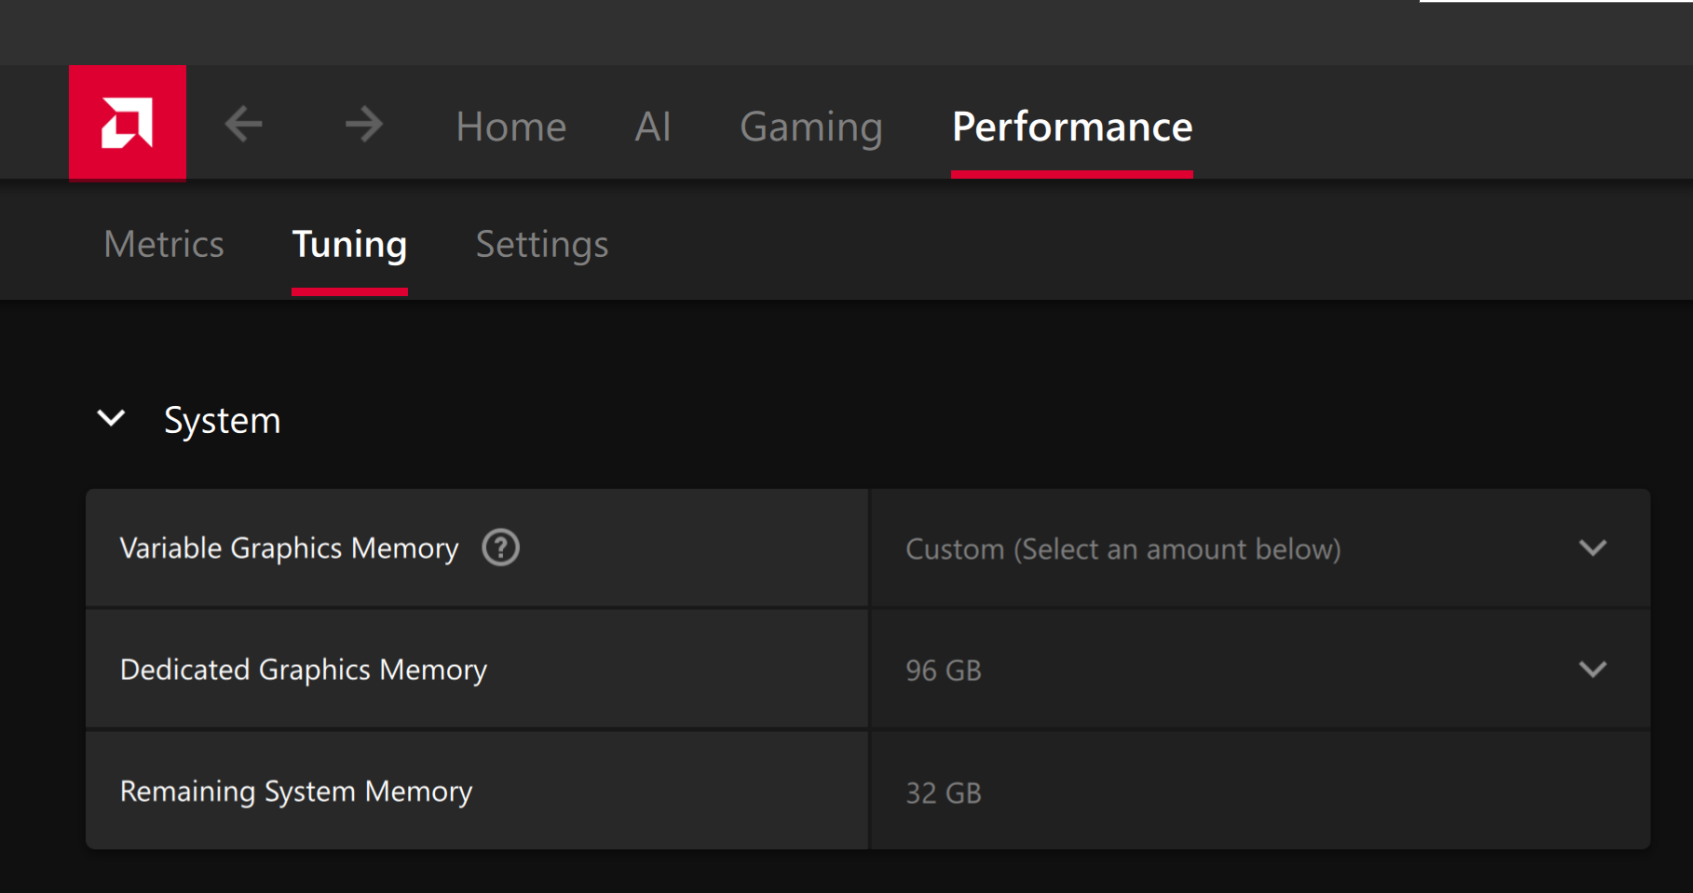
To change the dedicated GPU memory value, open AMD Software: Adrenalin Edition™ and navigate to Performance → Tuning → AMD Variable Graphics Memory. Reboot for the changes to take effect.
On Linux, to run larger models, increase the shared memory pool available to the GPU. This might involve setting the BIOS dedicated GPU memory to the minimum, so that the shared memory pool can be maximized.
For the AMD Ryzen™ AI Halo, the default is 96GB shared. To modify this, open the AMD Ryzen™ AI Developer Center and go to the Settings tab. Under Graphics Performance Settings, increase the Shared Video Memory slider, then click Apply Changes and reboot for the changes to take effect.
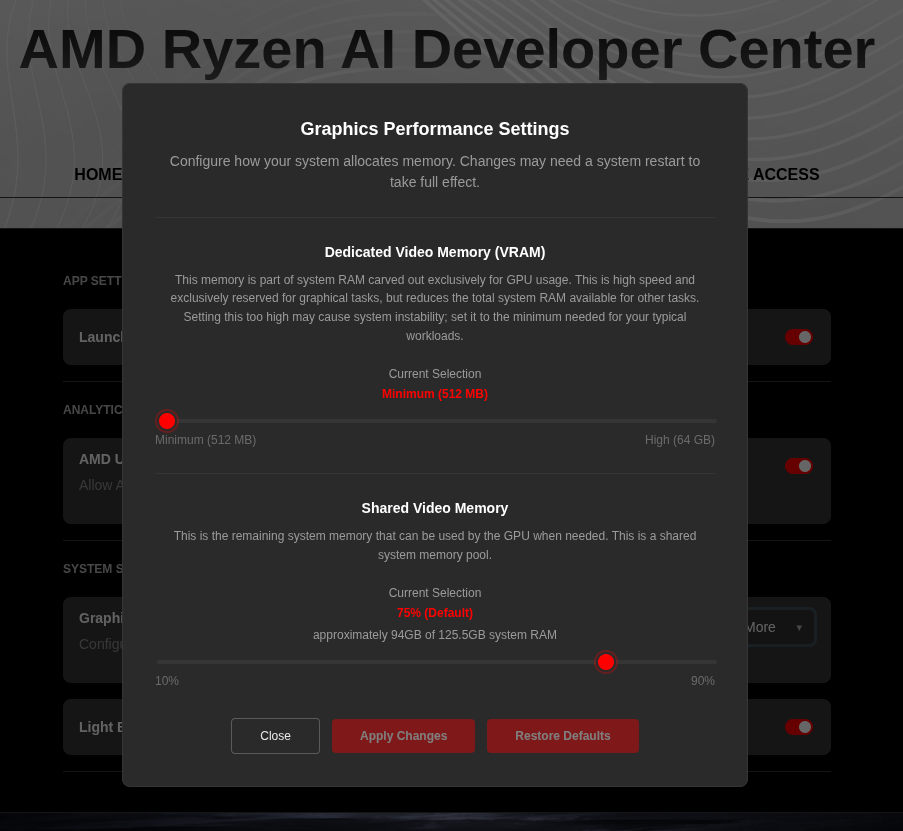
Increase the shared memory pool by changing the kernel’s Translation Table Manager (TTM) page setting. AMD recommends setting the minimum dedicated VRAM in the BIOS (0.5 GB) so the maximum amount is available as shared memory.
- Install the
pipxutility and add the path for pipx-installed wheels to the system search path:
sudo apt install pipxpipx ensurepath- Install the
amd-debug-toolswheel from PyPI:
pipx install amd-debug-tools- Query the current shared memory settings:
amd-ttm- Increase the shared memory allocation (units in GB):
amd-ttm --set <NUM>- Reboot for the changes to take effect.
Check for Software Updates
Before starting, ensure your Ryzen AI Halo has the latest software installed. Open the AMD Ryzen™ AI Developer Center and check for available updates, both to the app itself and additional software.
Go to the Updates tab. If updates are available, install them and reboot before continuing.
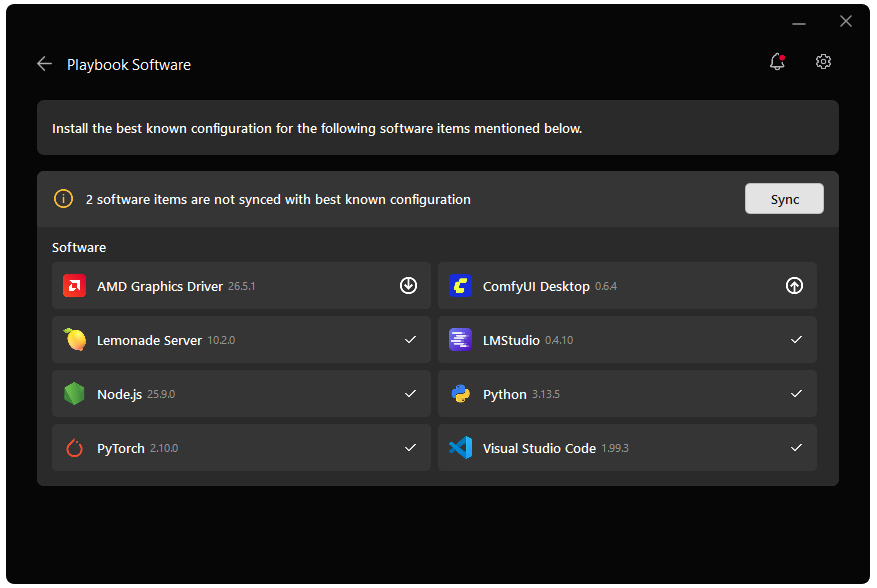
Go to the Manage tab. If updates are available, install them and reboot before continuing.

Installing Software Prerequisites
AMD GPU Driver
Update to the latest AMD GPU driver using AMD Software: Adrenalin Edition™.
- Open
AMD Software: Adrenalin Editionfrom your Start menu or system tray. - Navigate to Driver and Software, click Manage Updates.
- If an update is available, follow the prompts to download and install.
AMD GPU Driver
Install the AMD GPU Driver (amdgpu) using the Radeon Software for Linux (RSL) flow. For instructions for your distribution, see Install the kernel driver.
Lemonade
Installing Lemonade
Download the latest installer from lemonade-server.ai and run the .msi file.
After installation:
- The
lemonadeCLI is added to your system PATH automatically - Lemonade server is expected to run in the background automatically
You can also install silently from the command line:
msiexec /i lemonade-server-minimal.msi /qnUbuntu:
sudo add-apt-repository ppa:lemonade-team/stablesudo apt install lemonade-serverArch Linux (AUR):
yay -S lemonade-serverFor other distributions or to install from source, see the full installation options.
Verifying Lemonade Installation
Open a terminal and run:
lemonade --versionYou should see output like:
lemonade version x.y.zIf you see a version number, Lemonade is installed correctly and ready to go.
For quick reference, here are common Lemonade CLI commands:
| Command | What it does |
|---|---|
lemonade --help | Shows all available commands and flags. |
lemonade --version | Prints the installed Lemonade version. |
lemonade status | Confirms whether the Lemonade server is running and reachable. The default OpenAI-compatible API base URL is http://localhost:13305/api/v1. |
lemonade list | Lists models available to your Lemonade setup. |
lemonade pull <MODEL_NAME> | Downloads a model without launching it. |
lemonade run <MODEL_NAME> | Downloads the model if needed, then starts it for inference/chat. |
lemonade run <MODEL_NAME> --llamacpp rocm | Starts a llama.cpp model with the ROCm backend. |
lemonade run <MODEL_NAME> --llamacpp vulkan | Starts a llama.cpp model with the Vulkan backend. |
lemonade config | Displays the current Lemonade configuration values. |
lemonade config set llamacpp.backend=rocm | Sets the default llama.cpp backend to ROCm. |
For the latest Lemonade server options or troubleshooting, please refer to the official Lemonade documentation.
Node.js
Node.js 22.22.1 LTS is the recommended version for this platform.
- Download the Windows 64-bit Installer from nodejs.org
- Run the installer and follow the prompts
- Verify installation:
node --versionnpm --versioncurl -o- https://raw.githubusercontent.com/Homebrew/install/HEAD/install.sh | bash
# Download and install Node.js:brew install node@22
# Verify the Node.js version:node -v # Should print "v22.22.1".
# Verify npm version:npm -v # Should print "10.9.4".Lemonade
Installing Lemonade
Download the latest installer from lemonade-server.ai and run the .msi file.
After installation:
- The
lemonadeCLI is added to your system PATH automatically - Lemonade server is expected to run in the background automatically
You can also install silently from the command line:
msiexec /i lemonade-server-minimal.msi /qnUbuntu:
sudo add-apt-repository ppa:lemonade-team/stablesudo apt install lemonade-serverArch Linux (AUR):
yay -S lemonade-serverFor other distributions or to install from source, see the full installation options.
Verifying Lemonade Installation
Open a terminal and run:
lemonade --versionYou should see output like:
lemonade version x.y.zIf you see a version number, Lemonade is installed correctly and ready to go.
For quick reference, here are common Lemonade CLI commands:
| Command | What it does |
|---|---|
lemonade --help | Shows all available commands and flags. |
lemonade --version | Prints the installed Lemonade version. |
lemonade status | Confirms whether the Lemonade server is running and reachable. The default OpenAI-compatible API base URL is http://localhost:13305/api/v1. |
lemonade list | Lists models available to your Lemonade setup. |
lemonade pull <MODEL_NAME> | Downloads a model without launching it. |
lemonade run <MODEL_NAME> | Downloads the model if needed, then starts it for inference/chat. |
lemonade run <MODEL_NAME> --llamacpp rocm | Starts a llama.cpp model with the ROCm backend. |
lemonade run <MODEL_NAME> --llamacpp vulkan | Starts a llama.cpp model with the Vulkan backend. |
lemonade config | Displays the current Lemonade configuration values. |
lemonade config set llamacpp.backend=rocm | Sets the default llama.cpp backend to ROCm. |
For the latest Lemonade server options or troubleshooting, please refer to the official Lemonade documentation.
Podman
Podman is containerization software for Linux.
Step 1: Install the core Podman engine and the standalone Compose V2 parsing plugin.
sudo apt update && sudo apt install -y podman docker-compose-plugin podman-composeStep 2: Verify Podman and Compose
podman --versionpodman-compose --versionStep 3: Enable the system-wide Podman API socket so the Compose plugin can communicate with the container runtime.
sudo systemctl enable --now podman.socketStep 4: Run a temporary test container to verify the engine can successfully pull and execute images.
sudo podman run --rm docker.io/library/hello-worldInstalling n8n
Install n8n globally using npm.
npm install -g n8nPATH Issue: If
n8n --versionsays command not found, ensure your npm global bin directory is on the userPATH. The usual installation path is atC:\Users\<username>\AppData\Roaming\npm. Add this to the user path (Edit the system environment variables > Environment Variables > Edit User Path) and reload the terminal.
We are now going to use Podman service to containerize our n8n installation.
Please download the following into a directory of your choice:
In that directory, run the following command:
podman compose up -dThis should install n8n and write to a persistent storage.
Launch n8n by typing localhost:5678 into your browser address bar.
Launching n8n
Start n8n from the terminal:
n8n startn8n starts a local web server. Press 'o' or Open your browser to http://localhost:5678 to access the editor.
Launching Lemonade
Lemonade is the local server that will run a model and connect to n8n.
Open the Lemonade GUI by clicking the Lemonade Icon in the taskbar. You can browse models, backends, and load the pre-installed models from here.
Open the Lemonade GUI by clicking the Lemonade Icon. Right click the tray icon to open the app. Then, you can add models, backends, and load the pre-installed models.
Alternatively, you can open a terminal and run lemonade list to see what models are installed. Then, run:
lemonade run gpt-oss-120b-Q4_K_M --llamacpp vulkanlemonade run gpt-oss-120b-GGUF --llamacpp vulkanlemonade run gpt-oss-120b-GGUF --llamacpp vulkanlemonade run gpt-oss-20b-GGUF --llamacpp vulkanSetting Up the Workflow
Step 1: Sign Up or Log In to n8n
When you first open n8n, you’ll be prompted to create an account or log in:
- Open
http://localhost:5678in your browser - Create a new local account with your email, or log in if you already have one
- Once logged in, you’ll see the n8n dashboard
Step 2: Import the Workflow
We’ve provided a pre-built workflow that you can import directly:
- Download the following workflow file:
- Click Start from Scratch to open the workflow editor. Alternatively, click the + Button in the top left, and then Add workflow.
- Click the … menu (three dots) in the top right bar and select Import from file
- Select the downloaded
financial-news-workflow.jsonfile - The workflow will appear on the canvas
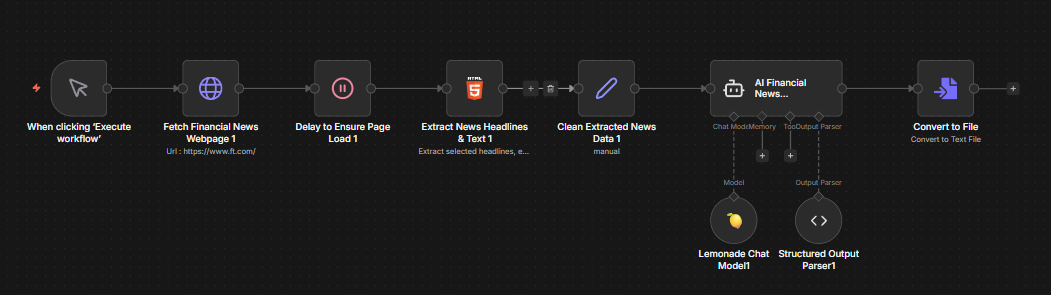
Step 3: Understanding the Workflow
The imported workflow contains 9 connected nodes:
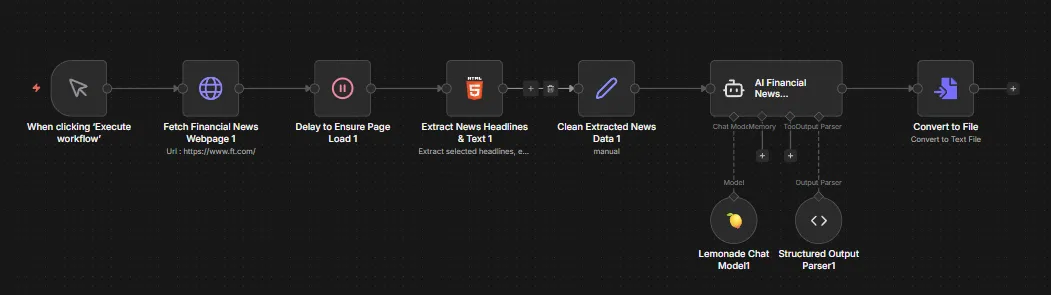
| Node | Purpose |
|---|---|
| When clicking ‘Execute workflow’ | Manual trigger to start the workflow |
| Fetch Financial News Webpage | HTTP GET request to https://apnews.com/business |
| Delay to Ensure Page Load | Wait node to ensure page content is fully loaded |
| Extract News Headlines & Text | HTML node that extracts headlines, editor’s picks, top stories, and regional news using CSS selectors |
| Clean Extracted News Data | Set node that combines all extracted data into a single text field |
| AI Financial News Summarizer | AI Agent that processes the news with a financial analyst system prompt |
| Lemonade Chat Model | Connects to your local Lemonade server running the LLM |
| Structured Output Parser | Formats the AI output as structured JSON |
| Convert to File | Converts the summary to a downloadable file |
Step 4: Configure Lemonade Credentials
Before running the workflow, you need to connect it to your local Lemonade server:
- Double click the Lemonade Chat Model node in n8n
- In the dropdown menu Credential to connect with select Create New Credential
- Enter the values in the table below and click save.
- Choose the relevant model that you have loaded in Lemonade Server.
| Field | Value |
|---|---|
| Base URL | http://localhost:13305/api/v1 |
| API Key | lemonade |
This workflow uses GPT-OSS-120B and it is pre-installed in Lemonade. You can change this to other loaded models in the Lemonade Chat Model node settings.
Step 5: Test the Workflow
- Ensure Lemonade is running with a model loaded
- Click Execute workflow at the bottom center of the canvas
- Watch each node execute from left to right—they turn green when complete
- Double click the AI Financial News Summarizer node to see the generated summary in the bottom pane.
- Double click the Convert to File node to download the corresponding text file in the bottom pane.
Understanding the AI Agent
The AI Financial News Summarizer uses a system prompt designed for financial analysis:
You are an AI financial analyst. Your role is to read, understand, andsummarize key financial news from today. The goal is to provide investorswith a clear and concise market overview to support better investment decisions.
Investor OutlookToday's news points to [bullish/bearish/neutral] sentiment. Watch for[economic event/earnings report] tomorrow, which could influence market direction.
The agent receives the cleaned news data and outputs a structured summary with market sentiment.
Saving Your Workflow
Click the workflow name at the top and rename it if desired. Workflows auto-save as you work.
Next Steps
- Schedule automation: Replace Manual Trigger with a Schedule Trigger to run daily
- Send notifications: Add a Discord, Slack, or Email node to receive summaries
- Try different models: Change the model in the Lemonade Chat Model node to experiment with different LLMs
- Customize extraction: Modify the HTML Extract node’s CSS selectors to target different news sections
- Try different backends: n8n also supports Ollama, LM Studio, and other local LLM backends
Explore n8n Templates
n8n has hundreds of pre-built workflow templates. Browse the official template library at:
Search for “AI”, “LLM”, or “automation” to find workflows you can import and customize.
For more information, check out the n8n Documentation.
Need help with this playbook?
Run into an issue or have a question? Open a GitHub issue and our team will take a look.