- Generating Images with ComfyUI and Z Image Turbo
- Automating Workflows with n8n and Local LLMs
- Local LLM Coding with VSCode and Qwen3-Coder
- Running and Serving LLMs with LM Studio
- Running LLMs on PyTorch with AMD ROCm™ Software
- Building Custom GPU Kernels with PyTorch and AMD ROCm™
- Building Your First Agent with GAIA
- Chatting with LLMs in Open WebUI
- Clustering Two Ryzen™ AI Halos with RCCL
- Clustering Two Ryzen™ AI Halos with RPC
- Fine-Tuning LLMs with LLaMA Factory
- Fine-Tuning LLMs with PyTorch and AMD ROCm™ Software
- Fine-Tuning LLMs with Unsloth
- Getting Started with Lemonade
- Getting Started with Ollama
- Getting Started with vLLM
- Local Computer Vision with AMD Ryzen™ AI NPU
- Real-Time Speech-to-Speech Translation
- Remote Development with AMD Sync
- Running OpenClaw Locally with Lemonade Server
- Overview
- What You’ll Learn
- Setting the Memory Configuration
- Check for Software Updates
- Installing Software Prerequisites
- Core Concepts — How Local AI Servers Work
- Main Activity — Your First Local AI Chat
- Going Deeper — Build an AI-Powered App with Python
- Running Models on the NPU (Optional)
- Next Steps
Getting Started with Lemonade
Learn to run Gen AI models locally with Lemonade, an open-source local AI server.
Overview
🍋 Lemonade is an open-source local AI server that lets you run large language models (LLMs), image generators, and audio models directly on your own hardware. It exposes the models through the industry-standard OpenAI API, so any app that works with OpenAI can instantly work with Lemonade. By the end of the playbook, you’ll be using Lemonade to run models locally on your machine.
What You’ll Learn
By the end of this playbook you will be able to:
- Install Lemonade Server and verify it is running.
- Download and chat with an LLM using a single command.
- Explore the web UI and try different modalities such as vision, speech-to-text, and image generation.
- Switch GPU backends between Vulkan and AMD ROCm™ software.
- Build a Python app powered by a local LLM using the OpenAI-compatible API.
- Run models on the AMD Neural Processing Unit (NPU) using Hybrid and FLM execution modes on AMD Ryzen™ AI hardware.
Setting the Memory Configuration
For the Ryzen AI Halo, the dedicated GPU memory defaults to 64GB, which is sufficient for most workloads. For larger models or longer contexts, increasing this to 96GB may help. To adjust, open AMD Software: Adrenalin Edition™ and navigate to Performance → Tuning → AMD Variable Graphics Memory. Reboot for the changes to take effect.
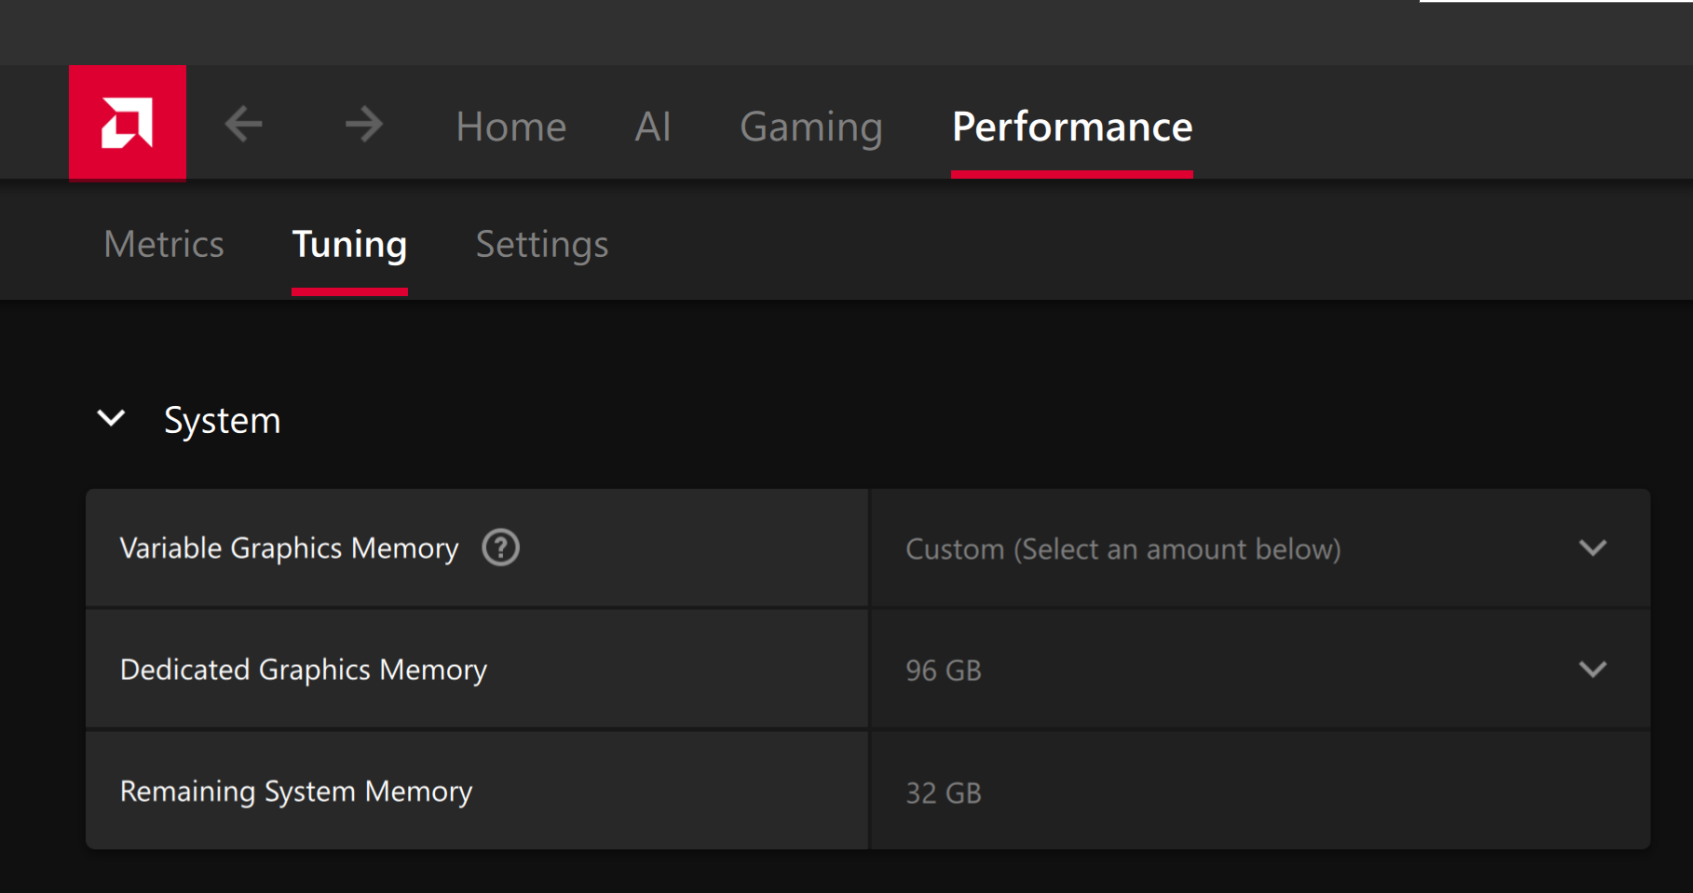
To change the dedicated GPU memory value, open AMD Software: Adrenalin Edition™ and navigate to Performance → Tuning → AMD Variable Graphics Memory. Reboot for the changes to take effect.
On Linux, to run larger models, increase the shared memory pool available to the GPU. This might involve setting the BIOS dedicated GPU memory to the minimum, so that the shared memory pool can be maximized.
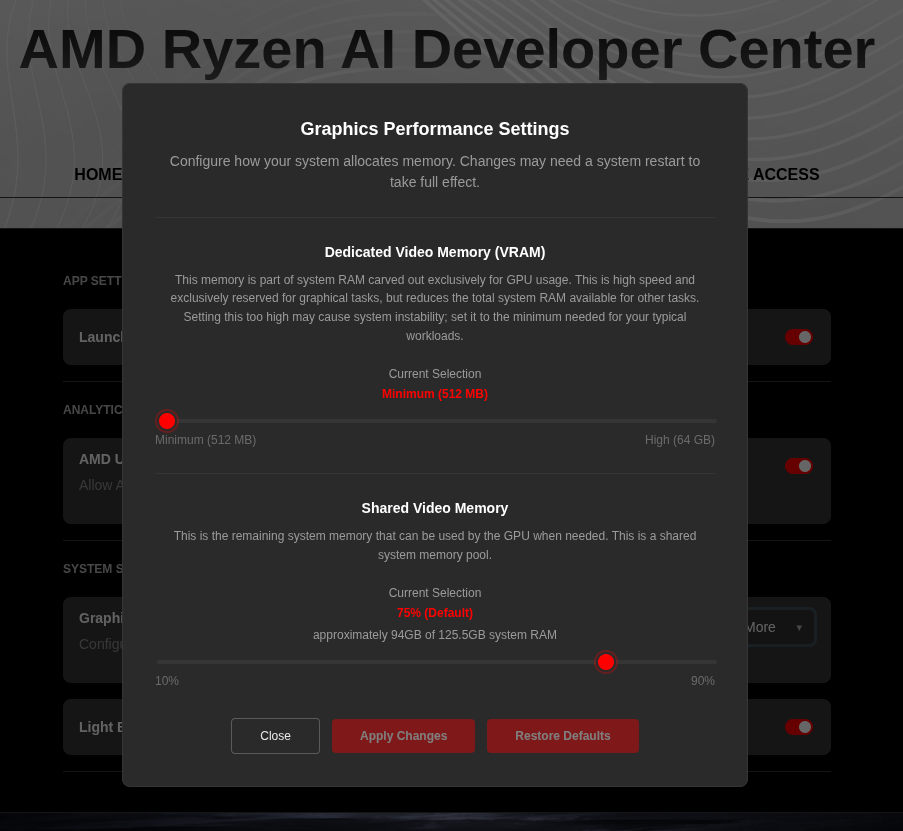
For the AMD Ryzen™ AI Halo, the default is 96GB shared. To modify this, open the AMD Ryzen™ AI Developer Center and go to the Settings tab. Under Graphics Performance Settings, increase the Shared Video Memory slider, then click Apply Changes and reboot for the changes to take effect.
Increase the shared memory pool by changing the kernel’s Translation Table Manager (TTM) page setting. AMD recommends setting the minimum dedicated VRAM in the BIOS (0.5 GB) so the maximum amount is available as shared memory.
- Install the
pipxutility and add the path for pipx-installed wheels to the system search path:
sudo apt install pipxpipx ensurepath- Install the
amd-debug-toolswheel from PyPI:
pipx install amd-debug-tools- Query the current shared memory settings:
amd-ttm- Increase the shared memory allocation (units in GB):
amd-ttm --set <NUM>- Reboot for the changes to take effect.
Check for Software Updates
Before starting, ensure your Ryzen AI Halo has the latest software installed. Open the AMD Ryzen™ AI Developer Center and check for available updates, both to the app itself and additional software.
Go to the Updates tab. If updates are available, install them and reboot before continuing.
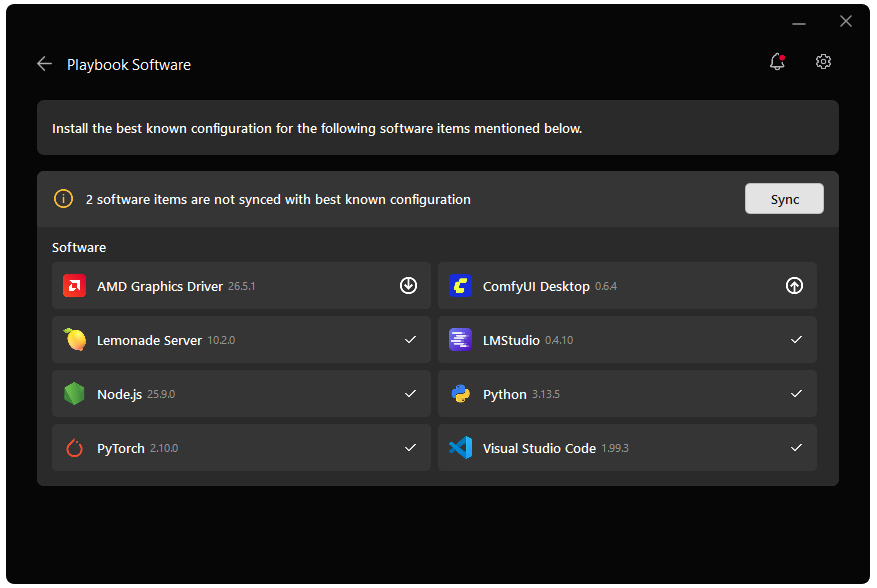
Go to the Manage tab. If updates are available, install them and reboot before continuing.

Installing Software Prerequisites
Before you begin, make sure you have:
- A PC running Windows 11 or a supported Linux distribution (Ubuntu 24.04+, Fedora, Debian)
- 16 GB of RAM is recommended for the runtime model used in Steps 1–7 (
Gemma-4-E2B-it-GGUF, ~3 GB). 32 GB+ is recommended if you want to use the larger code-generation model in Step 6 (Qwen3.5-35B-A3B-GGUF, ~20 GB). - ~4–30 GB of free disk space, depending on the models you download. The largest model in this guide is about 20 GB.
- Python 3.10–3.13 (used in the Python app section)
- An internet connection (wired or wireless)
- [Optional] An AMD XDNA 2 NPU (Ryzen AI 300/400/Max 300 series or Z2 Extreme) with the latest driver installed from Ryzen AI Software Installation Instructions if you want to run a model on the NPU.
AMD GPU Driver
Update to the latest AMD GPU driver using AMD Software: Adrenalin Edition™.
- Open
AMD Software: Adrenalin Editionfrom your Start menu or system tray. - Navigate to Driver and Software, click Manage Updates.
- If an update is available, follow the prompts to download and install.
AMD GPU Driver
Install the AMD GPU Driver (amdgpu) using the Radeon Software for Linux (RSL) flow. For instructions for your distribution, see Install the kernel driver.
Lemonade
Installing Lemonade
Download the latest installer from lemonade-server.ai and run the .msi file.
After installation:
- The
lemonadeCLI is added to your system PATH automatically - Lemonade server is expected to run in the background automatically
You can also install silently from the command line:
msiexec /i lemonade-server-minimal.msi /qnUbuntu:
sudo add-apt-repository ppa:lemonade-team/stablesudo apt install lemonade-serverArch Linux (AUR):
yay -S lemonade-serverFor other distributions or to install from source, see the full installation options.
Verifying Lemonade Installation
Open a terminal and run:
lemonade --versionYou should see output like:
lemonade version x.y.zIf you see a version number, Lemonade is installed correctly and ready to go.
For quick reference, here are common Lemonade CLI commands:
| Command | What it does |
|---|---|
lemonade --help | Shows all available commands and flags. |
lemonade --version | Prints the installed Lemonade version. |
lemonade status | Confirms whether the Lemonade server is running and reachable. The default OpenAI-compatible API base URL is http://localhost:13305/api/v1. |
lemonade list | Lists models available to your Lemonade setup. |
lemonade pull <MODEL_NAME> | Downloads a model without launching it. |
lemonade run <MODEL_NAME> | Downloads the model if needed, then starts it for inference/chat. |
lemonade run <MODEL_NAME> --llamacpp rocm | Starts a llama.cpp model with the ROCm backend. |
lemonade run <MODEL_NAME> --llamacpp vulkan | Starts a llama.cpp model with the Vulkan backend. |
lemonade config | Displays the current Lemonade configuration values. |
lemonade config set llamacpp.backend=rocm | Sets the default llama.cpp backend to ROCm. |
For the latest Lemonade server options or troubleshooting, please refer to the official Lemonade documentation.
Core Concepts — How Local AI Servers Work
Before we run a model, it is worth understanding why things are set up this way. Lemonade is a local model server, a process that loads AI models into memory and exposes them to applications over HTTP, just like a cloud AI service would.
Why a Server?
| Benefit | What It Means for You |
|---|---|
| Simplified integration | Apps talk to one HTTP API instead of dealing with hardware-specific C++ or Python libraries. |
| Shared models | A single loaded model can serve multiple apps at once, no duplicate copies eating your RAM. |
| Cloud-to-local portability | Code written for OpenAI’s cloud API works with Lemonade by changing one URL. |
| Separation of concerns | Model management, streaming, and fault tolerance are handled by the server so developers can focus on their app. |
The OpenAI API Standard
Lemonade implements the OpenAI API, the same interface used by ChatGPT, Azure OpenAI, and dozens of other services. The conversation model is simple:
| Role | Who Is Talking |
|---|---|
| system | Instructions to the model (persona, constraints, available tools) |
| user | Messages from the human (or application) to the model |
| assistant | Responses generated by the model |
This means any library or app that supports OpenAI can talk to Lemonade by pointing it at http://localhost:13305/api/v1 while Lemonade Server is running.
Main Activity — Your First Local AI Chat
Let’s download an LLM and have a conversation with it, running the AI entirely on your own machine.
Step 1: Download and Run a Model
Lemonade ships with a curated model library. Let’s start with Gemma-4-E2B-it, a capable and compact model that includes vision support. Open a terminal and run:
lemonade run Gemma-4-E2B-it-GGUFThis single command does three things:
- Downloads the model (~3 GB) from Hugging Face, if it is not already downloaded. (May take some time)
- Starts the Lemonade Server process on port 13305.
- Opens Lemonade App so you can start chatting with the model.
On Windows, the Lemonade App launches automatically and you can begin chatting immediately. If you installed the minimal.msi package, the app is not included. To start chatting, open your web browser and go to http://localhost:13305.
On Linux, open your browser and navigate to http://localhost:13305 to access the web app.
Try typing a question:
What are three fun facts about lemons?The model will respond directly in the chat window. Congratulations! You are running a large language model locally.
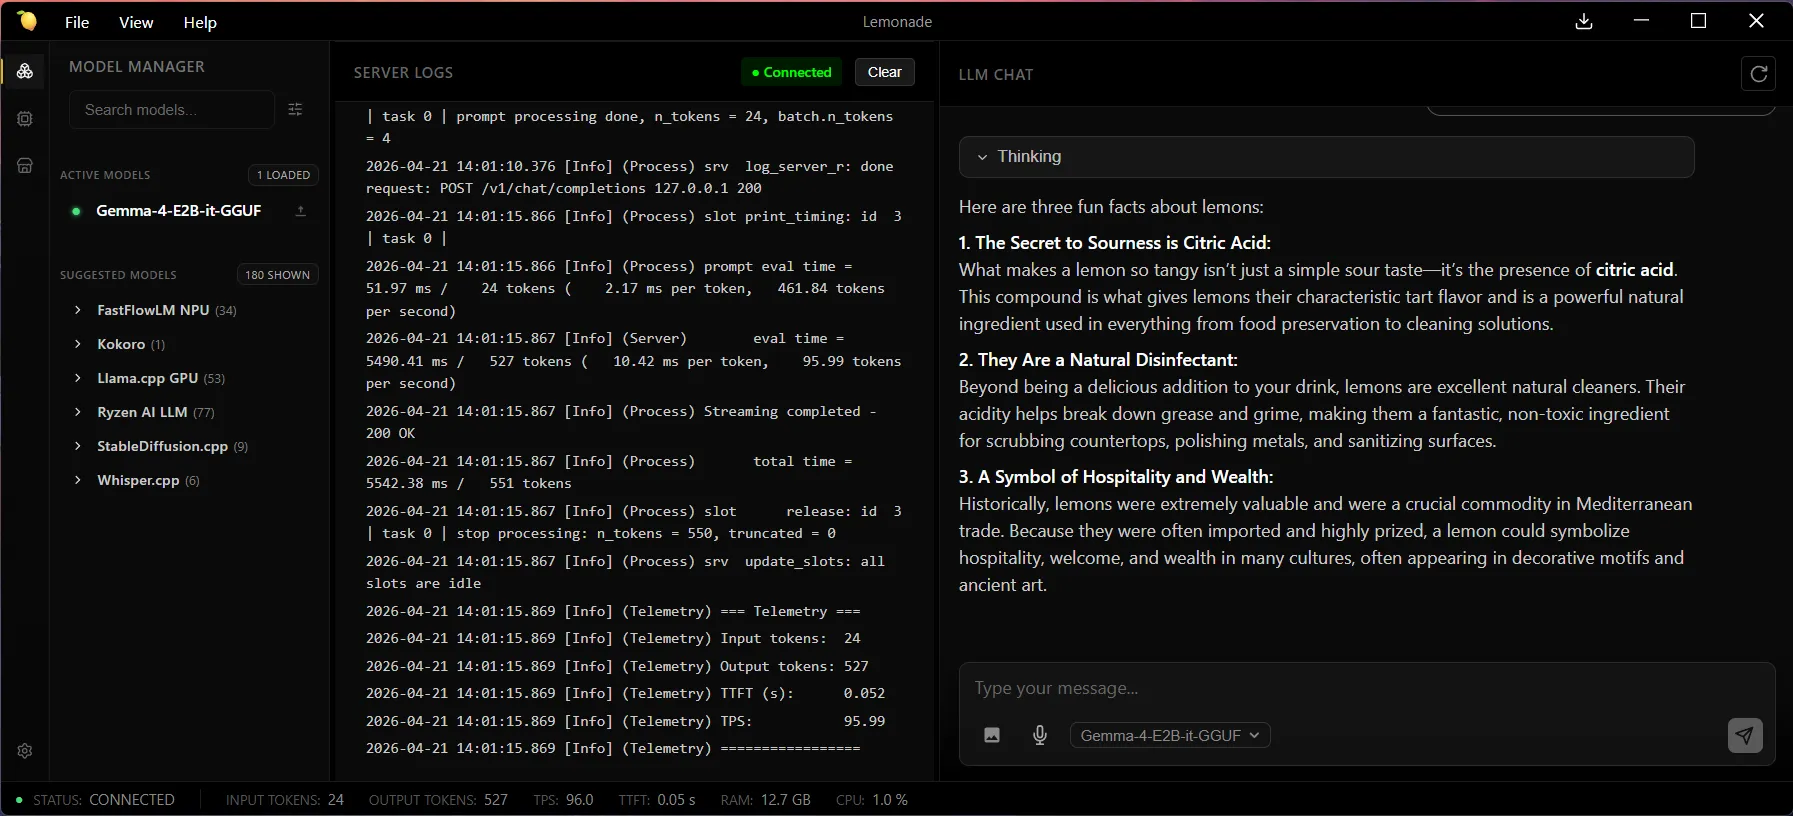
In the Server Logs pane in the Lemonade App, you can find telemetry data about the model’s performance after each response. For example:
=== Telemetry ===Input tokens: 24Output tokens: 527TTFT (s): 0.052TPS: 95.99=================Step 2: Explore the Web Interface and Different Modalities
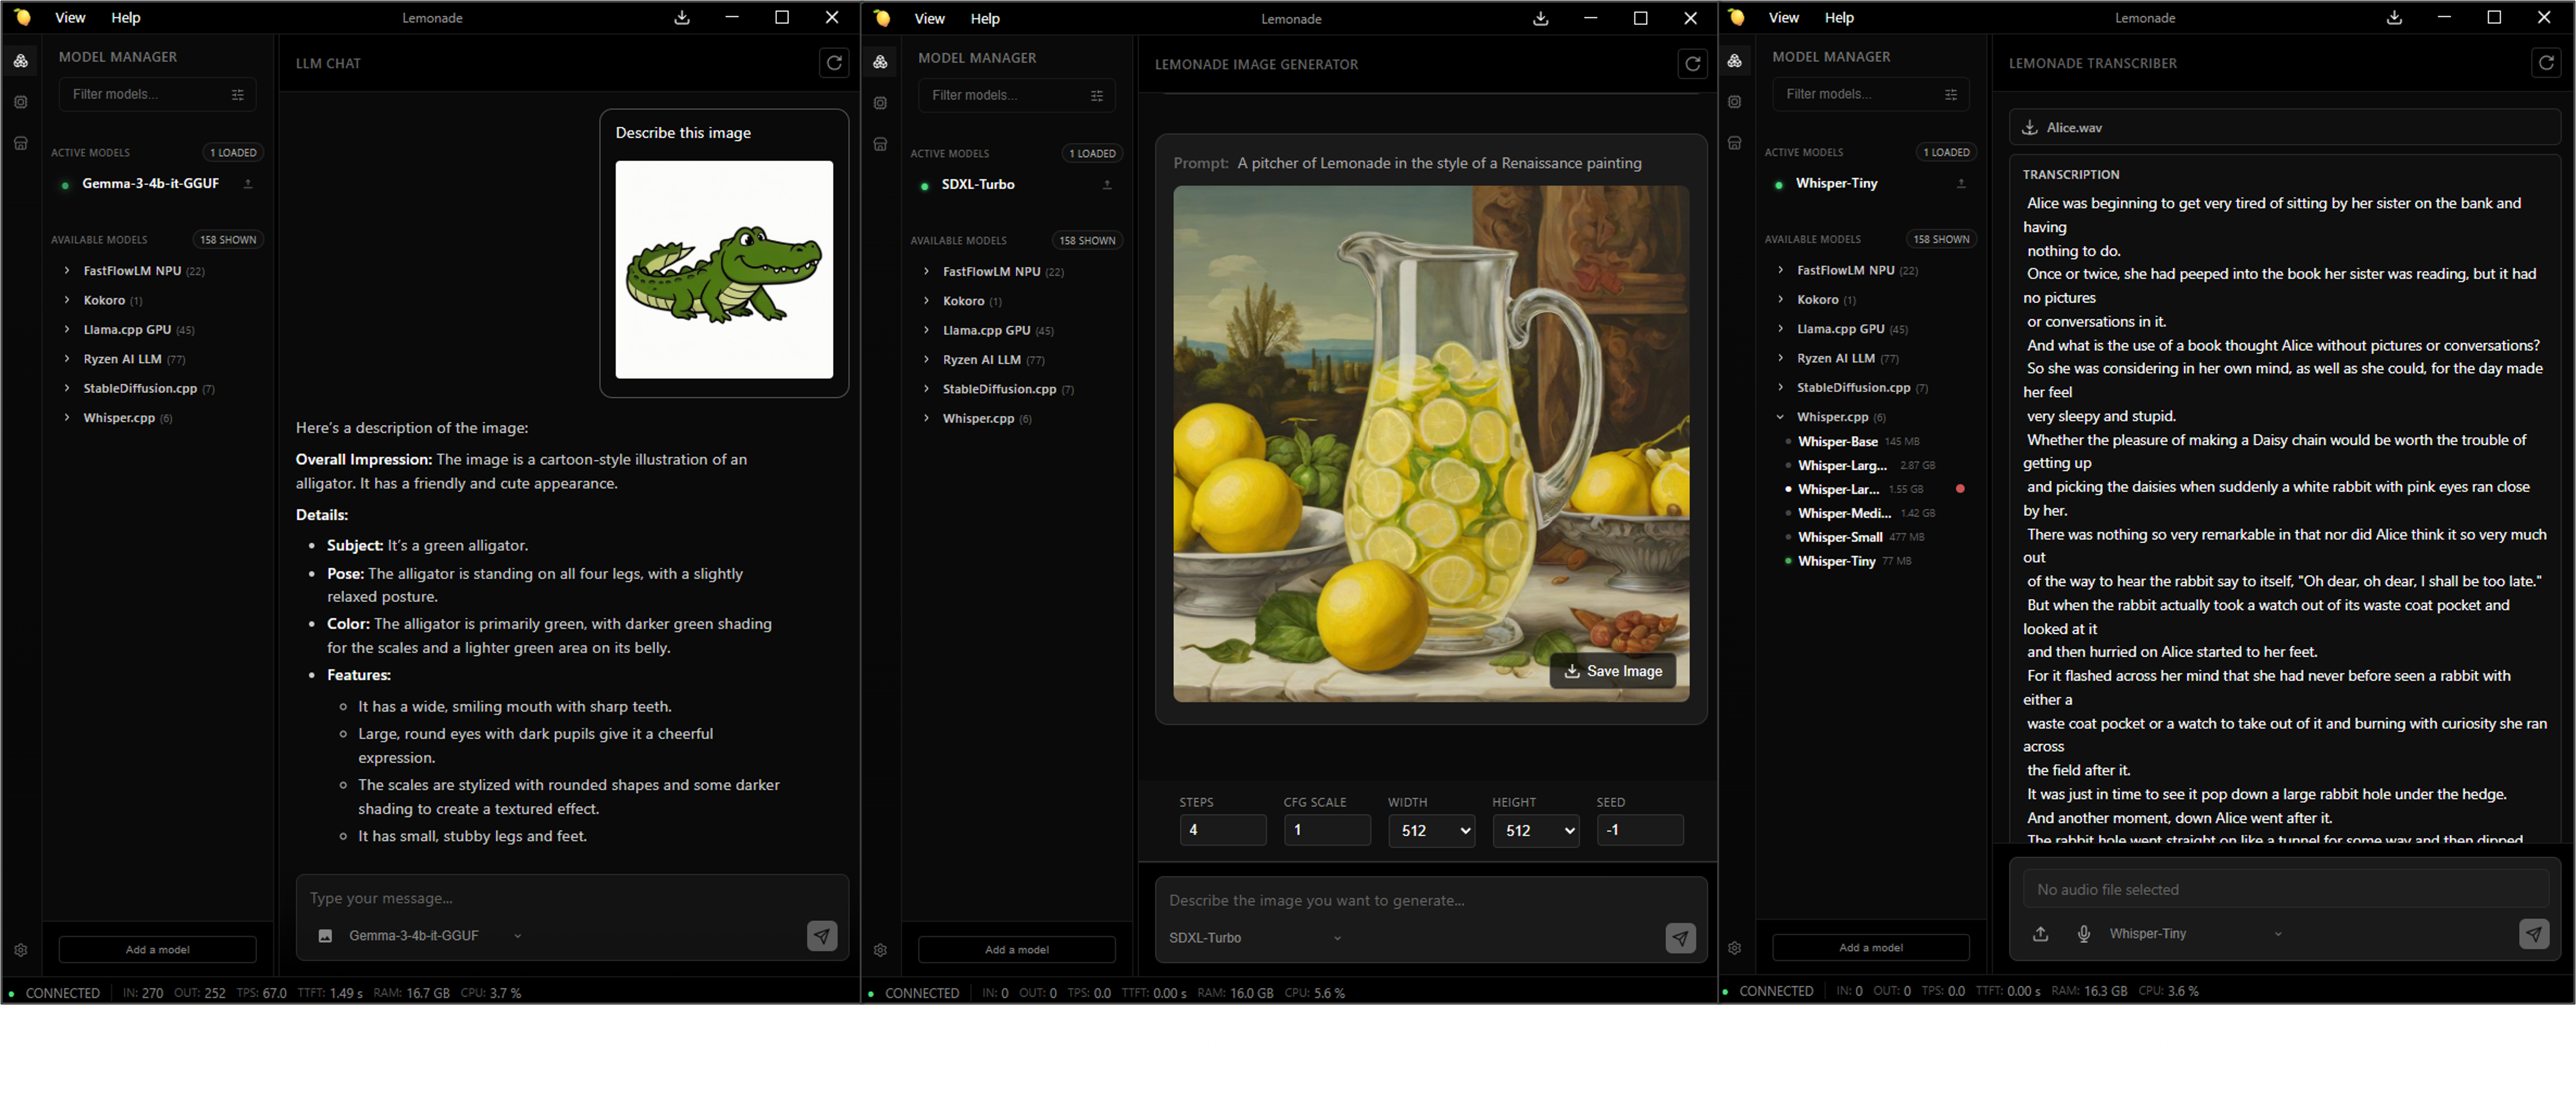
Lemonade includes a built-in web interface where you can:
- Interact with the loaded model in a familiar chat window
- Browse models in the Model Manager tab
- Download new models with one click
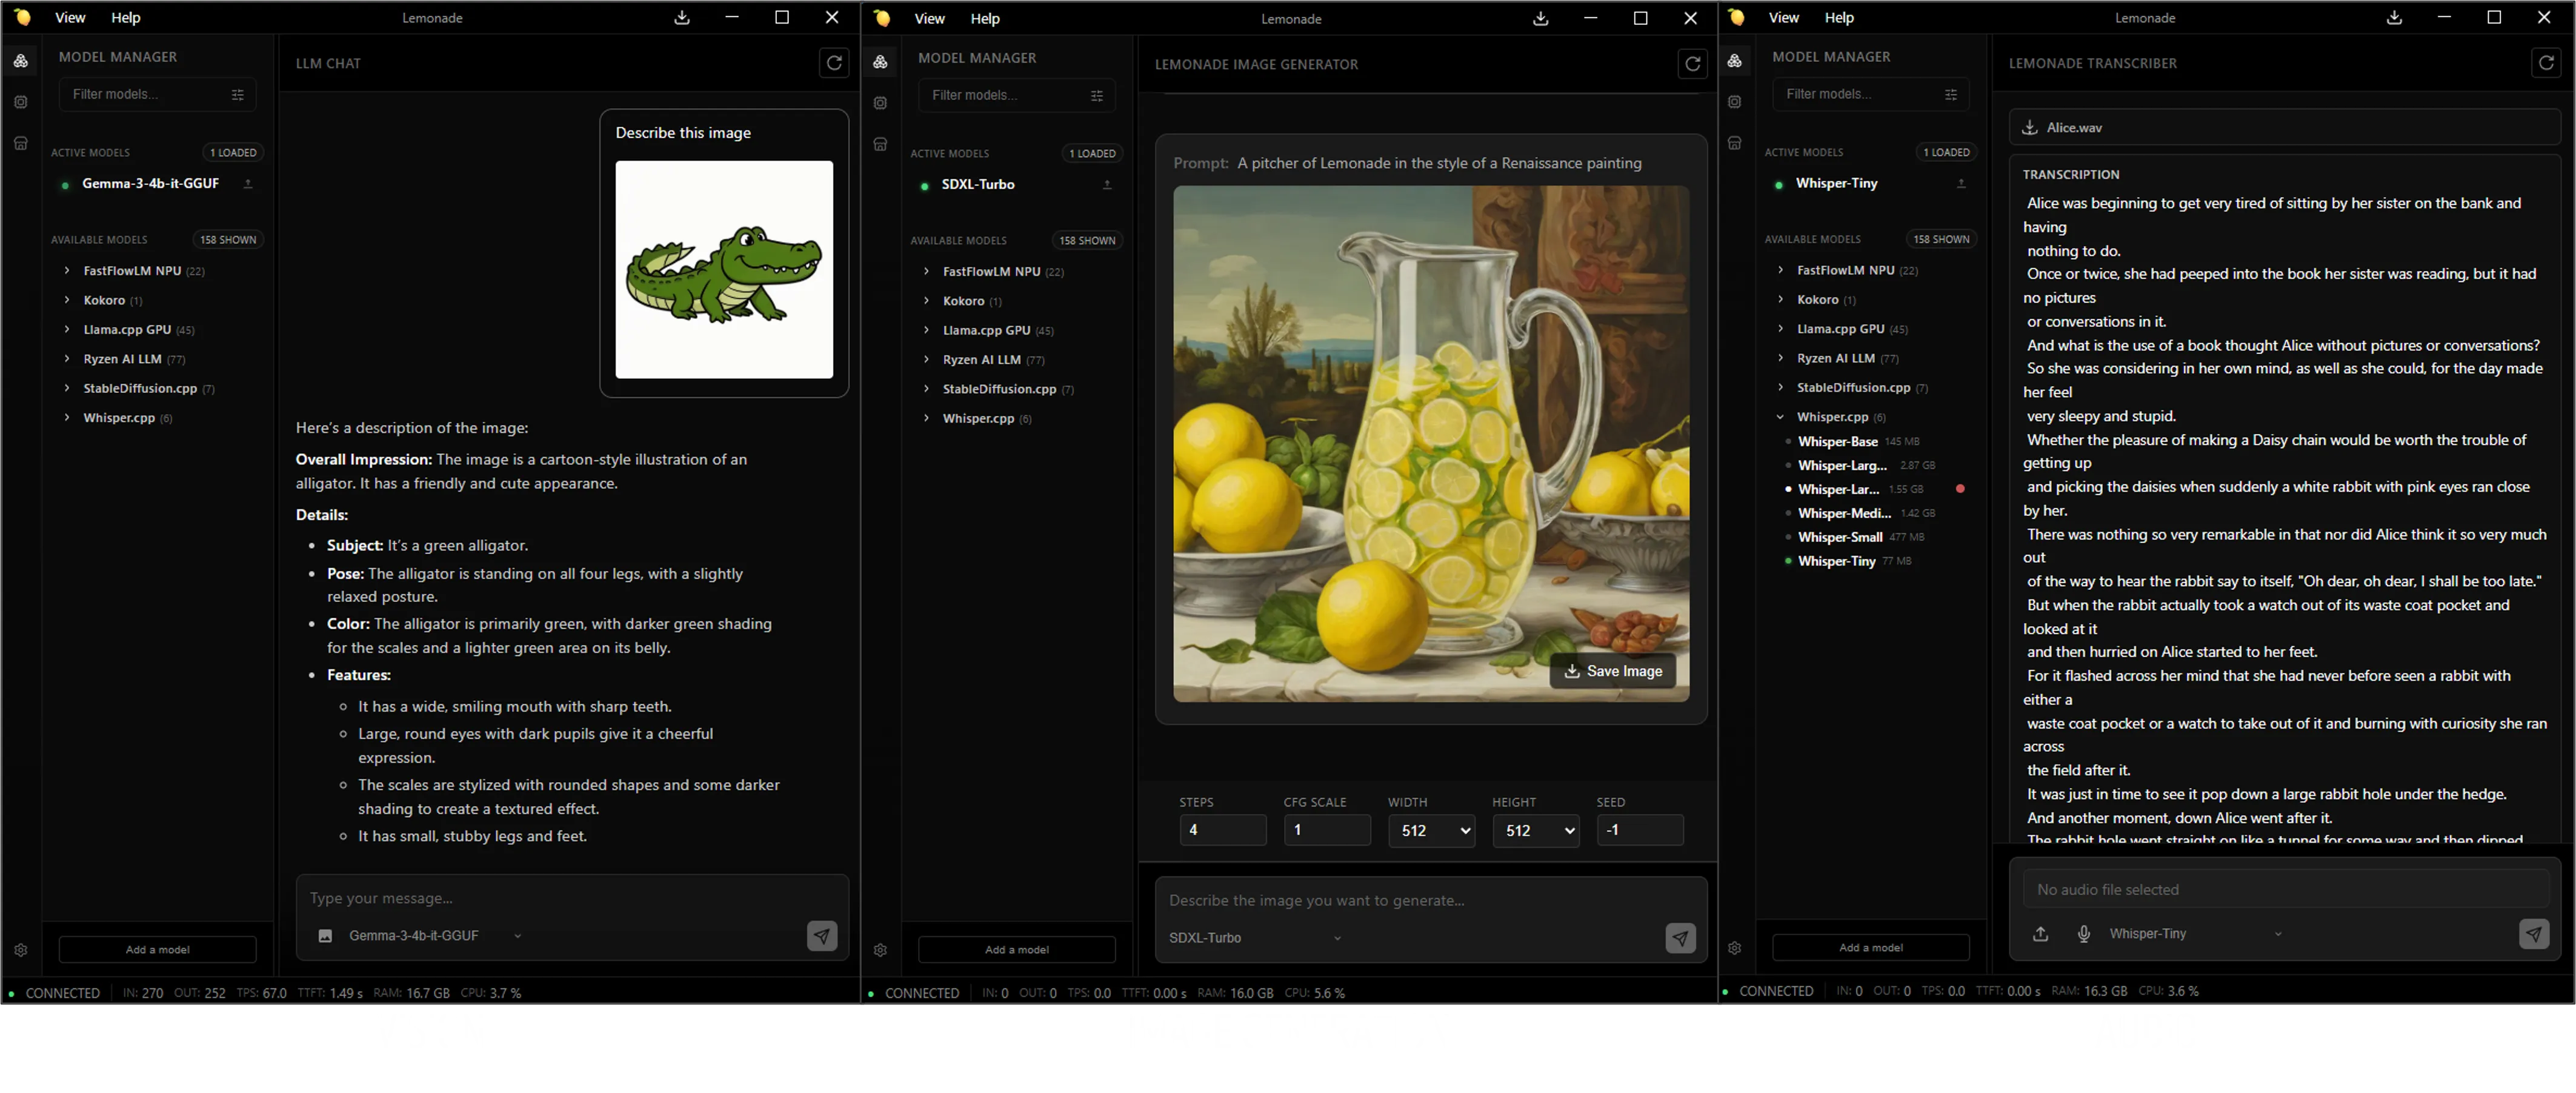
Try switching between different modalities using the Model Manager tab in the web UI where you can browse models by Recipe or by Category:
- Vision: The
Gemma-4-E2B-it-GGUFmodel you already have loaded supports vision. Paste an image into the chat box and ask the model to describe it. - Image generation: In the Image category, download an image model such as
SDXL-Turbofrom the Model Manager, then use the Lemonade Image Generator to type a prompt and generate an image locally. - Audio: In the Audio category, download an audio model such as
Whisper-Tiny, which can do speech-to-text. Provide a recording of audio to transcribe it locally. For text-to-speech, try one of the models in the Speech category, such askokoro-v1.
Step 3: Try a Model with a Different Backend
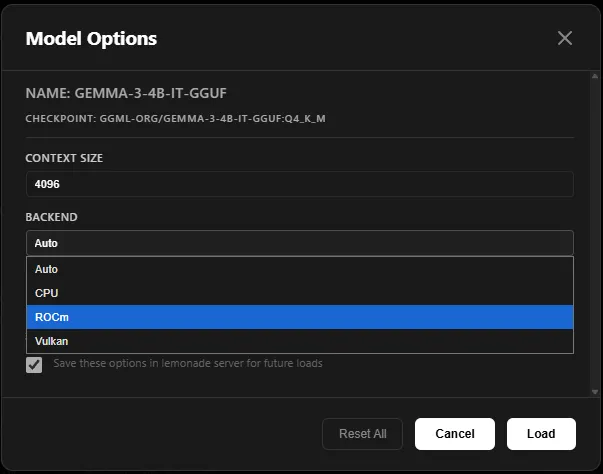
If you hover over a model in the Lemonade App, you’ll see a gear icon. Clicking this allows you to select options for the model, including choosing your desired backend.
By default, Lemonade uses Vulkan for GPU acceleration. If you have a supported AMD discrete GPU, you can switch to ROCm.
To manage your installed backends, click the backend button in the leftmost column.
Alternatively, you can specify the backend using the following command:
lemonade run Gemma-4-E2B-it-GGUF --llamacpp rocmYou can also set your default backend using the environment variable LEMONADE_LLAMACPP with the values: vulkan, rocm, or cpu.
Going Deeper — Build an AI-Powered App with Python
The real power of a local AI server is that any application can connect to it using just a few lines of code. To prove it, let’s build a small but functional study flashcard generator where you give it a topic, it generates flashcards, and you can quiz yourself interactively.
Step 4: Start the Server
Verify that the Lemonade server is running. It typically starts automatically in the background after installation. To verify, run:
lemonade statusYou should see a message like: Server is running on port 13305.
If the server isn’t running, start it by opening the Lemonade app. Use the default port 13305 (you can confirm or select this from the tray icon).
Step 5: Install the OpenAI Python Client
In a terminal, create a venv and install the OpenAI Python Client using the following commands:
sudo apt updatesudo apt install -y python3-venvpython3 -m venv lemonade-envsource lemonade-env/bin/activatepip install openaipython -m venv lemonade-envlemonade-env\Scripts\activatepip install openaiStep 6: Build the Flashcard App
Let’s download a different model to generate code: Qwen3.5-35B-A3B-GGUF. This is a large (~20 GB) and performant model best suited to systems with 32 GB+ of RAM. If you have less RAM available, try Qwen3.5-9B-GGUF (~6 GB) instead.
You can download it from the UI or run the following:
lemonade run Qwen3.5-35B-A3B-GGUFFeed the following prompt into Lemonade Chat UI to generate code for a simple Flashcard app.
We’ll use Qwen3.5-35B-A3B-GGUF (a larger model better at writing code) to generate our Python app, and the app itself will call Gemma-4-E2B-it-GGUF (the smaller model you already downloaded) at runtime. The code can then be copied to a file of your choice to be run in Python.
Generate a Python script that uses the OpenAI Python library to call a local LLM and create an interactive flashcard study tool.
Connection details:- Base URL: http://localhost:13305/api/v1- API key: "lemonade"- Model to use: "Gemma-4-E2B-it-GGUF"
Structure:
1. A `generate_flashcards(topic, count=5)` function that:   - Sends a system message instructing the LLM to return ONLY a JSON array of objects with "question" and "answer" fields.   - Handles malformed JSON gracefully.   - Returns the parsed list of cards, or an empty list if parsing fails.
2. A `quiz(cards)` function that shuffles the cards and, for each card:   - Prints `--- Card i/N ---`.   - Prints `Q: <question>`.   - Waits for the user to press Enter ("Press Enter to reveal the answer...").   - Prints `A: <answer>`.   - Asks "Did you get it right? (y/n): " and tracks the score.   - At the end, prints `🏆 Score: <score>/<total>`.
3. A main loop that: - Prints a `🍋 Lemonade Flashcard Generator` banner on startup. - Asks the user for a topic (typing "quit" exits). - Prints `✨ Generating N flashcards on: <topic>`. - Calls `generate_flashcards` and lists the generated questions as an indented numbered list (` 1. ...`). - Offers to start the quiz.For your convenience, we have provided sample output in . Feel free to download it to your directory. Either way, you should now have a Python file that can be run.
Step 7: Run The Generated Code
# Ensure the virtual environment is runningpython flashcards.py # replace with your file nameHere’s what you should see:
🍋 Lemonade Flashcard Generator================================Powered by a local LLM running on your own hardware.
Enter a topic (or "quit" to exit): the solar system
✨ Generating 5 flashcards on: the solar system
Generated 5 cards!
  1. Which planet is closest to the Sun?  2. What is the largest planet in our solar system?  3. Which planet is known as the "Red Planet"?  4. How many moons does Earth have?  5. What separates the inner planets from the outer planets?
Start quiz? (y/n): y
--- Card 1/5 ---Q: What is the largest planet in our solar system?
Press Enter to reveal the answer...A: Jupiter is the largest planet, with a diameter of about 139,820 km.
Did you get it right? (y/n): y
...
🏆 Score: 4/5
In about 150 lines of code you have built a fully functional study tool powered by a local LLM. There is no API key to manage, no usage costs, and no data ever leaves your machine.
Key insight: Notice the
client = OpenAI(base_url=...)line is the only thing tying this app to Lemonade instead of OpenAI’s cloud. The rest of the code is identical to what you would write against any OpenAI-compatible service. If you have ever used the OpenAI Python library, you already know how to build apps with Lemonade.
What This Demonstrates
This small app exercises several real-world integration patterns:
| Pattern | Where It Appears |
|---|---|
| System prompts | The "system" message tells the LLM to output structured JSON |
| Structured output | The app parses the LLM’s response as JSON to build flashcards |
| Stateless requests | Each generate_flashcards() call is independent |
| Error handling | The try/except gracefully handles cases where the LLM’s output is not valid JSON |
These same patterns scale to any application such as chatbots, code assistants, content generators, automation tools.
Bonus Challenge
- For an added challenge, try updating the app to have the flashcards read to the user by referencing the example provided here.
Running Models on the NPU (Optional)
If you have a Ryzen AI 300/400/Max 300 series or Z2 Extreme, your device has a built-in Neural Processing Unit (NPU), a dedicated chip designed specifically for AI workloads. Running models on the NPU is more power-efficient than using the GPU, which makes it ideal for background AI tasks, longer sessions, and battery-powered use.
Lemonade supports three NPU execution modes, all transparent behind the same OpenAI API:
| Mode | How It Works | Recipe | Example Models |
|---|---|---|---|
| Hybrid (NPU + iGPU) | NPU processes the prompt, iGPU generates tokens | OGA (oga-hybrid) | Qwen3-4B-Hybrid |
| NPU-only | Entire inference runs on the NPU | Ryzen AI LLM (ryzenai-llm) | Qwen-2.5-7B-Instruct-NPU |
| FLM | Uses FastFlowLM engine on the NPU, optimized for AMD XDNA2 | FLM (flm) | qwen3.5-4b-FLM |
Requirements
- AMD Ryzen AI 300/400 series or Z2 series processor
- For FLM models: The FLM runtime can be installed from within the Lemonade app or Lemonade will automatically install the FLM runtime when running an FLM model. To learn more about FastFlowLM, see here.
Step 8: Run a Hybrid Model
Hybrid models split work between the NPU and iGPU for a good balance of speed and efficiency. In the Lemonade App, select a model from the Ryzen AI LLM list, for example, Qwen3-4B-Hybrid, or run it using the following command:
lemonade run Qwen3-4B-HybridLemonade detects your NPU automatically and installs the Ryzen AI LLM backend.
What is happening under the hood? When you send a message, the NPU processes your entire prompt in parallel (this is called “prefill”). Then, the iGPU takes over to generate the response one token at a time (this is called “decode”). This hybrid approach plays to each chip’s strengths.
Step 9: Run an FLM Model
FastFlowLM (FLM) models are specifically optimized for AMD’s XDNA2 NPU architecture and can be very fast for their size. For example, select qwen3.5-4b-FLM from the FastFlowLM NPU list or use the following command:
To enable FastFlowLM on Windows:
- Open the
Backends Managermenu. - Locate
FastFlowLM NPUbackend category. - Click Install NPU.
- Once installation is complete, ~36 defaults models will be available under the FFLM dropdown menu.
When the Lemonade App is launched for the first time, the FastFlowNPU backend is not enabled by default.
The local app will open the installation page to guide you through setup.
To enable FastFlowLM on Linux:
- Open the
LemonadeApp. - Visit the official FLM documentation and follow the installation steps for FLM by selecting your Linux distribution.
- Enable backports as instructed on the installation page.
- Download the latest
v0.9.xrelease from the tags page.’
[!Note] For AMD Halo Developer Platform, make sure to choose Debian 13.
fastflowlm_0.9.X_debian13_amd64.debfastflowlm_0.9.X_ubuntuY.Z_amd64.deb- Install the downloaded
.debpackage. - Recommended: Quit the
Lemonade Appand open it again so the changes are detected. - Recommended: Open
Backends Managerand click InstallFastFlowNPUBackend.
After a successful installation, you should see that flm:npu completed in the Download Manager inside the Lemonade Desktop App.
 You can then select any of the available FFLM models and start using the NPU backend.
For specific model, download desired model from models page and validate it using the Shell command provided in the documentation.
flm run qwen3.5-4b-FLMor via
lemonade run qwen3.5-4b-FLMFLM models include some of the most popular architectures (Gemma 3, Qwen 3, Llama 3, and DeepSeek R1) and range from under 1 GB to over 13 GB. Lemonade detects your NPU automatically and installs the FastFlowLM NPU backend.
Switching Models
The flashcard app from Step 6 works on NPU models too, just change the model name:
# In flashcards.py, swap the model to run on NPU instead of GPUresponse = client.chat.completions.create( model="Qwen3-4B-Hybrid", # swap in any NPU/Hybrid/FLM model messages=messages,)Next Steps
You have a local AI server running on your own hardware, here is where to go next:
-
Connect your favorite apps: Lemonade works out of the box with VS Code Copilot, Open WebUI, Continue, n8n, and many more.
-
Browse more models: Explore the full model library to find models optimized for coding, reasoning, vision, and more. Use the Lemonade App or
lemonade listto see what is available. -
Unlock ROCm GPU acceleration: If you have a supported AMD GPU, switch to the ROCm backend:
lemonade config set llamacpp.backend=rocm. See supported AMD GPUs. -
Read the full API spec: Lemonade supports chat completions, embeddings, audio transcription, image generation, text-to-speech, and more. See the Server Spec for every endpoint.
-
Contribute: Lemonade is open source. Check out the contribution guide and look for Good First Issues.
Need help with this playbook?
Run into an issue or have a question? Open a GitHub issue and our team will take a look.