- Generating Images with ComfyUI and Z Image Turbo
- Automating Workflows with n8n and Local LLMs
- Local LLM Coding with VSCode and Qwen3-Coder
- Running and Serving LLMs with LM Studio
- Running LLMs on PyTorch with AMD ROCm™ Software
- Building Custom GPU Kernels with PyTorch and AMD ROCm™
- Building Your First Agent with GAIA
- Chatting with LLMs in Open WebUI
- Clustering Two Ryzen™ AI Halos with RCCL
- Clustering Two Ryzen™ AI Halos with RPC
- Fine-Tuning LLMs with LLaMA Factory
- Fine-Tuning LLMs with PyTorch and AMD ROCm™ Software
- Fine-Tuning LLMs with Unsloth
- Getting Started with Lemonade
- Getting Started with Ollama
- Getting Started with vLLM
- Local Computer Vision with AMD Ryzen™ AI NPU
- Real-Time Speech-to-Speech Translation
- Remote Development with AMD Sync
- Running OpenClaw Locally with Lemonade Server
Running LLMs on PyTorch with AMD ROCm™ Software
Learn to run powerful language models on your PC with PyTorch and AMD ROCm™ software to summarize documents quickly and easily.

Overview
Want to run powerful AI language models on your own hardware? This guide shows you how. This tutorial uses PyTorch powered by AMD ROCm™ software to run models that can summarize documents, answer questions, generate text, and more, all running locally.
What You’ll Learn
- Run LLMs like gpt-oss-20b and qwen3.5-4B locally using PyTorch and ROCm
- Create a document summarization tool using LLMs
Setting the Memory Configuration
For the Ryzen AI Halo, the dedicated GPU memory defaults to 64GB, which is sufficient for most workloads. For larger models or longer contexts, increasing this to 96GB may help. To adjust, open AMD Software: Adrenalin Edition™ and navigate to Performance → Tuning → AMD Variable Graphics Memory. Reboot for the changes to take effect.
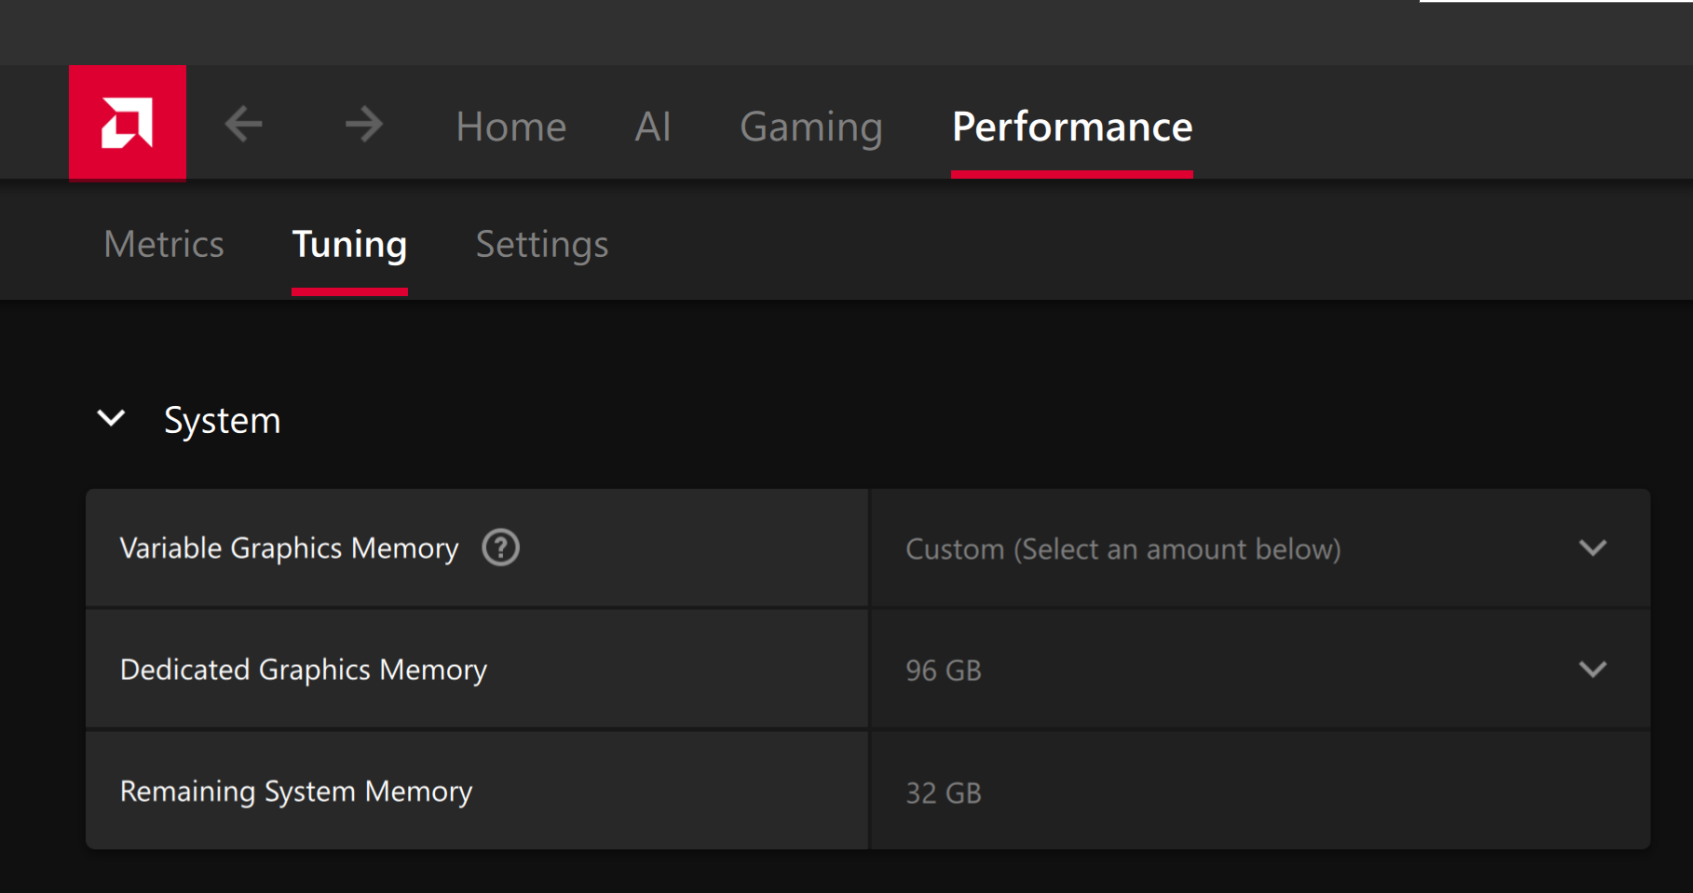
To change the dedicated GPU memory value, open AMD Software: Adrenalin Edition™ and navigate to Performance → Tuning → AMD Variable Graphics Memory. Reboot for the changes to take effect.
On Linux, to run larger models, increase the shared memory pool available to the GPU. This might involve setting the BIOS dedicated GPU memory to the minimum, so that the shared memory pool can be maximized.
For the AMD Ryzen™ AI Halo, the default is 96GB shared. To modify this, open the AMD Ryzen™ AI Developer Center and go to the Settings tab. Under Graphics Performance Settings, increase the Shared Video Memory slider, then click Apply Changes and reboot for the changes to take effect.
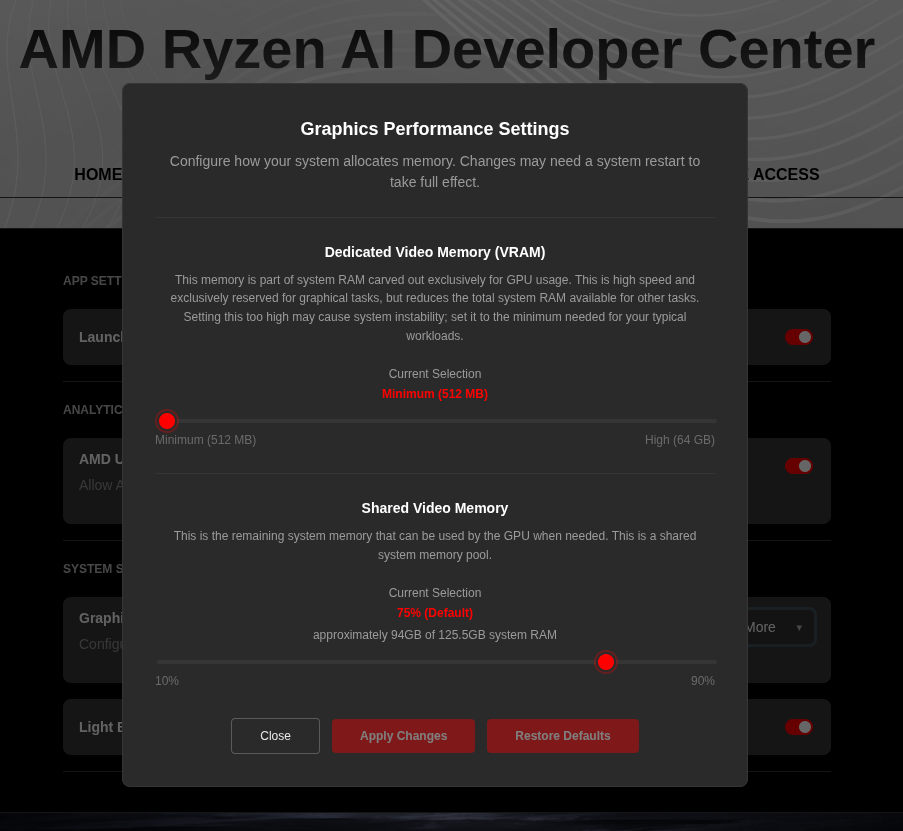
Increase the shared memory pool by changing the kernel’s Translation Table Manager (TTM) page setting. AMD recommends setting the minimum dedicated VRAM in the BIOS (0.5 GB) so the maximum amount is available as shared memory.
- Install the
pipxutility and add the path for pipx-installed wheels to the system search path:
sudo apt install pipxpipx ensurepath- Install the
amd-debug-toolswheel from PyPI:
pipx install amd-debug-tools- Query the current shared memory settings:
amd-ttm- Increase the shared memory allocation (units in GB):
amd-ttm --set <NUM>- Reboot for the changes to take effect.
Check for Software Updates
Before starting, ensure your Ryzen AI Halo has the latest software installed. Open the AMD Ryzen™ AI Developer Center and check for available updates, both to the app itself and additional software.
Go to the Updates tab. If updates are available, install them and reboot before continuing.
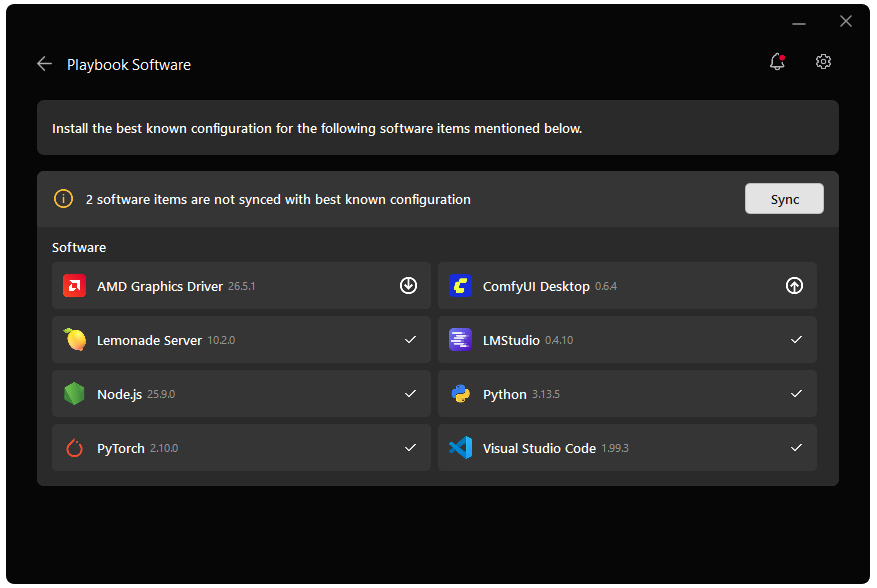
Go to the Manage tab. If updates are available, install them and reboot before continuing.

Installing Software Prerequisites
Create a Virtual Environment
On Linux, open a terminal in the directory of your choice and follow the commands to create a venv with ROCm+Pytorch already installed.
sudo apt updatesudo apt install -y python3-venvpython3 -m venv pytorch-env --system-site-packagessource pytorch-env/bin/activateGrant your user access to GPU devices (log out and back in for this to take effect):
sudo usermod -aG render,video $LOGNAMEOn Linux, open a terminal in the directory of your choice and follow the commands to create a venv.
sudo apt updatesudo apt install -y python3-venvpython3 -m venv pytorch-envsource pytorch-env/bin/activateOn Windows, open a terminal in the directory of your choice and follow the commands to create a venv with ROCm+Pytorch already installed.
python -m venv pytorch-env --system-site-packagespytorch-env\Scripts\activateOn Windows, open a terminal in the directory of your choice and follow the commands to create a venv.
python -m venv pytorch-envpytorch-env\Scripts\activateInstalling Basic Dependencies
AMD GPU Driver
Update to the latest AMD GPU driver using AMD Software: Adrenalin Edition™.
- Open
AMD Software: Adrenalin Editionfrom your Start menu or system tray. - Navigate to Driver and Software, click Manage Updates.
- If an update is available, follow the prompts to download and install.
AMD GPU Driver
Install the AMD GPU Driver (amdgpu) using the Radeon Software for Linux (RSL) flow. For instructions for your distribution, see Install the kernel driver.
PyTorch
Install PyTorch with AMD ROCm™ software support in the created virtual environment:
python -m pip install --index-url https://repo.amd.com/rocm/whl/gfx1151/ "torch==2.11.0+rocm7.13.0" "torchvision==0.26.0+rocm7.13.0" "torchaudio==2.11.0+rocm7.13.0"python -m pip install --index-url https://repo.amd.com/rocm/whl/gfx1150/ "torch==2.11.0+rocm7.13.0" "torchvision==0.26.0+rocm7.13.0" "torchaudio==2.11.0+rocm7.13.0"python -m pip install --index-url https://repo.amd.com/rocm/whl/gfx1152/ "torch==2.11.0+rocm7.13.0" "torchvision==0.26.0+rocm7.13.0" "torchaudio==2.11.0+rocm7.13.0"python -m pip install --index-url https://repo.amd.com/rocm/whl/gfx110X-all/ "torch==2.11.0+rocm7.13.0" "torchvision==0.26.0+rocm7.13.0" "torchaudio==2.11.0+rocm7.13.0"python -m pip install --index-url https://repo.amd.com/rocm/whl/gfx120X-all/ "torch==2.11.0+rocm7.13.0" "torchvision==0.26.0+rocm7.13.0" "torchaudio==2.11.0+rocm7.13.0"For other devices, please refer to this link for full instructions.
Installing Additional Dependencies
pip install transformers==4.57.1 safetensors==0.6.2 accelerate sentencepiece protobufpip install transformers safetensors accelerate sentencepiece protobufpip install transformers==5.10.1 safetensors accelerate sentencepiece protobufpip install "transformers>=5.9.0" safetensors accelerate sentencepiece protobufQuick Start with Example Scripts
This playbook includes ready-to-use scripts. Click them to preview and download them to the same directory as the environment you created.
| Script | Description | Usage |
|---|---|---|
| Basic LLM text generation | python run_llm.py | |
| Document summarizer with Harmony support | python summarizer.py --file document.txt |
Both scripts support:
- Model selection via
--modelflag - Chat template formatting for proper model prompting, especially useful for document summarization
Loading and Running Your First LLM
The included script shows how to generate text with LLMs using PyTorch and AMD ROCm.
The snippet below shows how to use the model and customize the questions asked.
model_name = "${hf_model}"tokenizer = AutoTokenizer.from_pretrained(model_name)model = AutoModelForCausalLM.from_pretrained(    model_name,    torch_dtype=torch.bfloat16,    device_map="auto",)
prompt = "Explain what a large language model is in 2 brief sentences."print(f"Prompt: {prompt}\n")
messages = [    {"role": "system", "content": "You are a helpful technology assistant"},    {"role": "user", "content": f"{prompt}"},]
Try out the downloaded script:
python run_llm.py --model ${hf_model}Building a Document Summarizer
Now that you’ve generated local LLM output, you can build on that by making a practical document summarizer. In this section, you will use the script to feed in a .txt file and automatically generate a concise summary, all running locally on your GPU.
The script is designed to work out of the box. Open the script in an editor to explore the code, customize prompts, and tweak parameters like length and temperature.
Usage Examples
# Summarize the built-in example text (defaults to openai/gpt-oss-20b)python summarizer.py --model ${hf_model}
# Summarize a text filepython summarizer.py --file example_document.txt
# Adjust creativity with temperaturepython summarizer.py --file document.txt --temperature 0.5
# Longer summaries with more tokenspython summarizer.py --file document.txt --max-length 400
Learn about Generation Parameters
| Parameter | What It Controls | Typical Values |
|---|---|---|
max_new_tokens | The maximum length of the LLM’s output | Use 50–500 tokens for summaries. (1 token is about 0.75 English words) |
temperature | Creativity. Low values make it focused, while high values come with more unpredictability | - 0.1–0.3: Focused, deterministic (good for summaries) 0.5–0.7: Balanced(general use) 0.8–1.0: Creative, varied (brainstorming) |
top_p | Nucleus Sampling - Low values limit the model to more narrow outputs | 0.1-0.5: Strict, predictable 0.9-0.95: (standard, natural, conversational) |
Real-World Applications
- Research Paper Analysis: Extract key findings from complex publications for quick review
- News Aggregation: Summarize news articles into brief daily digests or highlights
- Meeting Notes: Condense transcripts into actionable items and concise summaries
- Legal Document Review: Extract relevant clauses or obligations from long legal texts quickly
- Code Documentation: Generate concise repository overviews and function explanations
Next Steps
- Fine-tuning: Adapt models to your specific field or jargon for better accuracy (see Fine-tuning Playbooks)
- RAG Systems: Combine LLMs with document retrieval for context-aware answers and search
- Model Exploration: Experiment with new models like Llama 3, Phi-3, or Qwen for better results
- Production Deployment: Use tools like vLLM for scalable LLM serving in organizations
Your system gives you the power to run sophisticated language models locally. Experiment with different models, prompts, and parameters to discover what works best for your applications.
Need help with this playbook?
Run into an issue or have a question? Open a GitHub issue and our team will take a look.