User Guide
AMD Ryzen™ AI Halo User Guide
Set up, update, and get the most out of your AMD Ryzen AI Halo — from first boot and pre-installed software to the AMD Ryzen AI Developer Center, AMD Sync, and Variable Graphics Memory.
Choose your operating system
Your selection tailors the setup instructions throughout this guide.
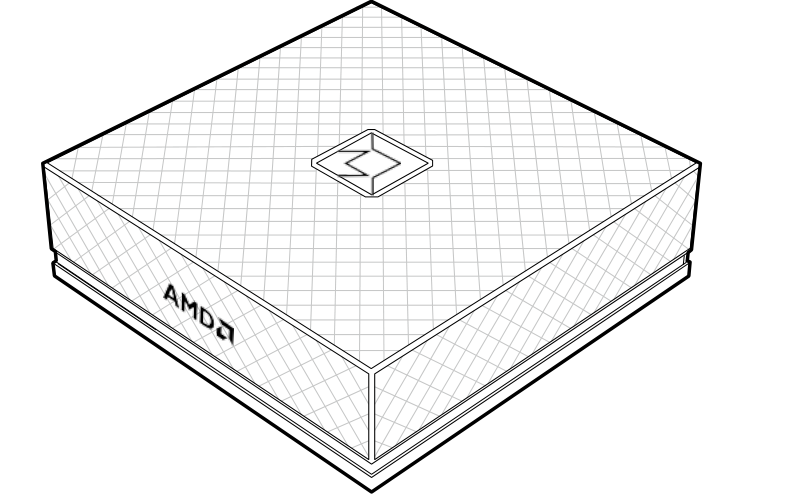
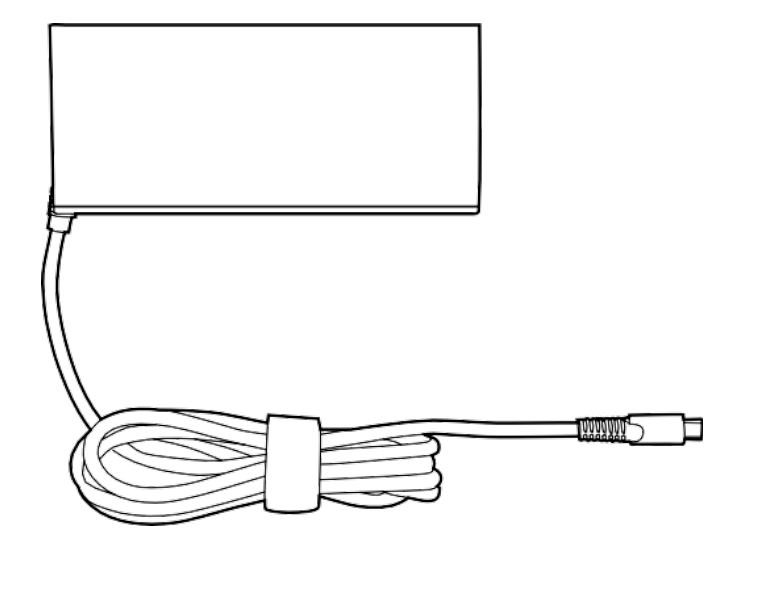
Package Contents
The following items are included in your AMD Ryzen™ AI Halo package:
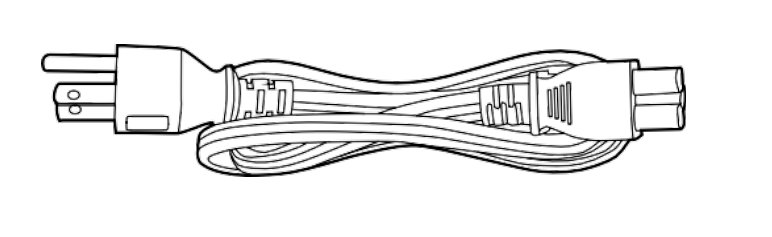
A printed Quick Start Guide is also included in the box.
System Overview
The AMD Ryzen AI Halo has a single status LED on the front and all of its connectivity on the rear of the system.
Front Components
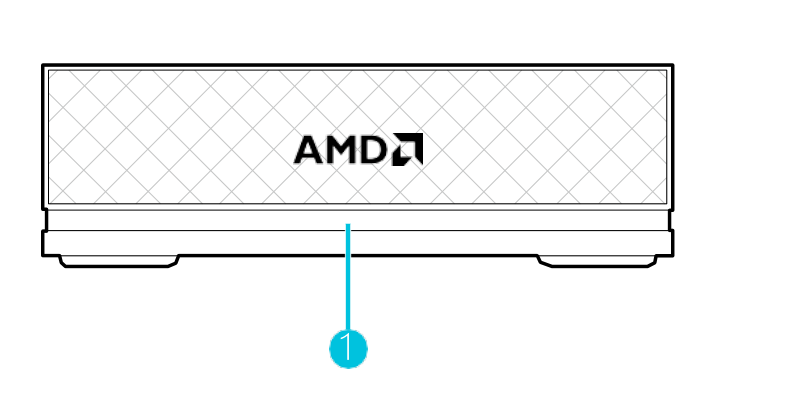
| No. | Component | Description |
|---|---|---|
| 1 | LED Light | Indicates the status of the system. See LED Definition below. |
Rear Components
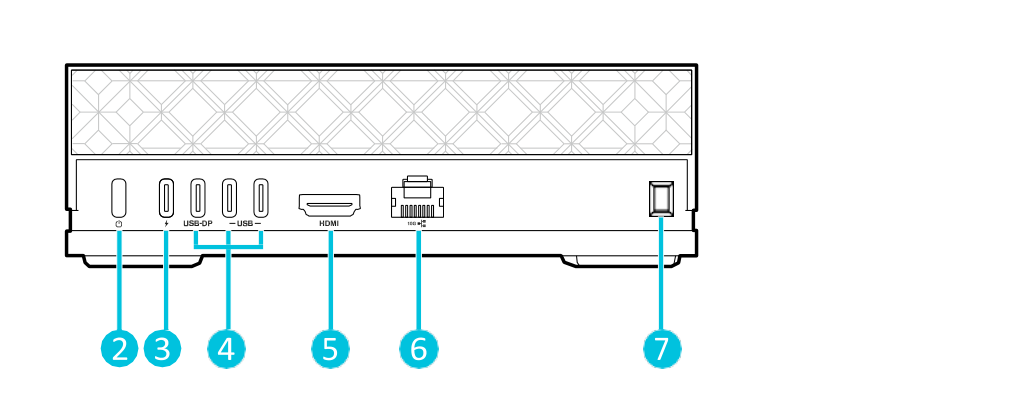
| No. | Component | Description |
|---|---|---|
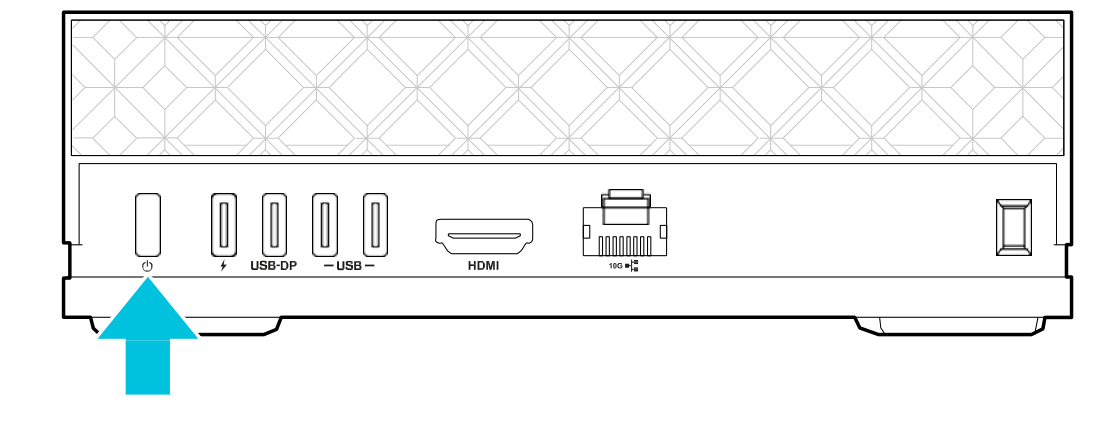
| 2 | Power Button | Press to power the system on or off. |
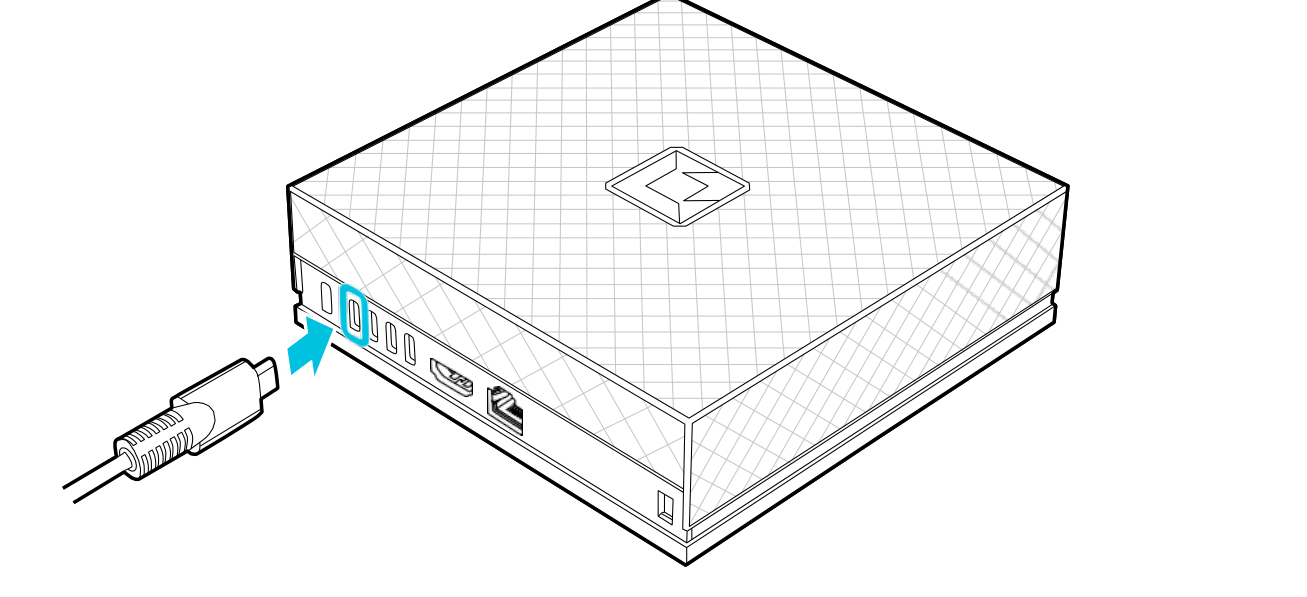
| 3 | DC-In Power Port | Connects to the supplied power adapter. (This port only supplies power — it does not transfer any data.) |
| 4 | USB-C® 3.2 Ports | Connect to a display that supports the DisplayPort interface, or to any USB-C® peripherals. |
| 5 | HDMI™ 2.1 Port | Connects to a display that supports the HDMI interface. |
| 6 | RJ-45 Network Port | Connects to a LAN network. |
| 7 | Kensington Lock Slot | Supports Kensington security locks. |
LED Definition
During normal operation, the LED light indicates the system’s current status:
| LED Behavior | System Status |
|---|---|
| Solid White | Powered On |
| Breathing Blue | Idle / Modern Standby |
| Off | Hibernate / Powered Off |
If the system encounters an error, the LED acts as an error indicator:
| LED Behavior | Error Definition |
|---|---|
| Fast Blinking White | Power Rail Abnormal |
| Solid Red | DRAM Failure |
| Slow Blinking Blue | Fan Related Failure |
Refer to Troubleshooting & Reinstalling for options that may resolve the errors above.
Connecting a Display
You can connect a display to the system using either a DisplayPort or HDMI™ connection.
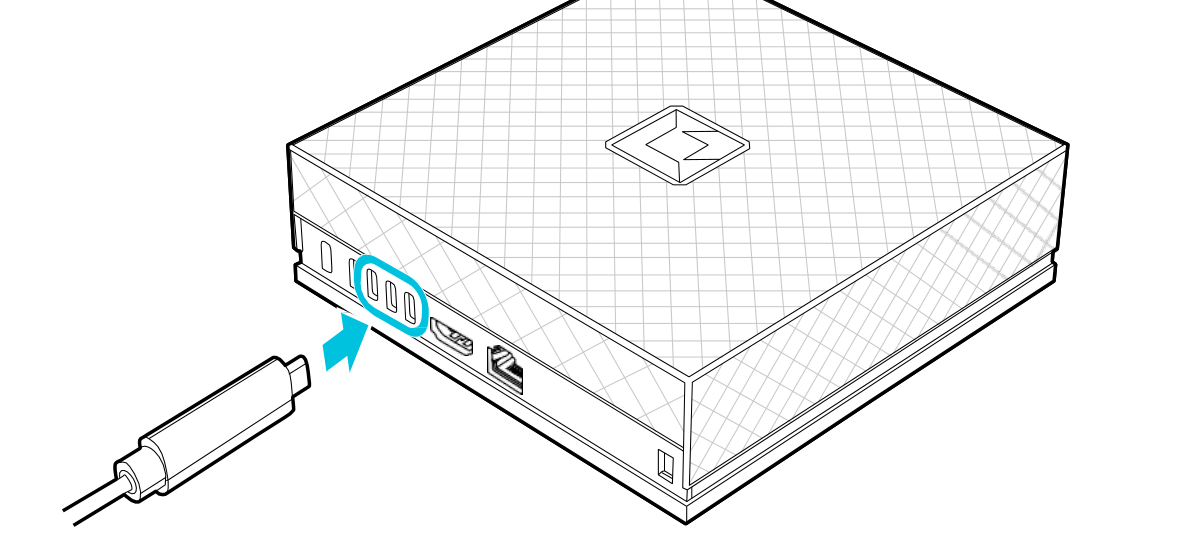
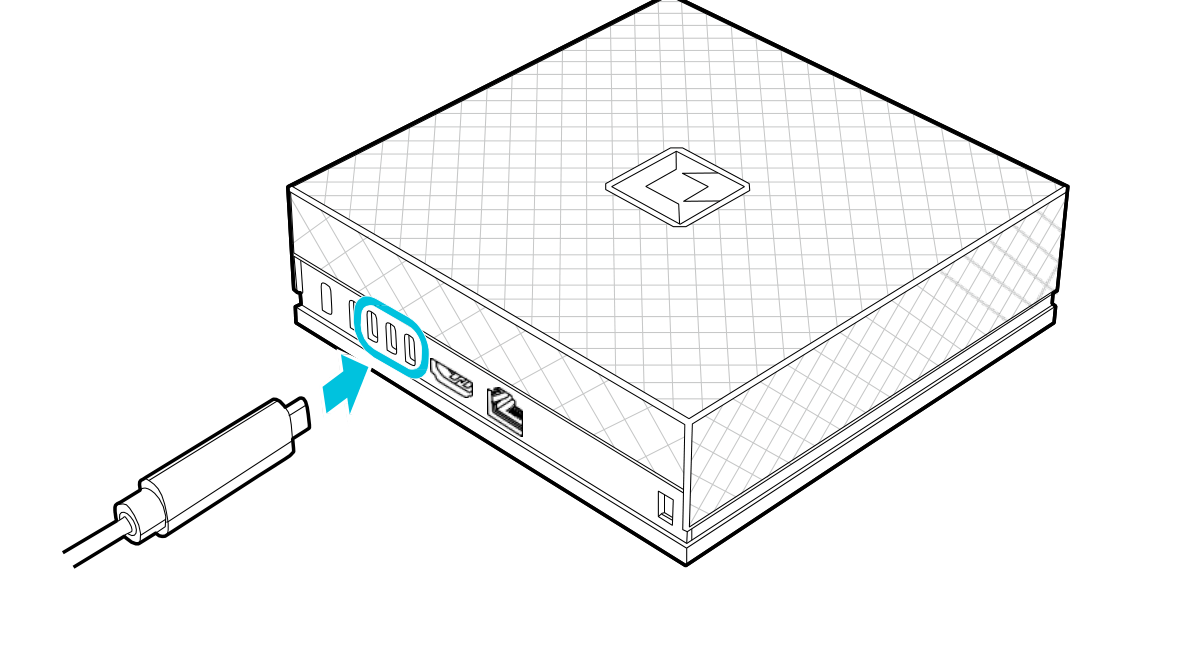
Connecting via DisplayPort — Connect the display to any one of the USB-C® ports at the rear of the system.
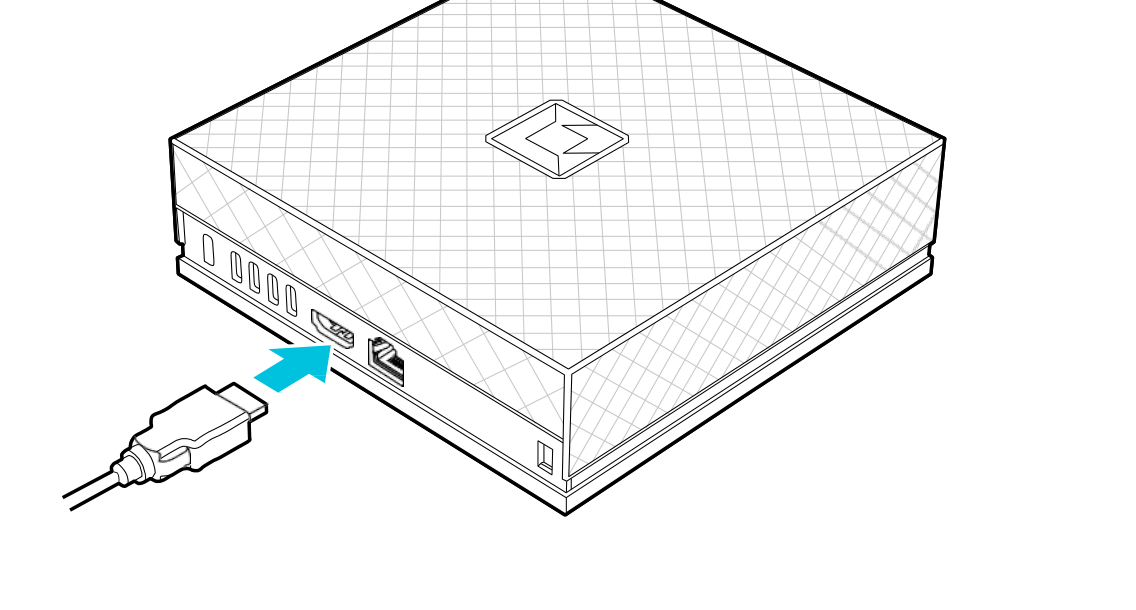
Connecting via HDMI™ — Connect the display to the HDMI™ port at the rear of the system.
Connecting a Mouse/Keyboard
Connect a USB-C® mouse and keyboard to any of the USB-C® ports at the rear of the system.
Powering On the System
To power on the system:
-
Connect the power cord to the power adapter.
-
Connect the power cord to a power outlet.
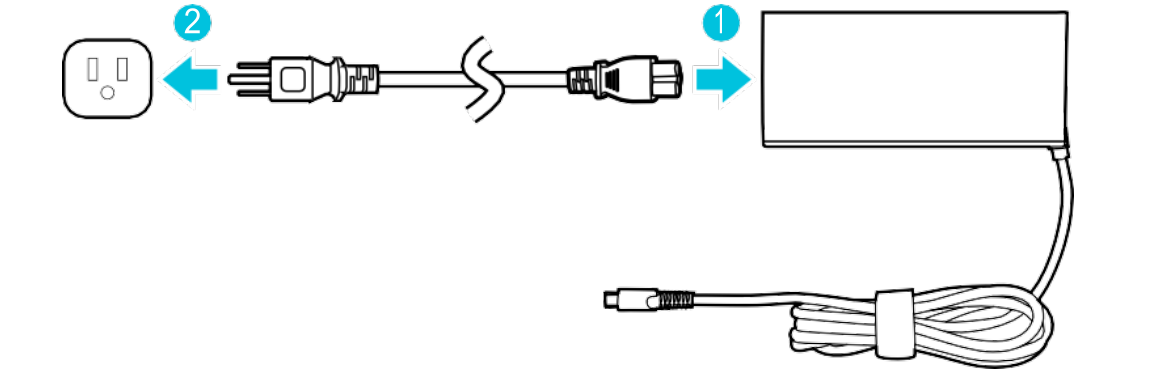
- Connect the power adapter to the DC-In power port at the rear of the system.
- Press the power button at the rear of the system.
- Follow the on-screen instructions to log into the system’s operating system.
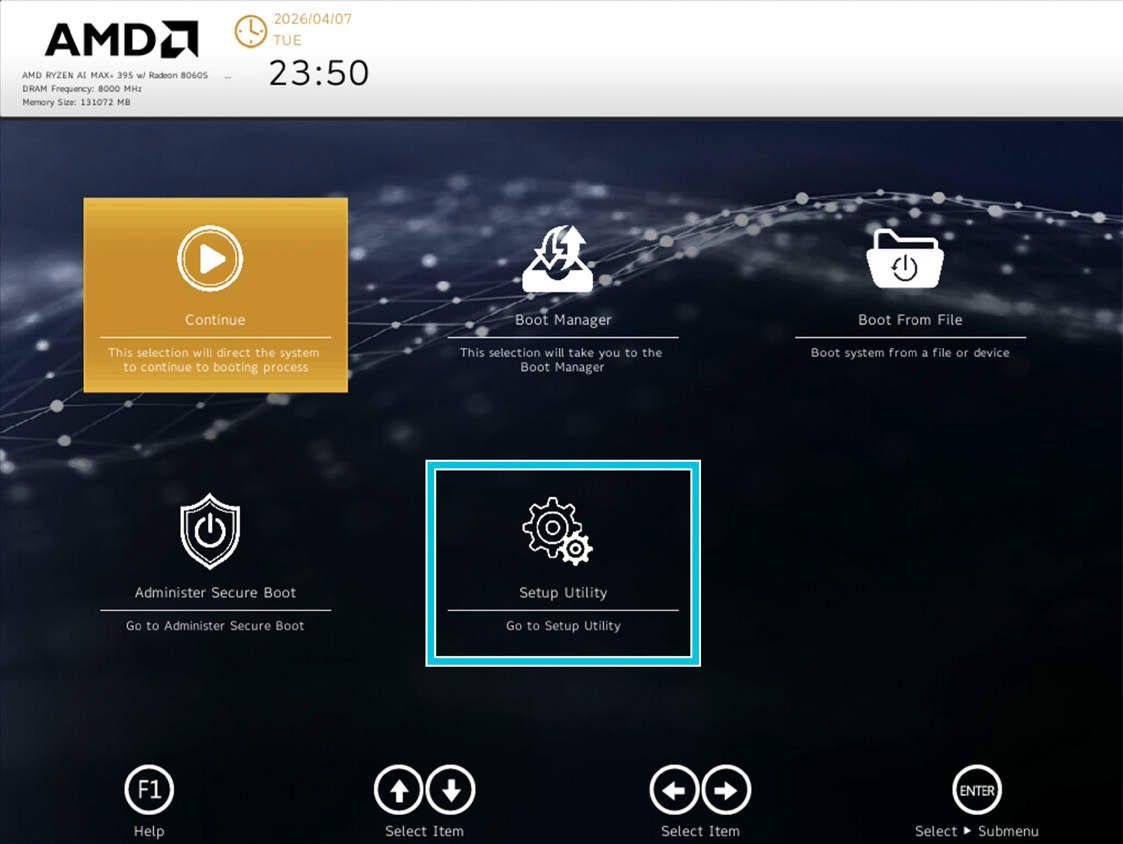
The BIOS Menu
To enter the system’s BIOS menu:
- Power on the system.
- Press F2 as the system is booting up. The system will enter the Setup menu.
- In the Setup menu, select Setup Utility to enter the BIOS menu.
Navigating the BIOS Menu
Use the following keys to navigate the BIOS menu:
| Key | Action |
|---|---|
| Esc | Exits the current sub-menu, or prompts to exit the BIOS without saving changes. |
| Arrow keys | Navigate up/down and left/right between menus and menu items. |
| Enter | Executes the selected command, confirms a choice, or enters the selected sub-menu. |
| F1 | Displays help text for the currently highlighted item. |
| F3 | Opens the search box to find specific BIOS settings or keywords. |
| F5 / F6 | Decreases / increases the value of the selected item, or toggles through its options. |
| F9 | Loads the default factory values for all BIOS items. |
| F10 | Saves all current changes and exits the BIOS to continue booting. |
BIOS Menus
Each BIOS menu lists the items or sub-menus available within it. For detailed information on any item, select it and refer to the description shown on the right side of the BIOS screen.
The Main Menu
The Main menu shows read-only system information.
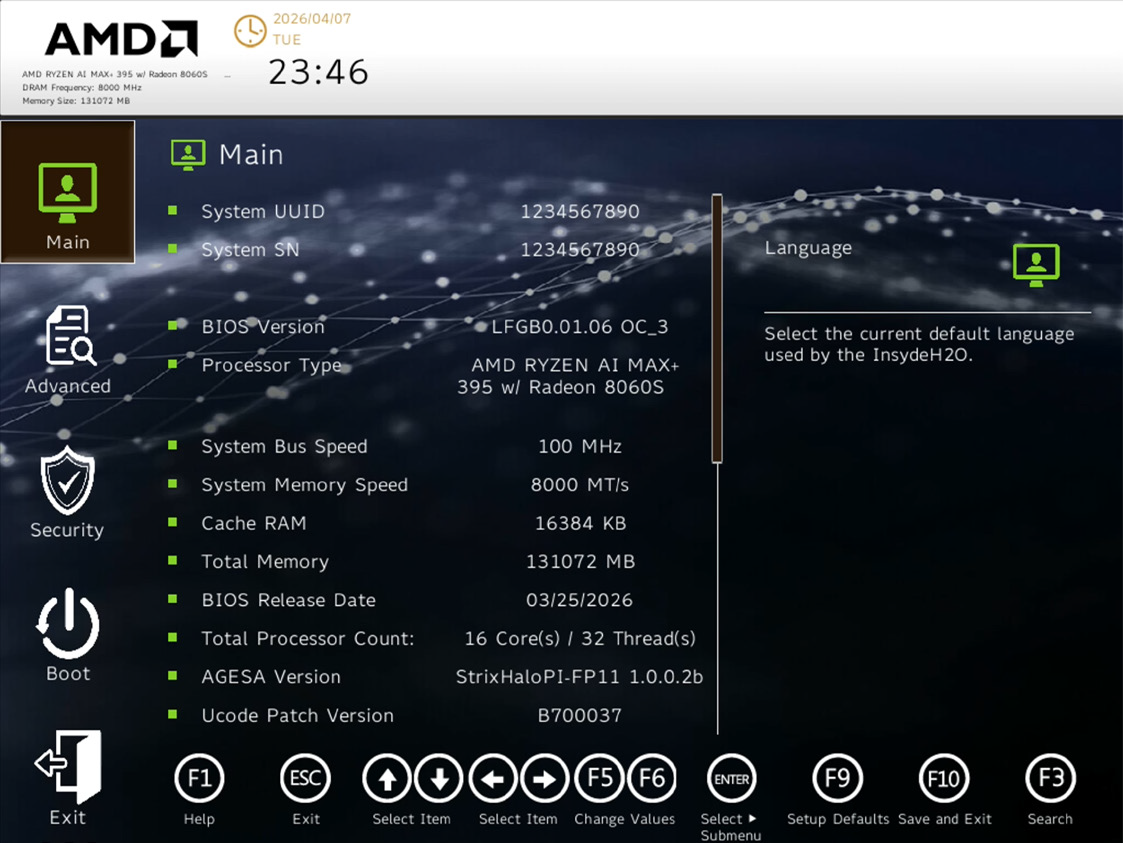
- System UUID
- System SN
- BIOS Version
- Processor Type
- System Bus Speed
- System Memory Speed
- Cache RAM
- Total Memory
- BIOS Release Date
- Total Processor Count
- AGESA Version
- Ucode Patch Version
- CPU Frequency
- GOP Driver Version
- PSP Boot Loader Version
- PSP SecureOS Version
- RomArmor 3
- EC Ver
- PD Controller 1 Ver
- PD Controller 2 Ver
- Language
- System Time
- System Date
- About this Software
The Advanced Menu
The following menu items or sub-menus can be accessed in the Advanced menu.
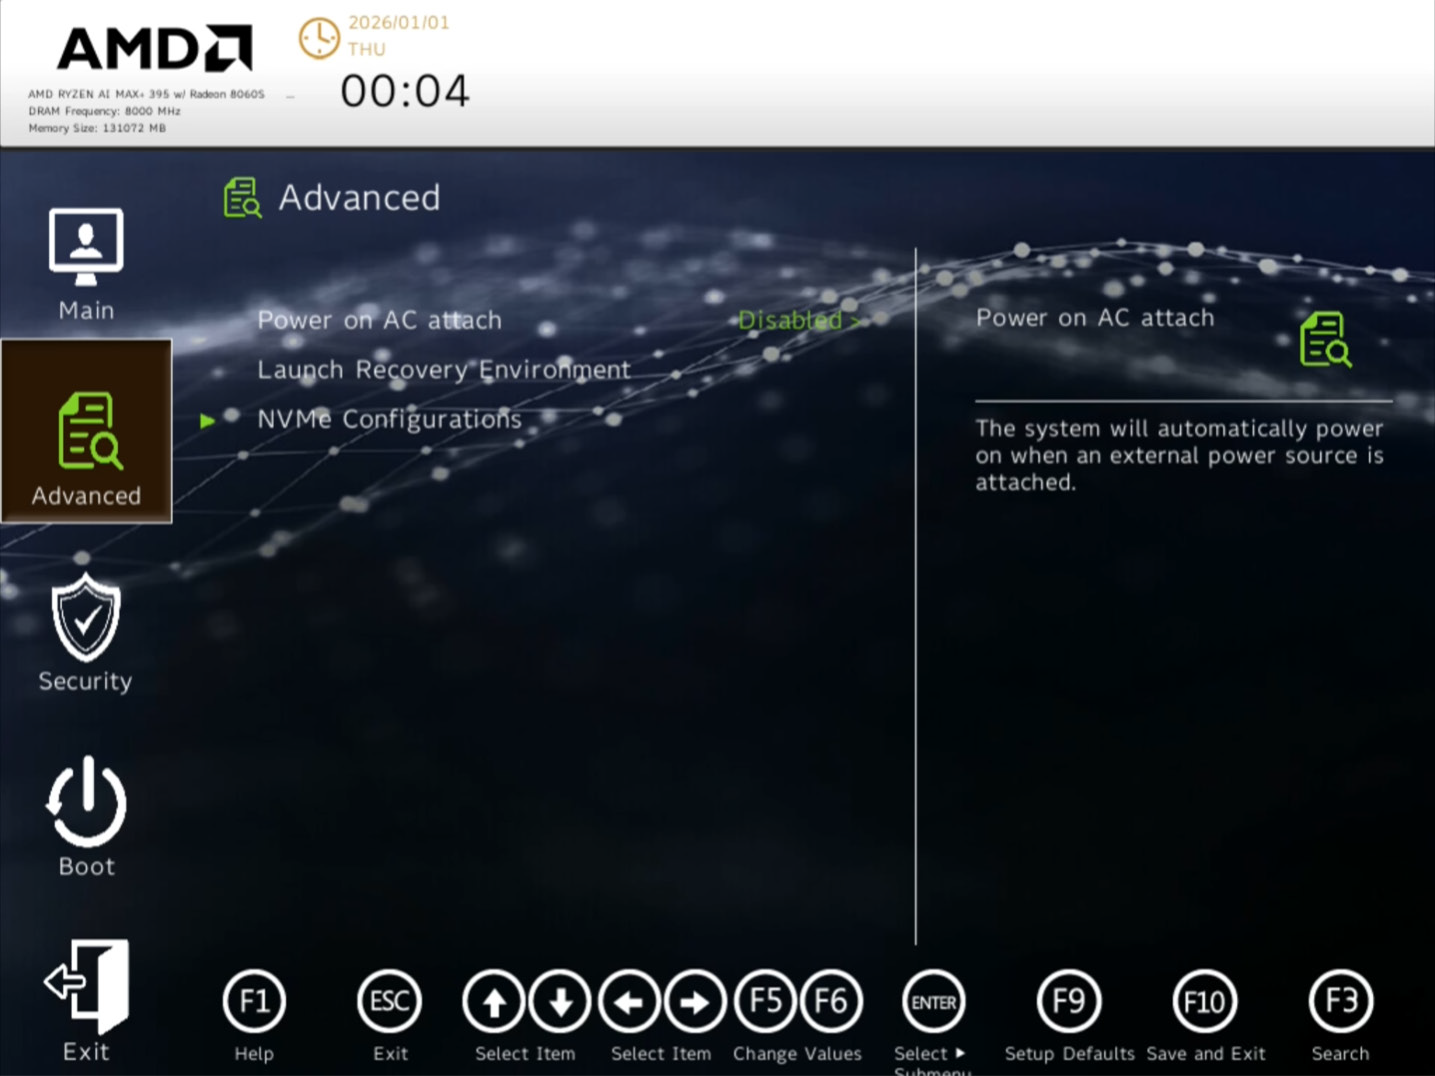
- Power on AC attach
- Launch Recovery Environment
- NVMe Configurations
The Security Menu
The following menu items or sub-menus can be accessed in the Security menu.
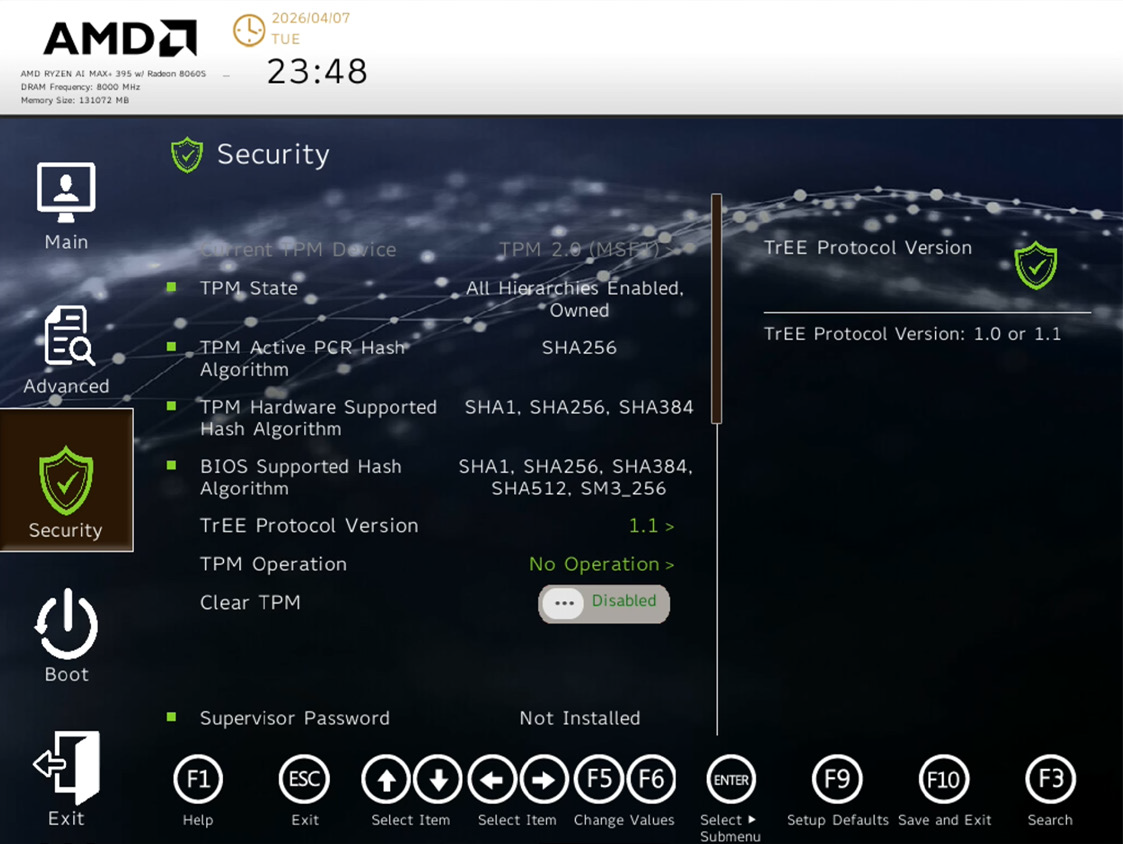
- Supervisor Password
- Set Supervisor Password
- Power on Password
The Boot Menu
The following menu items or sub-menus can be accessed in the Boot menu.
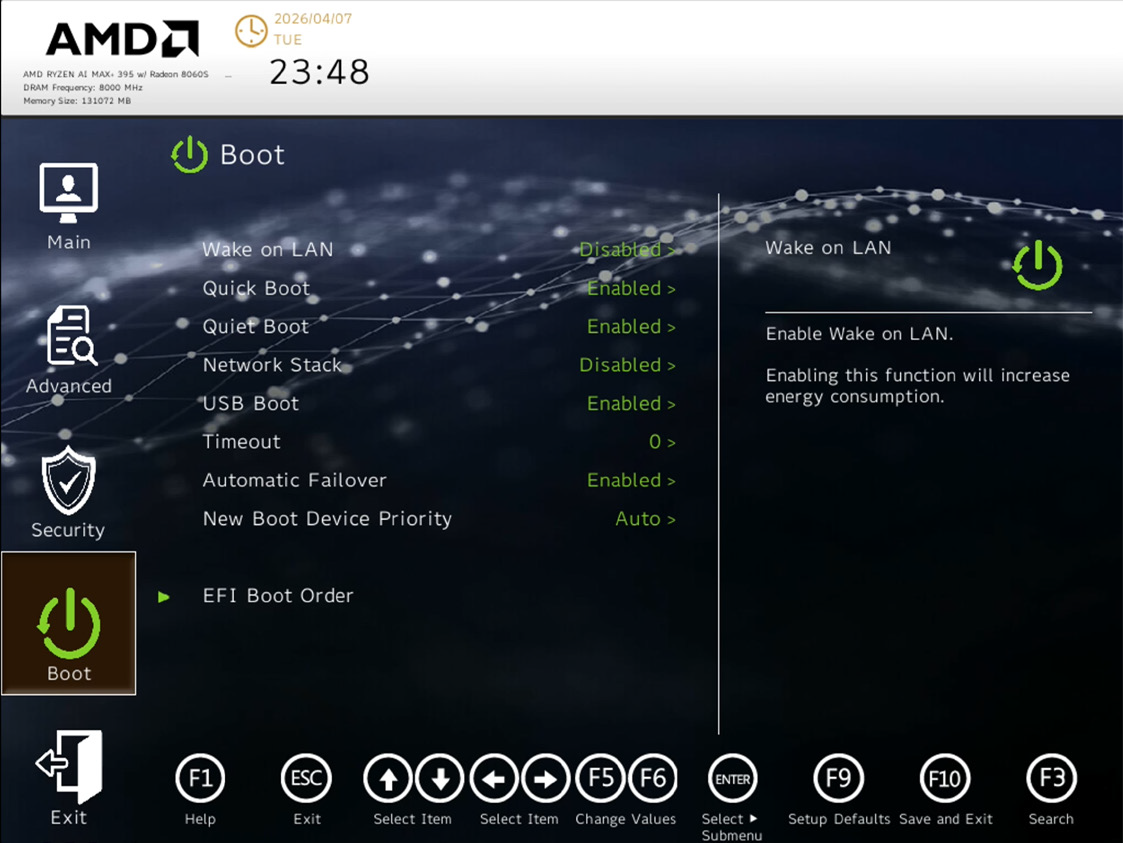
- Wake on LAN
- Quick Boot
- Quiet Boot
- Network Stack
- USB Boot
- Timeout
- Automatic Failover
- New Boot Device Priority
- EFI Boot Order
The Exit Menu
The following menu items or sub-menus can be accessed in the Exit menu.
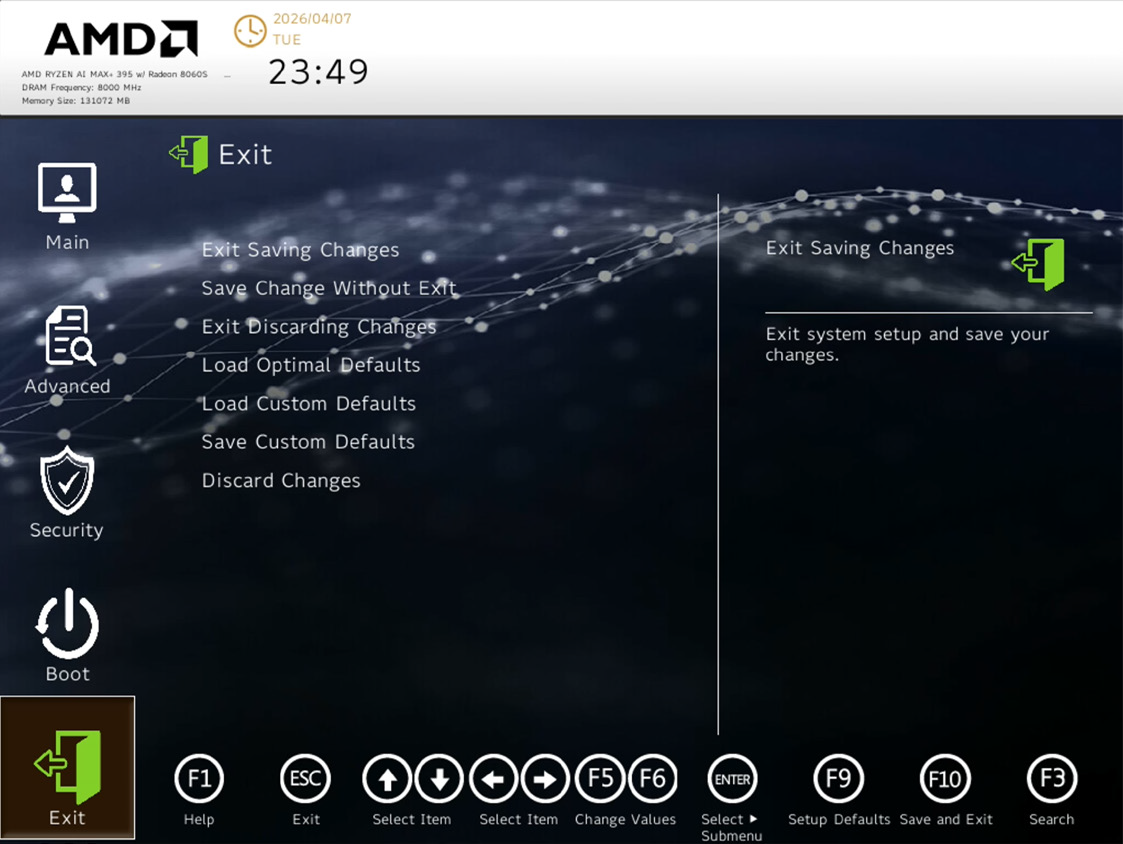
- Exit Saving Changes
- Save Change Without Exit
- Exit Discarding Changes
- Load Optimal Defaults
- Load Custom Defaults
- Save Custom Defaults
- Discard Changes
Initial Set Up – First Boot
Set up AMD Ryzen AI Halo and receive the necessary updates to start developing and running models.
Prerequisites (all operating systems):
- A display to work directly with the system
- Keyboard and mouse connected via USB
During the initial setup, it is advised to connect to Wi-Fi to get the best experience. If Wi-Fi is connected, after the setup process is completed you will be presented with a brief loading page that updates the application with the latest features. Once the installation is complete, a button on the screen labeled “Sync Software” will appear, allowing you to install the Day-0 update:

This loads the Updates / Playbook Software location. Here, users are presented with software install options including the latest versions, and additional software — such as LM Studio and VS Code — that are optional installations.
This is the recommended method for end users to apply the optimal configuration for all pre-installed software and ensures a smooth experience using AMD Playbooks.
Connecting to the Internet following Installation
If an Internet connection was not available during the installation, a redo of the first-boot setup is not necessary. Users can connect to a network and continue the update:
- Open Settings → Network & Internet → Wi-Fi in Windows and connect to your network.
- Bring the AMD Ryzen AI Developer Center up to date in one of two ways:
- If the AMD Ryzen AI Developer Center is already open: click the “Update App” button on the landing page. The app will detect the new connection and pull the update.
- If the application is not currently open (or is not detecting the network): simply close the AMD Ryzen AI Developer Center and reopen it. On relaunch it will see the active connection and surface the “Update App” button so you can proceed.
- Once the app update finishes, the rest of the flow is identical to the description above where you connect during the installation process — you are still responsible for driving the remaining steps manually:
- Click “Sync Software” when the button appears.
- Confirm and start the Day-0 update on the page that follows.
- Wait for the sync to finish before continuing.
In short: connecting to the internet later only changes how you get to the Update App step. From that point on, the Update App → Sync Software → Day-0 update sequence is the same and still requires you to click through each step.
During the first boot you will need internet access so the system can update before you can start using it. After selecting your language and then your keyboard, you will have the option to select your Wi-Fi network (or, if ethernet is connected, you can skip Wi-Fi). Next come options for location services, telemetry, time zone, username and password, and the OS license agreement, followed by a screen to download OS updates. This update is mandatory — it is the reason internet access is required to complete setup.
Once you get the updates and move to the finish screen, your system will restart to create a restore point and apply the updates. Your system will then be ready to use.
On the home screen, the AMD Ryzen AI Developer Center will automatically open.
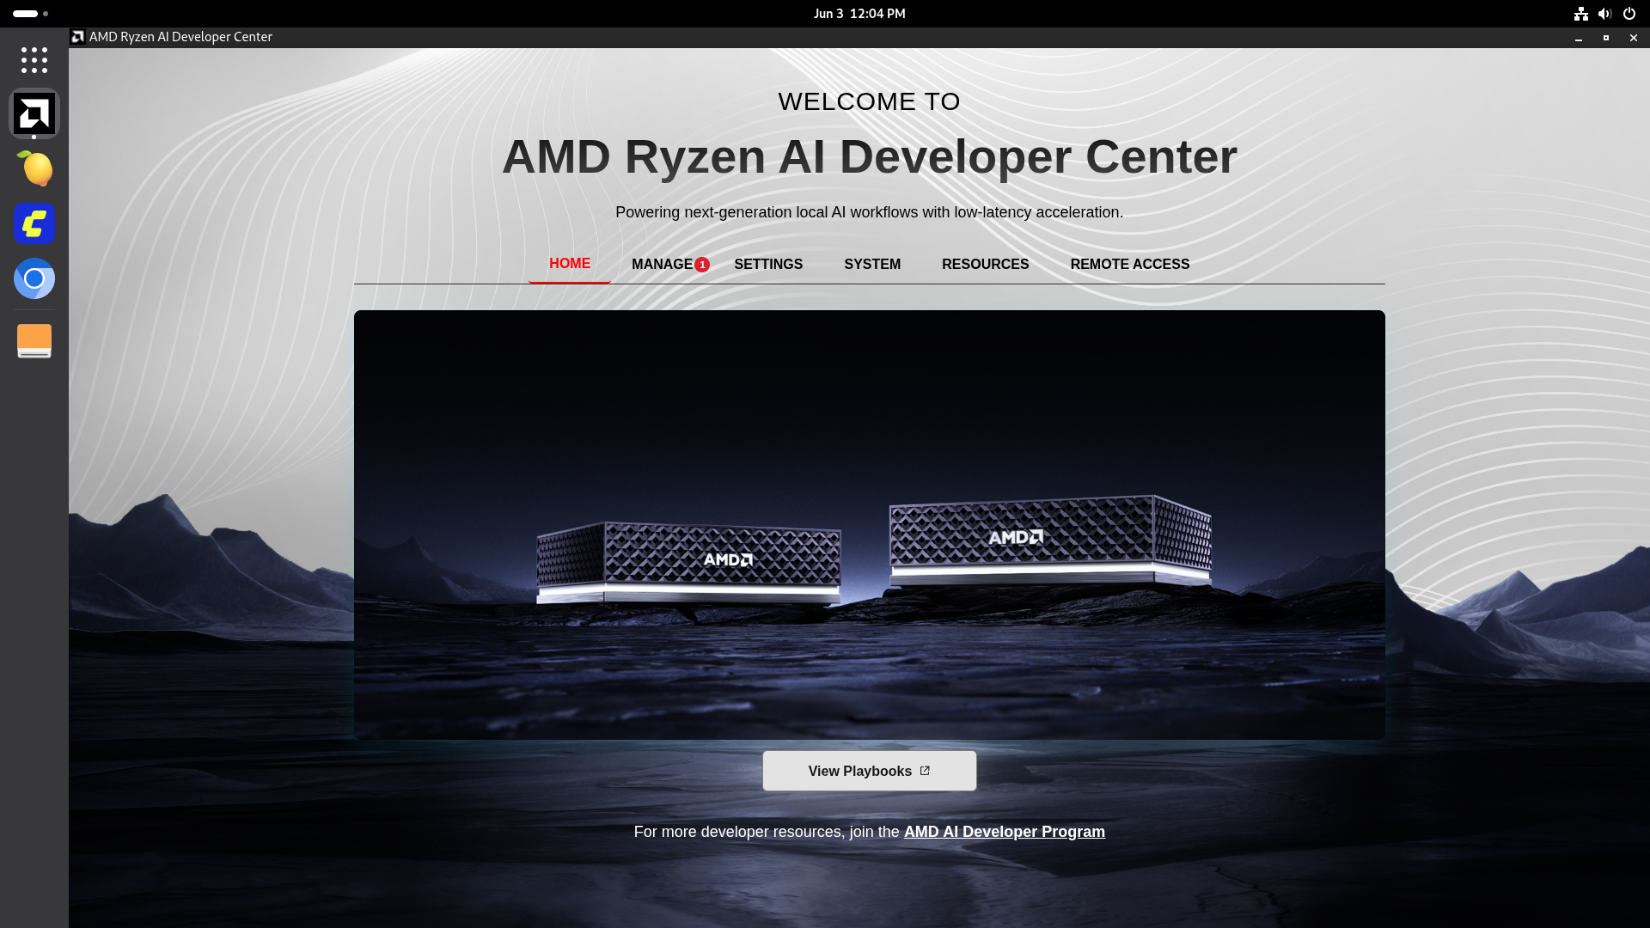
The AMD Ryzen AI Developer Center is organized into six tabs: Home (links to AMD Playbooks to help you get started faster), Manage (OS, firmware, and software updates), Settings (system options including the video memory carve-out), System (system information and pre-installed package details), Resources (helpful links from AMD), and Remote Access (connection information for reaching the box over SSH).
Pre-Installed Software
To assist with running AI as quickly as possible, AMD has identified a set of main playbook experiences. These playbooks have undergone extra validation work by AMD, and are recommended when getting started with AMD Ryzen AI Halo. The full catalogue is available on the AMD Playbooks website.
These main playbooks are:
- Running LLMs on PyTorch with ROCm
- Generating images with ComfyUI and Z Image Turbo
- Local LLM coding with VSCode and Qwen3-Coder-30B
- Running and Serving LLMs with LM Studio
- Automating Workflows with n8n and gpt-oss-120B
The playbooks listed above and the supporting software and models come pre-installed on the system. Additional playbooks can be found at www.amd.com/playbooks. Each playbook guide walks you through the steps end-to-end, so you can configure everything as needed regardless of what is already installed on the system.
Where software is pre-installed, it’s intended to shorten the setup time and help you start running AI workloads sooner — not because the playbook depends on it being pre-installed. Think of pre-installation as a head start on the same instructions you’d otherwise follow yourself.
In short: the main playbooks are AMD’s recommended starting point. Pre-installed software is a convenience meant to get you to “running AI” faster — the guides remain the source of truth for what to install, configure, and run.
The sections below list the full inventory of software, frameworks, and models that ship pre-installed (or are installed automatically as part of the Day-0 update) for each operating system, so you can see at a glance what is already on the box versus what a given playbook will ask you to install.
The full scope of software that is on the system after you install the Day-0 update is:
Applications
- ComfyUI Launcher
- LM Studio (Requires installation through AMD AI Developer Center)
- VS Code (Requires installation through AMD AI Developer Center)
- Node.js
- Git
- Lemonade
- Windows Subsystem for Linux (WSL)
- PowerShell 7
- OpenSSH
Frameworks & Runtimes
- Python
- PyTorch (installed into the global environment of the pre-installed Python)
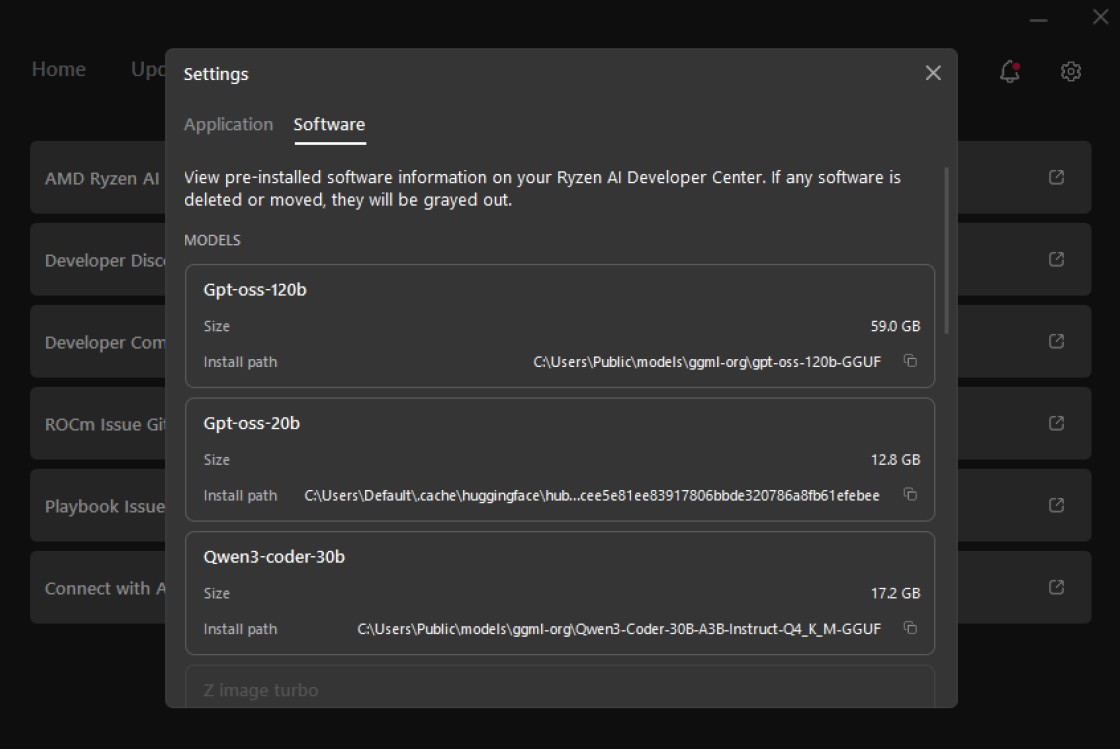
Models
- Z Image Turbo (Diffusion)
- Qwen3 4b Text Encoder
- Pixel Art Style Z Image Turbo (LoRA)
- AE (VAE)
- GPT-OSS-120b
- GPT-OSS-20b
- Qwen3-coder-30b-A3B-instruct-Q4_K_M
By navigating to the Settings → Software tab, you can review what software came pre-installed or was installed through the AMD Ryzen AI Developer Center.
Applications
- ComfyUI
- VS Code
- Node.js
- Git
- Lemonade
Frameworks & Runtimes
- Python
- PyTorch (installed into the global environment of the pre-installed Python)
Models
- Z Image Turbo (Diffusion)
- Qwen3 4b Text Encoder
- Pixel Art Style Z Image Turbo (LoRA)
- AE (VAE)
- GPT-OSS-120b
- GPT-OSS-20b
- Qwen3-coder-30b-A3B-instruct-Q4_K_M
AMD ROCm™
- ROCm Core SDK
- ROCm Profilers
AMD Ryzen AI Developer Center
The AMD Ryzen AI Developer Center is available on both Windows and Linux and provides you with the ability to:
- Navigate to and be redirected to the best AMD resources (Windows / Linux)
- Interact with pre-installed software from a single location (Windows / Linux)
- View (Windows / Linux) and sync (Windows) your software versions against the Best Known Configuration that AMD has last validated to work — the in-scope software is focused around the core playbooks
- Set the memory carve-out, opt in to telemetry, and generate a diagnostics log (Linux)
When the app opens, the Home tab is the central jumping-off point — it surfaces the welcome view, a shortcut into the playbook catalogue, and the Sync Software action used to bring the system up to the latest validated configuration.
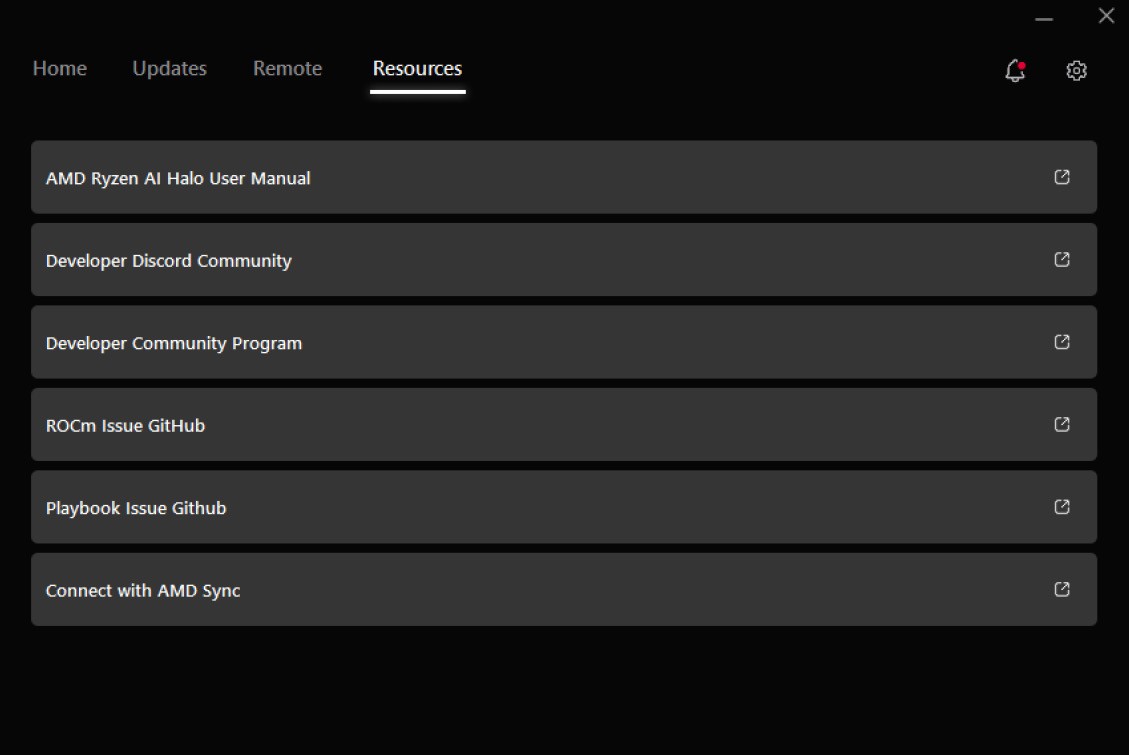
The top navigation also exposes a Resources tab that collects shortcut links to the official AMD Ryzen AI Halo manual, the developer Discord community, the developer community program, the ROCm and Playbook GitHub issue trackers, and the AMD Sync companion app — so the most common destinations for help and follow-up reading are always one click away.
Launch at Start & Telemetry
By default, the AMD Ryzen AI Developer Center will launch automatically every time the system powers on, so that updates, sync status, and pre-installed software are immediately accessible without any manual steps.
If you prefer not to have the application start automatically, this behavior can be disabled from within the application.
From this same Settings page, you can also opt in to or opt out of the AMD User Experience Program at any time using the corresponding toggle. The program shares anonymous usage data with AMD to help improve the product, and the choice can be changed back and forth here whenever you prefer.
Open the Settings page using the gear icon in the top-right corner of the app and toggle off Launch app on start under the Application tab.
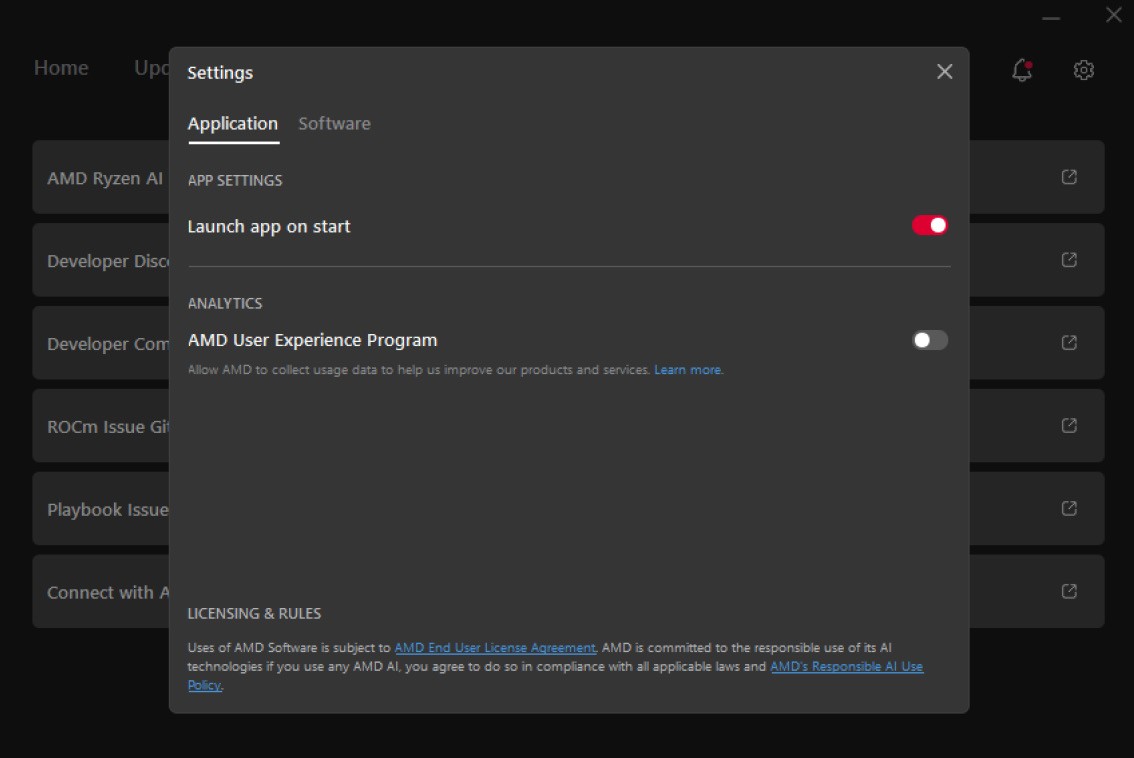
These options live in the Developer Center’s Settings tab — App Settings → Launch on Start and Analytics → AMD User Experience Program. See the Settings tab in the Developer Center walkthrough below for the full details, including the Light Bar toggle.
Remote Page
The AMD Ryzen AI Developer Center includes a Remote page that lets you turn the system’s SSH server on or off and view the connection details other machines will need to reach it.
What SSH Is
SSH (Secure Shell) is a standard, encrypted protocol that allows one computer to securely connect to another over a network. When the SSH server is enabled on the AMD Ryzen AI Halo, other systems on the network are allowed to:
- Open a remote terminal session on the AMD Ryzen AI Halo
- Transfer files to and from the AMD Ryzen AI Halo
- Use tools like AMD Sync, VSCode Remote, JupyterLab Remote, ssh, scp, rsync, and any other SSH-based workflow
In short, enabling SSH opens the system up to accepting incoming connections from other machines that have valid credentials.
What the Remote Page Shows
Once SSH is enabled, the Remote page displays the information another system needs to connect. Each field has a copy icon so you can quickly grab the value when configuring a remote client like AMD Sync.
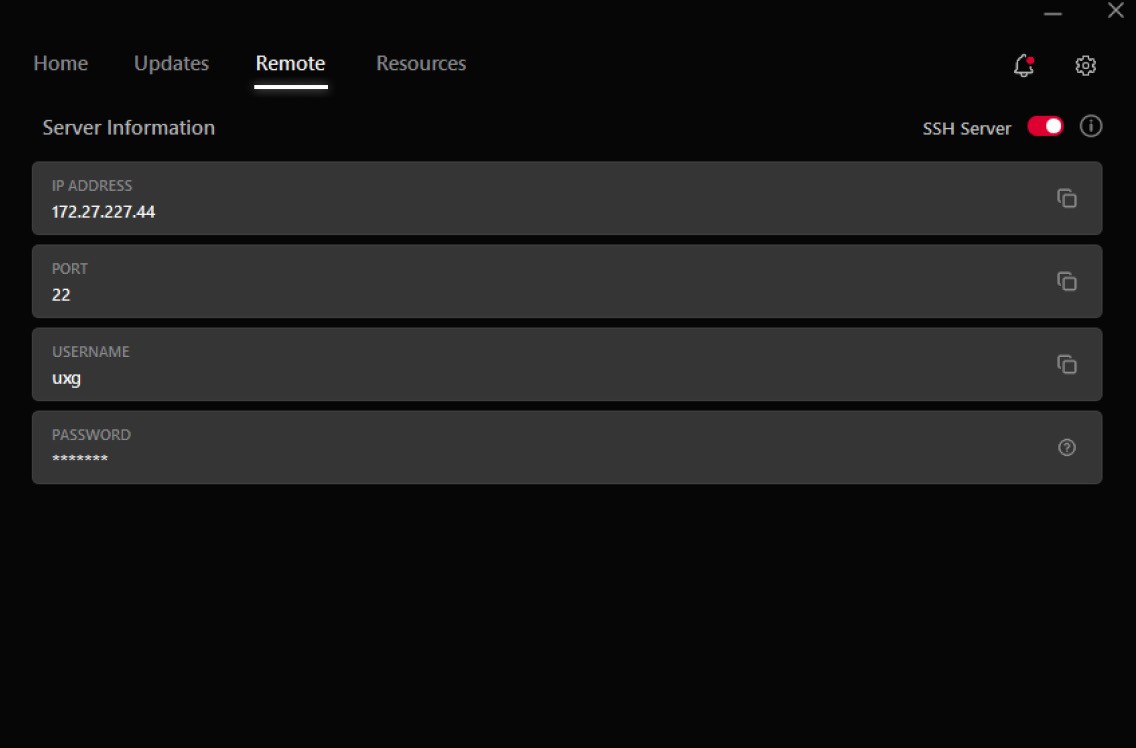
| Field | Purpose |
|---|---|
| IP Address | The address of the AMD Ryzen AI Halo on your network |
| Port | The TCP port the SSH server is listening on (default 22) |
| Username | The OS user account to log in as |
| Password | The OS password for that user account (see note below) |
On Linux, the SSH server toggle and connection details live in the Developer Center’s Remote Access tab — see the walkthrough below.
Best Known Configuration (BKC)
The AMD Ryzen AI Developer Center includes a way to install the Best Known Configuration (BKC) — the specific set of software versions that AMD has validated on the AMD Ryzen AI Halo hardware. AMD tests these versions together on the system in a way that we know will work when installed, so installing the BKC takes the guesswork out of getting the core playbooks running end-to-end.
This is not a lock-in. You are still free to install whatever versions of the in-scope software you prefer, outside of what BKC provides — the BKC feature simply gives you a single, easy way to return the in-scope software to a known-working state at any time.
Why This Exists
The BKC feature is there for two situations:
- First-time setup is out of date. Pre-installed software on the AMD Ryzen AI Halo may already be behind by the time you first power the box on. When you first try to use the playbooks, BKC ensures they can still get a working stack right away.
- Recovering from a bad update. If a later version update of one of the in-scope tools causes something to stop working, BKC lets you roll back to a version combination AMD has confirmed works — restoring a known-good state for everything in scope.
Scope reminder: “Best Known Configuration” applies to the software in scope of the core playbooks — not every piece of software on the system.
How to Install / Roll Back to the BKC
The exact steps differ slightly between operating systems:
This is handled from the Manage tab (see the Developer Center walkthrough below). Instead of separate Playbook Software and AMD Software sections, the page acts on the system as a whole through Update All, Factory Reset, and System Snapshot Rollback.
Basic flow:
- Open the AMD Ryzen AI Developer Center.
- Navigate to the Manage tab.
- Click Update All to update everything, or use System Reset (Factory Reset / System Snapshot Rollback) to recover a previous working configuration.
-
Open the AMD Ryzen AI Developer Center.
-
Navigate to the Updates page. The Updates tab groups everything that can be brought up to date — the Playbook Software entry at the top is what drives the BKC flow, while the AMD Software section underneath manages the Adrenalin driver, chipset drivers, and software extensions.
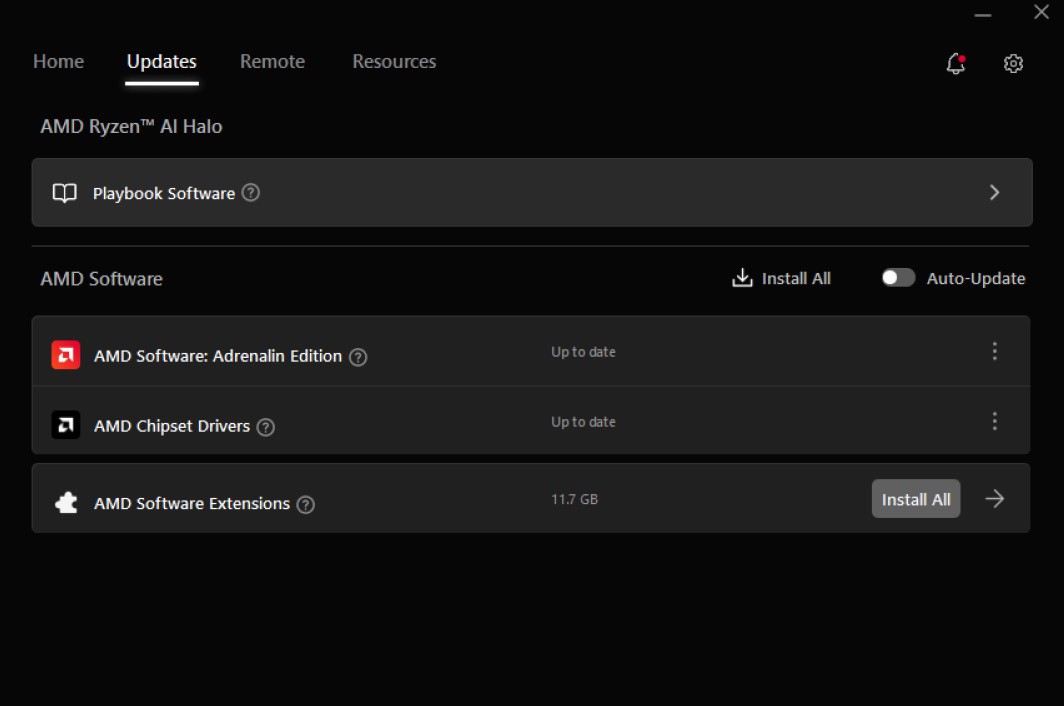
-
Click the Playbook Software button. This opens the Playbook Software detail view, which lists every in-scope item (driver, ComfyUI Desktop, Lemonade Server, LMStudio, Node.js, Python, PyTorch, VS Code) alongside its currently installed version and a flag for whether it matches the BKC. A summary banner at the top tells you how many items are out of sync.
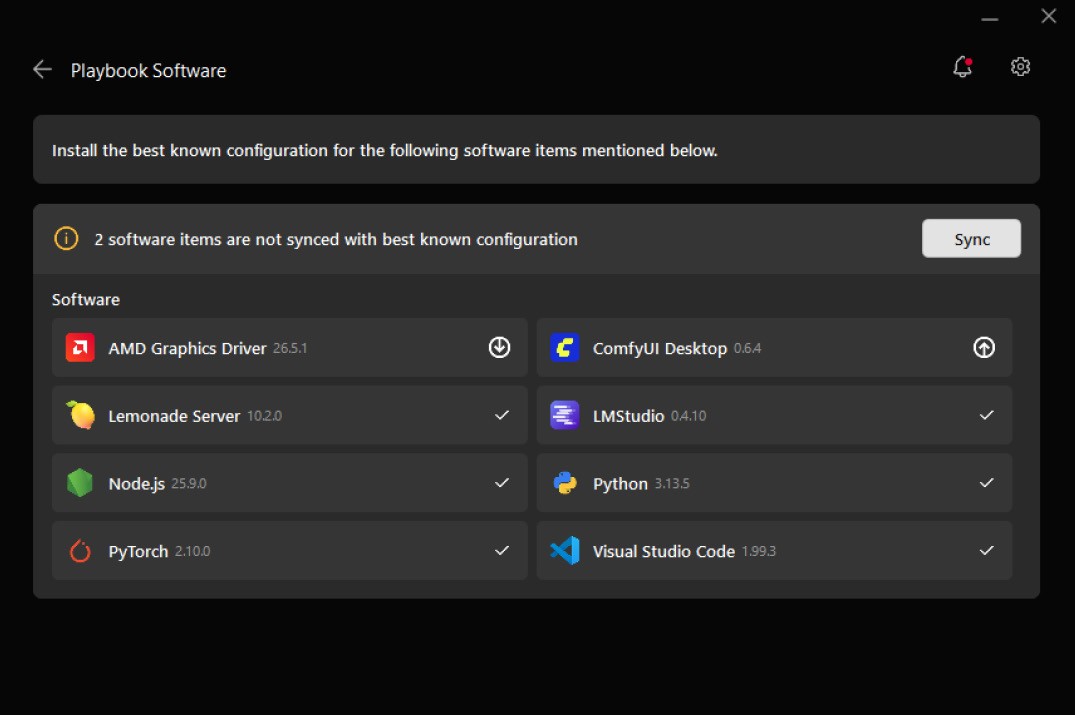
-
Click Sync. The app will bring every flagged item back to the version combination AMD has validated.
If any of the in-scope software versions are out of sync with the Best Known Configuration, a “Sync Software” button will appear on the Home page. Clicking that button takes you straight to the same place as walking through Updates → Playbook Software → Sync — it’s just a faster way to start the same process.
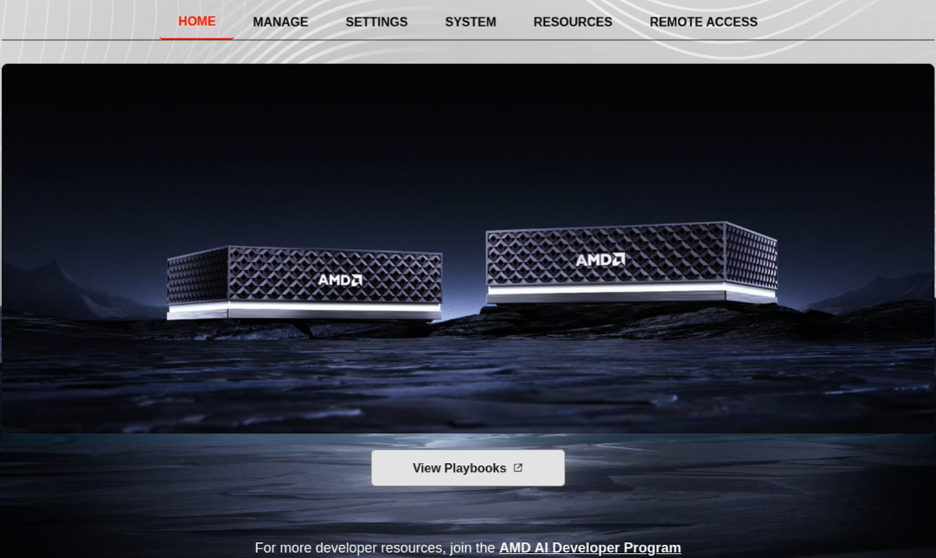
The AMD Ryzen AI Developer Center is your control panel for managing software, hardware settings, and remote access on your Halo Box. It is organized into six tabs: Home, Manage, Settings, System, Resources, and Remote Access.
Home
The Home tab is your starting point. It provides a brief overview of the AMD Ryzen AI Developer Platform and a direct link to View Playbooks — AMD-curated, ready-to-run AI workflows you can launch on your device. It also displays an invitation to join the AMD AI Developer Program for additional resources and community access.
Manage
The Manage tab is where you manage your device — software and firmware updates, system recovery, and a glance at containers and models.
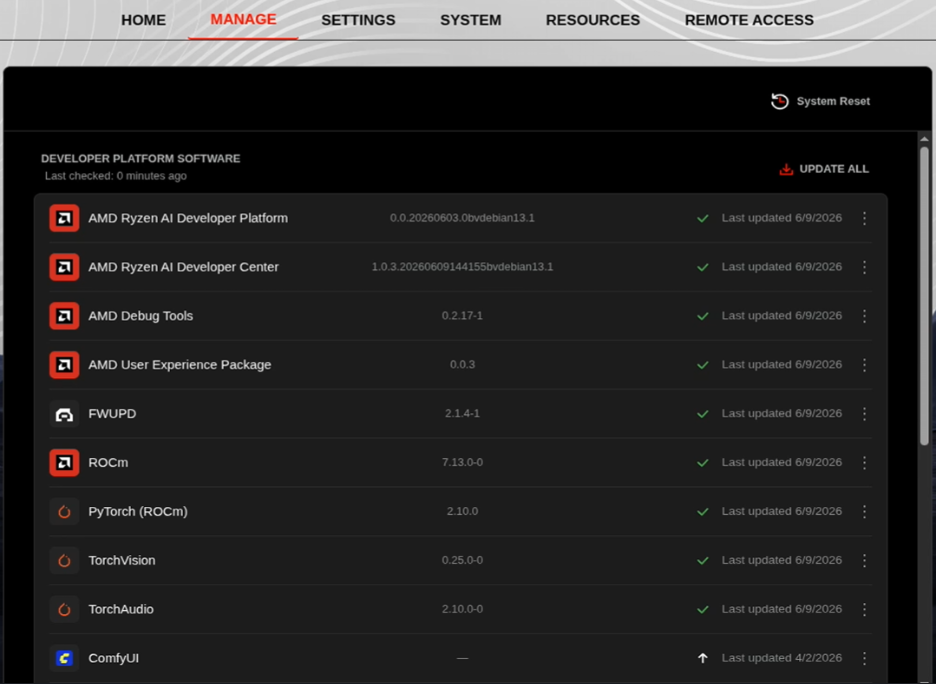
Software Updates
Lists all developer-platform software installed on your device, including core AMD packages and playbook-specific applications such as ROCm, PyTorch, ComfyUI, vLLM, Lemonade, and VS Code. For each package you can see:
- The currently installed version
- Whether an update is available, and what the new version will be
- Whether a pending update includes security fixes (indicated by a CVE badge)
You can apply updates holistically by using Update All to update everything at once. This process requires a reboot.
Release Notes
For any package with an update available, the three-dot menu gives you access to Release Notes so you can review what changed before updating.
Container Management (ComfyUI and vLLM)
ComfyUI and vLLM run as containerized applications on your Halo Box. From the three-dot menu next to either package you can open a detailed view that lets you:
- See the container status — whether the container is running or stopped
- Change the container status — start or stop the container
- Clear User Data to reset the application to a clean state if corruption occurs
Models
A View Models section shows all AI model files on the device. For each model you can see its file size, the date it was last modified, and which applications use it.
Firmware Updates
Below the software list, the Manage tab shows your current BIOS version. If a firmware update is available, an Update button becomes active so you can apply it directly from the app.

System Reset
At the top of the Manage tab there are two recovery options:
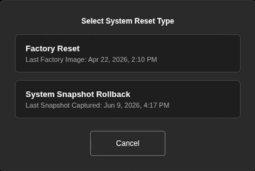
- Factory Reset — restores the device to its original out-of-box state.
- System Snapshot Rollback — rolls the system back to a previously saved snapshot.
| Option | What It Does |
|---|---|
| Update All | Updates every piece of software on the system listed on the page. Whenever an Update All is performed, a snapshot of the system is taken — this snapshot is what Rollback returns to. |
| Factory Reset | Resets the entire system back to its default state with the default pre-installed software in place. Everything else is wiped, so treat this as a clean slate. |
| System Snapshot Rollback | Restores the system to the most recent snapshot taken by an Update All. Because the snapshot covers the whole system, rolling back affects everything on the system at that point in time — not just the in-scope playbook software. |
Settings
The Settings tab lets you customize how the device and app behave.
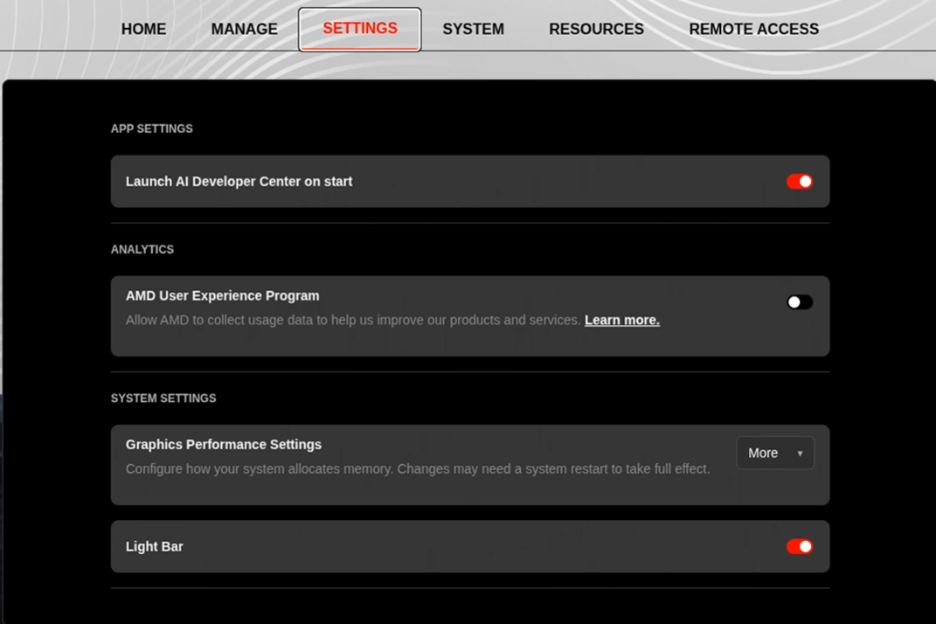
App Settings
Launch on Start — toggles whether the AMD Ryzen AI Developer Center opens automatically when the device boots (default: on).
Analytics
AMD User Experience Program — toggles your participation in anonymous usage data collection (default: off). A “Learn more” link explains what data is collected and how it is used.
System Settings
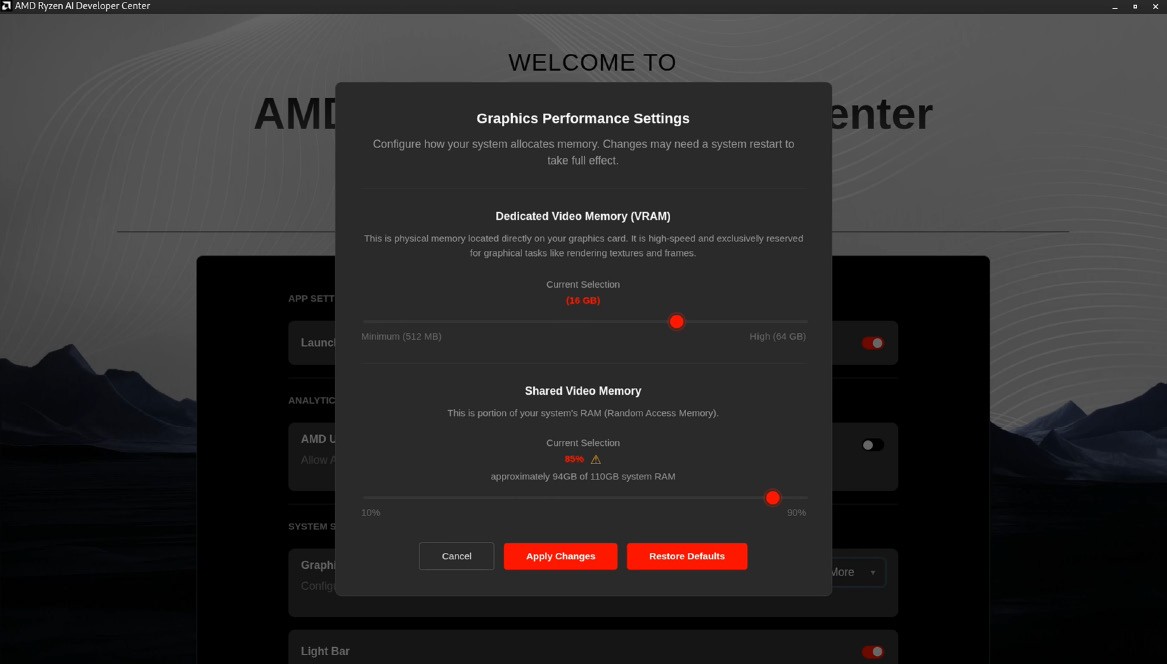
Graphics Performance Settings opens a configuration panel with two sliders for adjusting the device’s Variable Graphics Memory (VGM) allocation:
- Dedicated Video Memory (VRAM) — sets how much memory is reserved exclusively for the GPU. The available steps are determined by your device’s firmware; the default is the lowest available VRAM option for your device.
- Shared Video Memory — sets how much system memory the GPU can also use (adjustable from 10% to 90% in 5% increments; default 75%). A warning is shown above 75%, as higher values reduce memory available to other applications.
Use Apply Changes to save your configuration or Restore Defaults to return both sliders to their factory values. Changes take effect after a reboot.
Light Bar — toggles the device’s LED light bar on or off. The current state reflects the actual hardware state when the app loads; the default is determined by the device’s saved LED configuration.

System
The System tab gives you a detailed view of your device’s current state, useful for troubleshooting or sharing diagnostic information.
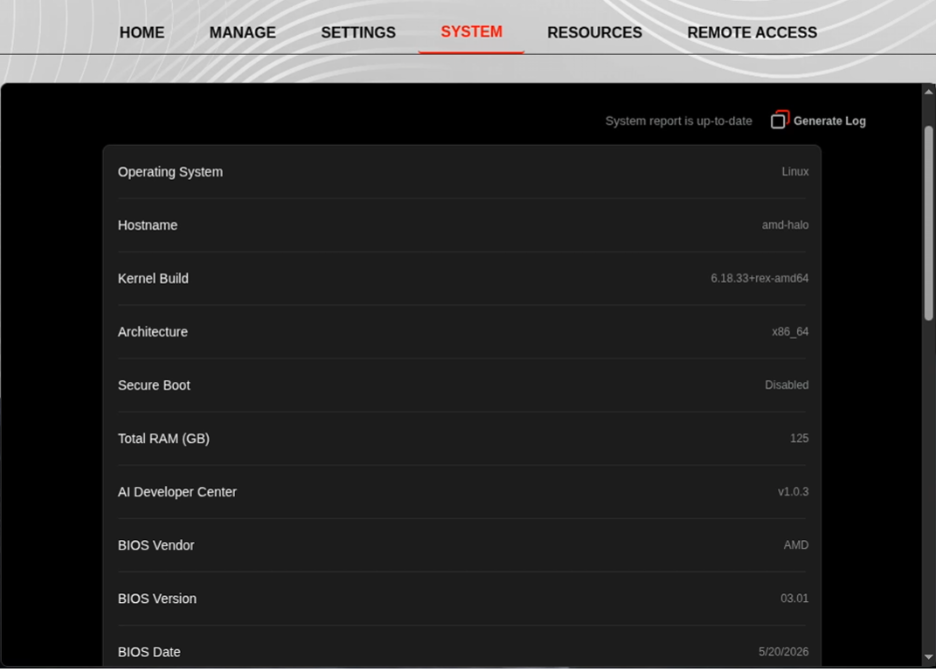
System Information
Displays a snapshot of your hardware and software environment, including:
- Operating system and kernel version
- Hostname and architecture
- Secure Boot status
- Total RAM
- BIOS vendor, version, and date
- Installed version of the AMD AI Developer Center
Use the Refresh button to pull the latest values at any time.
Diagnostic Log
The Generate Log button captures a full set of system diagnostics and saves the file locally. You can share this log with AMD support when reporting an issue.
Resources
The Resources tab is a curated link hub for documentation, community support, and bug reporting.
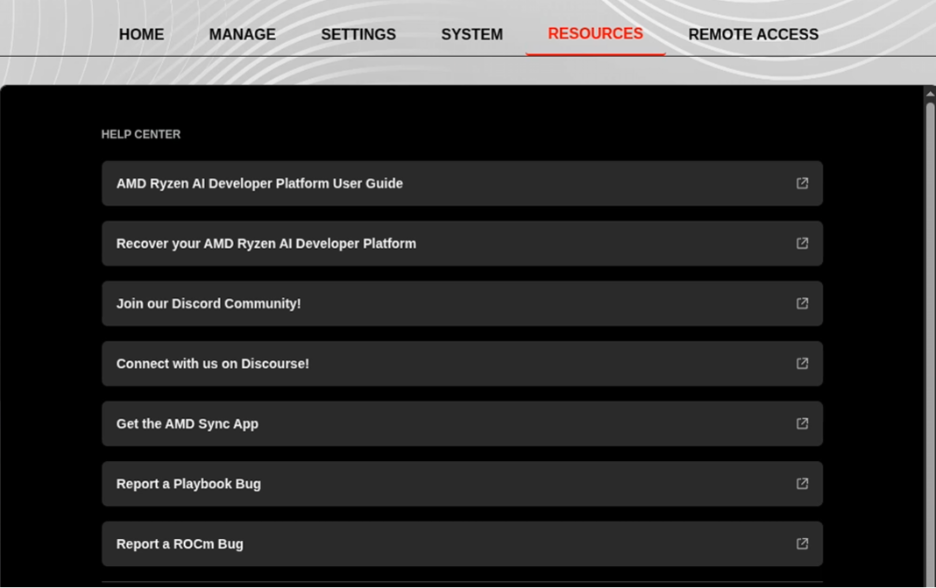
Help and Documentation
- AMD Ryzen AI Developer Platform User Guide — full platform documentation
- Recover your AMD Ryzen AI Developer Platform — step-by-step recovery instructions
Community
- Join Discord — real-time chat with the AMD AI developer community
- Connect on Discourse — forum for longer-form discussion and Q&A
Tools
- Get the AMD Sync App — link to download the AMD Sync companion app
Bug Reporting
- Report a Playbook Bug — submit issues with playbook behavior
- Report a ROCm Bug — submit issues with the ROCm software stack
Legal
- End User License Agreement (EULA)
- AMD Responsible AI Use Policy
Remote Access
The Remote Access tab lets you connect to your Halo Box from another machine over SSH.
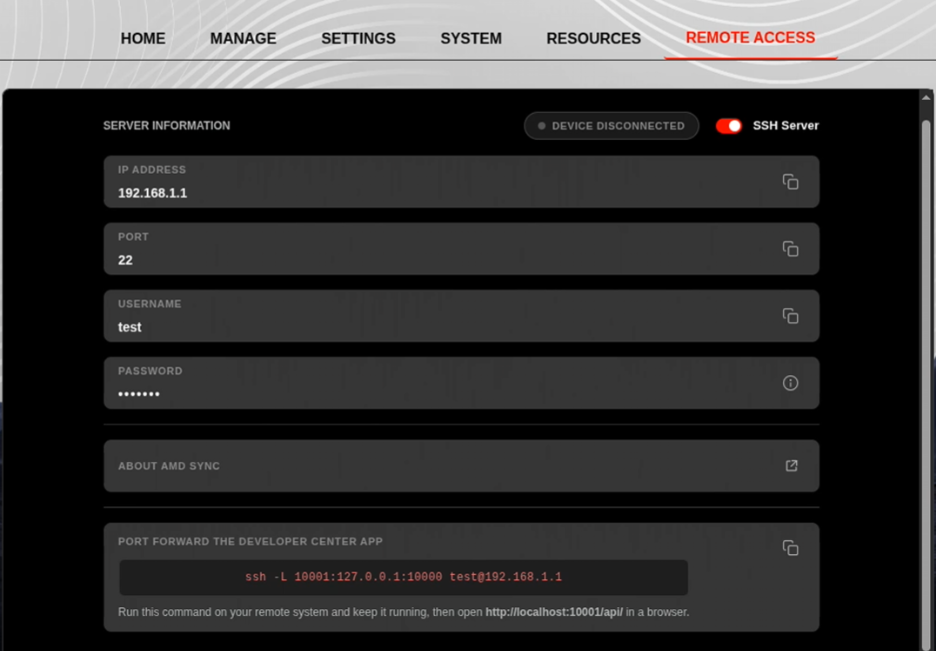
SSH Server — use the toggle switch to enable or disable the SSH server on the device (default: on). A connection-status badge shows whether any other device currently has an active SSH connection to the box.
Connection Details — when the SSH server is on, the tab displays everything another system needs to connect. Each field has a copy-to-clipboard button for quick use in a terminal.
| Field | Purpose |
|---|---|
| IP Address | The address of the AMD Ryzen AI Halo on your network |
| Port | The TCP port the SSH server is listening on (default 22) |
| Username | The OS user account to log in as |
| Password | The OS password for that user account (see note below) |
Port Forwarding — for forwarding a remote service to your local machine, the tab shows a ready-to-use SSH port-forward command that you can copy with one click.
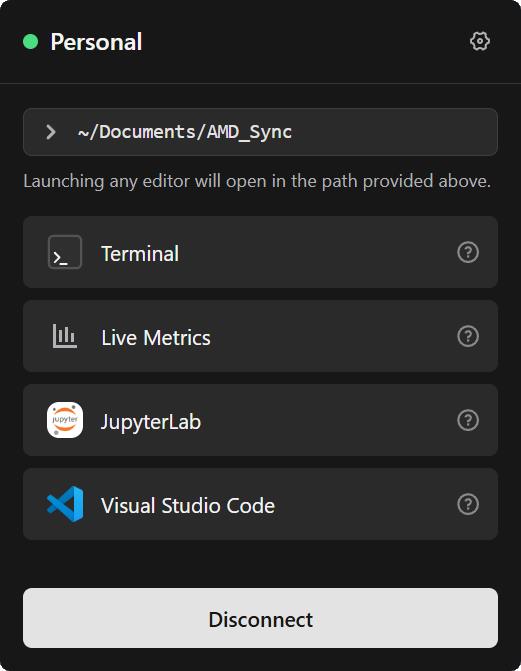
AMD Sync
AMD Sync is a desktop application for monitoring remote AMD GPU devices over SSH, opening terminals, launching development tools, and syncing files between your local machine and remote hosts.
Start with the platform guide that matches the computer where AMD Sync is installed. Each guide covers installation, first launch, device setup, and daily workflows.
Platform Guides
| Platform | Install Flow |
|---|---|
| Windows | Native installer (.exe) |
| Linux | .deb, .rpm, or .AppImage |
What AMD Sync Helps You Do
AMD Sync provides an easy method to SSH into the AMD Ryzen AI Halo, giving you a straightforward way to run code and execute programs directly on the box from your local machine.
First Session Checklist
- Install AMD Sync on your local computer.
- Launch the app.
- Add a remote device with its host, port, username, and authentication method.
- Test the SSH connection.
- Open the dashboard, terminal, VSCode, or JupyterLab for that device.
Common Setup Requirements
- The remote machine must be reachable over SSH.
- You need the correct host, port, username, and authentication method.
- GPU monitoring depends on the remote machine exposing the required AMD tooling for its operating system.
- Some launch helpers, such as VSCode Remote or JupyterLab, require those tools to be available on the target system.
If the remote machine is an AMD Ryzen AI Halo running Windows: the SSH server is off by default. Open the AMD Ryzen AI Developer Center → Remote page on that AMD Ryzen AI Halo and enable the SSH server before AMD Sync attempts to connect. The Remote page also displays the IP address, port, and username you’ll need when adding the device in AMD Sync.
Functionality Support of AMD Sync
AMD Sync provides a simple, low-friction interface for SSH-based developer workflows against the AMD Ryzen AI Halo. Rather than configuring SSH, terminals, and remote IDE setups by hand, you get a guided installer, a single connect screen, and one-click entry points into a remote terminal, code editor, notebook, or live metrics view on the box.
Once a device is connected, the AMD Sync home view exposes five user experience components for working with the remote AMD Ryzen AI Halo. All five are available regardless of whether AMD Sync is installed on Windows or Linux, and regardless of whether the AMD Ryzen AI Halo itself is running Windows or Linux.
Use this guide when AMD Sync is installed on a Windows computer and you want the fastest path from installation to connecting your first remote device.
Install AMD Sync
- Locate the Windows installer, typically AMDSyncInstaller.exe.
- Double-click the installer to start setup.
- Follow the installer steps and finish the installation.
- Launch AMD Sync from the Start menu or desktop shortcut.
If your security software asks whether to allow AMD Sync network access, allow it so the app can communicate with remote devices over SSH.
First Launch Notes
- Keep AMD Sync running as your normal user account.
- If Windows Firewall asks for permission, allow AMD Sync to access the network so it can reach your remote devices.
- Make sure outbound SSH access to your remote device is allowed.
Connect Your First Device
- Open AMD Sync.
- Choose the option to add a device.
- Enter the device name, host or IP address, SSH port, and username.
- Choose password or SSH key authentication.
- Test the connection before saving.
Once connected, see the shared Functionality Support of AMD Sync section above for the five user experience components AMD Sync provides.
Troubleshooting Tips
- Confirm that the remote machine has an SSH server enabled and reachable. If the remote machine is an AMD Ryzen AI Halo running Windows, the SSH server is off by default — enable it from the AMD Ryzen AI Developer Center’s Remote page.
- Use the correct remote operating system when configuring the device.
- When you connect to a remote Windows machine for GPU metrics, AMD Sync can upload the required helper binary automatically when needed.
- If a connection test fails, verify the host, port, firewall rules, username, and authentication method.
- Remember the password expected during a connection is the OS user’s own login password, not anything stored or generated by the AMD Ryzen AI Developer Center.
Next Steps
- Add additional devices if you work across multiple hosts.
- Open the dashboard for a broader performance view.
- Use the built-in terminal when you want a quick shell without leaving AMD Sync.
Use this guide when AMD Sync is installed on a Linux desktop and you want the right package format, the correct install command, and the Linux-specific notes that affect first launch.
Choose an Install Format
AMD Sync Linux builds are typically provided as:
- AMDSyncInstaller.deb
- AMDSyncInstaller.rpm
- AMDSyncInstaller.AppImage
| Format | Best For | Notes |
|---|---|---|
| .deb | Debian and Ubuntu systems | Best installed with apt when possible |
| .rpm | RPM-based distributions | Use your distribution’s package manager |
| .AppImage | Portable use | Good when you want a self-contained app file |
Install AMD Sync
Debian or Ubuntu
For the most reliable install path, use:
sudo apt install ./AMDSyncInstaller.debYou can also open the .deb file in your desktop package installer, but terminal installation is usually more reliable.
Package Notes
- Ubuntu App Center may show warnings such as “Potentially unsafe” or “Unknown publisher” for a locally opened .deb.
- That warning often means the package is a third-party local installer, not that the package is automatically malicious.
- On some GNOME systems, .deb file opening can fail if the default MIME handler points to a broken snap-store session installer entry.
- If GUI opening is unreliable, use
sudo apt install ./AMDSyncInstaller.debinstead.
Connect Your First Device
- Open AMD Sync.
- Add a new device.
- Enter the device name, host or IP address, SSH port, and username.
- Choose password or SSH key authentication.
- Test the connection before saving.
Once connected, see the shared Functionality Support of AMD Sync section above for the five user experience components AMD Sync provides.
Troubleshooting Tips
- Confirm that the remote host has SSH enabled and reachable. If the remote host is an AMD Ryzen AI Halo running Windows, the SSH server is off by default — enable it from the AMD Ryzen AI Developer Center’s Remote page.
- If you use GNOME and the tray icon is missing, install and enable the App Indicator extension.
- If the app is launched from a drive mounted with nosuid, you may need Linux-specific sandbox adjustments depending on how you run the packaged app.
- If a .deb file does not open from the file manager, check the current MIME association and prefer terminal installation as a fallback.
- Remember the password expected during a connection is the OS user’s own login password, not anything stored or generated by the AMD Ryzen AI Developer Center.
Next Steps
- Choose the dashboard when you want a wider system view.
- Use the overlay for lightweight monitoring.
- Open the built-in SSH terminal when you need to inspect the remote host directly.
Variable Graphics Memory (VGM)
The AMD Ryzen AI Halo ships with Variable Graphics Memory pre-configured to its optimal allocation out of the box, on both Windows and Linux. This means you can run large models right away — no manual tuning is required since the GPU already has the largest supported share of system memory available to it.
If you want to change the VGM allocation (for example, to give more memory back to the CPU/system for a specific workload), you can adjust it from the following locations:
| Operating System | Where to Change VGM |
|---|---|
| Linux | AMD Ryzen AI Developer Center app |
| Windows | AMD Software: Adrenalin Edition |
Open the AMD Software application on your system and navigate to the Performance / Tuning tab. From there you can access the Variable Graphics Memory setting and adjust the allocation.
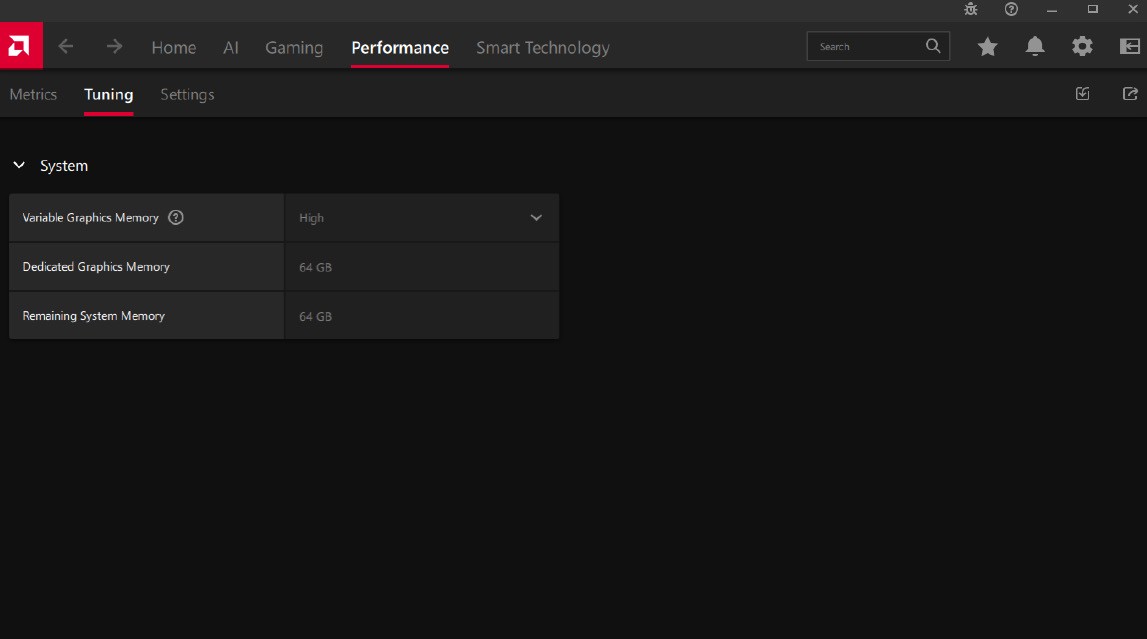
Open the AMD Ryzen AI Developer Center app, click the Settings tab, then select Graphics Performance Settings to adjust the memory allocation. See the Settings tab in the Developer Center walkthrough above for the full breakdown of the Dedicated Video Memory (VRAM) and Shared Video Memory sliders.
Troubleshooting & Reinstalling
If the AMD Ryzen AI Developer Center stops working as expected, your options for uninstalling and reinstalling depend on the operating system.
| Operating System | Uninstall Behavior |
|---|---|
| Linux | The AMD Ryzen AI Developer Center cannot be uninstalled. It is a permanent component of the AMD Ryzen AI Halo’s Linux software stack. |
| Windows | The AMD Ryzen AI Developer Center can be uninstalled like any other application — open Control Panel → Programs and Features (or Settings → Apps → Installed apps), select the application, and choose Uninstall. |
Reinstalling
If you have uninstalled the AMD Ryzen AI Developer Center and want to reinstall it, install any AMD Software: Adrenalin Edition driver package version 26.5.1 or newer. The Adrenalin installer will bring the AMD Ryzen AI Developer Center back as part of its install flow.
If the LED light on the system behaves in any of the ways described in LED Definition, refer to the table below for possible solutions:
| Error | Possible Solution |
|---|---|
| Abnormal Power Rail (fast blinking white LED) | Check that the correct adapter is being used. If not, switch to the adapter provided with the system. |
| DRAM Failure (solid red LED) | Plug the adapter in again and boot up the system. |
| Fan Related Failure (slow blinking blue LED) | Boot to the operating system and re-install the BIOS. The BIOS installation file can be downloaded from www.amd.com/ryzenaihalo. |
If none of the possible solutions above resolves the issue, send the device to your nearest service center for repairs.
Specifications
| Category | Specification |
|---|---|
| CPU | AMD Ryzen™ AI Max+ 395 Processor — 16 cores, 32 threads, “Zen 5” architecture |
| GPU | AMD Radeon™ 8060S Integrated Graphics |
| NPU | AMD XDNA™ 2 NPU |
| Memory Type | LPDDR5x |
| Memory Config | 128 GB |
| Memory Speed | 8000 MT/s |
| Memory Bandwidth | 256 GB/s |
| Storage | 2 TB M.2 SSD (SED) |
| USB | 3x USB-C® ports, 1x USB-C® for power input |
| Ethernet | 1x 10 Gbps Ethernet |
| Wi-Fi | Wi-Fi 7® |
| Bluetooth® | Bluetooth® 5.4 |
| Display Connectors | 1x HDMI™ 2.1b |
| TDP | 120 W |
| OS | Linux or Windows 11 |
| RTC Battery | CR2032 with wire |
| Dimensions | 150 x 150 x 45.4 mm (5.9 x 5.9 x 1.79 in) |
| Weight | Less than 1.2 kg (2.65 lb) |
| Operating Temperature | 5 ºC to 35 ºC (41 ºF to 95 ºF) |
| Storage Temperature | -25 ºC to 45 ºC (-13 ºF to 113 ºF) |